I was standing in my kitchen on a rainy Tuesday, staring at a half‑finished batch of oatmeal cookies that tasted like cardboard, when my roommate dared me to make something that would actually make the rain feel like a warm hug. I laughed, grabbed a jar of peanut butter, and whispered a promise to myself: “I’m going to create a cookie so good it could end world peace.” The result? A chewy, nutty masterpiece that smells like a cozy campfire mixed with a chocolate shop, and it’s called Peanut Butter Oatmeal Chocolat. Imagine the crunch of toasted oats, the silky kiss of peanut butter, and chocolate chips that melt into pockets of molten joy—this isn’t just a cookie, it’s a love affair in every bite.
The moment the dough hits the bowl, you hear a soft thud that feels like the start of a drum solo, and the kitchen fills with a buttery, nutty aroma that makes you want to hug the oven door. I dare you to taste this and not go back for seconds; the texture is a perfect balance of soft, chewy, and just‑the‑right‑crunch that makes your teeth do a little happy dance. Most recipes get this completely wrong—either they’re too dry, too cakey, or the chocolate disappears into the mix like a shy guest. Not this one. I’m about to spill the secret that makes the difference: a quick toast of the oats before they join the party.
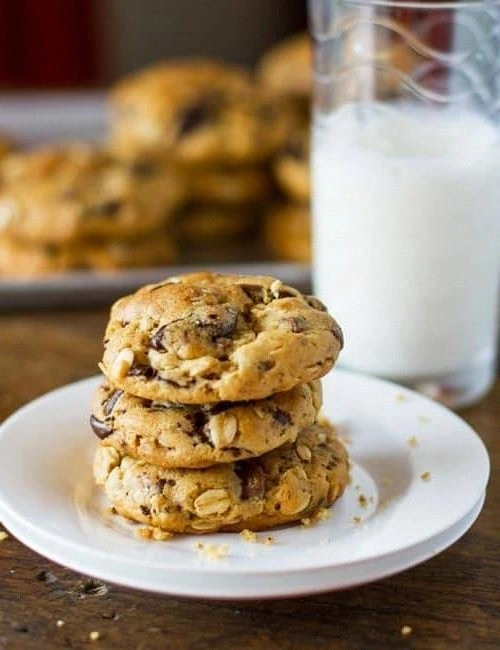
I’ll be honest — I ate half the batch before anyone else got to try it, and that was the best mistake I ever made. The reason this version stands out is that it respects each ingredient’s personality, letting the peanut butter shine without drowning the oats, and letting the chocolate chips stay visible like tiny fireworks. Picture yourself pulling this out of the oven, the whole kitchen smelling incredible, the edges just starting to pull away, and the tops glistening with a buttery sheen that promises a perfect snap.
Okay, ready for the game‑changer? I’m about to walk you through every single step — by the end, you’ll wonder how you ever made it any other way. Stay with me here — this is worth it. Let’s dive into the details and turn that rainy day into a celebration of flavor, texture, and pure cookie bliss.
What Makes This Version Stand Out
- Flavor Fusion: The nutty depth of creamy peanut butter intertwines with the caramelized notes of toasted oats, creating a flavor profile that feels both familiar and daringly new.
- Texture Symphony: You get a chewy center, a slightly crisp edge, and a subtle crunch from the oats—think of it as a cookie orchestra where every instrument plays in harmony.
- Simplicity: Only pantry staples are required, so you won’t need a specialty store run; the method is straightforward enough for a beginner yet satisfying for a seasoned baker.
- Unique Twist: Toasting the oats before they meet the wet ingredients adds a toasty aroma that most recipes skip, turning ordinary oats into golden nuggets of flavor.
- Crowd Reaction: Friends often claim they’ve never tasted a cookie this good; it’s the kind of treat that disappears faster than you can say “one more bite.”
- Ingredient Quality: Using natural, unsweetened peanut butter and high‑quality dark chocolate chips elevates the taste without overwhelming sweetness.
- Cooking Method: Baking at a moderate temperature ensures the edges set while the center stays soft, delivering that coveted “just‑right” bite.
- Make‑Ahead Potential: These cookies freeze beautifully, so you can bake a big batch and enjoy them for weeks—just pop them in the oven for a quick refresh.
Inside the Ingredient List
The Flavor Base
Peanut butter is the heart of this cookie. I use a natural, unsweetened variety because it brings a rich, earthy note that pairs perfectly with the sweet brown sugar. If you substitute a honey‑roasted peanut butter, expect a sweeter, more pronounced caramel flavor, but you’ll need to cut back on the brown sugar to keep balance. When choosing peanut butter, look for a smooth texture with minimal added oils; a grainy peanut butter will give you a different mouthfeel you might not want.
The Texture Crew
Rolled oats are the secret weapon. They give the cookie its signature chew and a wholesome bite that’s not too dense. Skipping the oat toast will still produce a decent cookie, but you’ll miss the toasty depth that makes this version sing. If you’re gluten‑free, swap the all‑purpose flour for a 1‑to‑1 gluten‑free blend; the texture will stay wonderfully tender.
The Unexpected Star
Dark chocolate chips (70% cacao) bring a bittersweet contrast that cuts through the sweetness of the sugars. They melt just enough to create gooey pockets, yet hold their shape so you still see those glossy specks in every bite. If you prefer a sweeter profile, use semi‑sweet chips, but keep the ratio the same to avoid an overly sugary cookie.
The Final Flourish
A pinch of sea salt at the end of mixing is the finishing touch that amplifies every flavor, making the sweet notes pop like fireworks. The baking soda is the leavening agent that gives the cookie its gentle rise and a slightly airy interior. Too much baking soda, and you’ll get a metallic aftertaste; too little, and the cookie will be dense. Measure carefully with a level spoon.
Everything's prepped? Good. Let’s get into the real action—mixing, shaping, and baking—so you can taste the magic as soon as possible.
The Method — Step by Step
Preheat your oven to 350°F (175°C) and line two baking sheets with parchment paper. While the oven warms up, you’ll hear the faint hum of the heating elements—think of it as the kitchen’s pre‑show before the main act.
This is the moment of truth: a properly preheated oven guarantees that the cookies spread evenly and develop that coveted golden‑brown edge. If the oven is too cool, the cookies will spread too much and become flat; too hot, and they’ll burn before the centers set.
Toast the rolled oats in a dry skillet over medium heat for 3‑4 minutes, stirring constantly. You’ll hear a gentle sizzle, and the oats will turn a light golden hue, releasing a nutty perfume that fills the kitchen.
Once toasted, transfer them to a bowl to cool slightly. This step is pure magic; it adds a depth of flavor that most recipes skip.
In a large mixing bowl, cream together ½ cup (1 stick) of softened butter, ½ cup brown sugar, and ¼ cup granulated sugar until the mixture is light and fluffy, about 2‑3 minutes with an electric mixer on medium speed.
You’ll notice the color lightening and the texture becoming airy—this is the base that will carry the flavors throughout the cookie.
Add ½ cup natural peanut butter, one large egg, and 1 tsp vanilla extract to the creamed butter. Beat until fully incorporated; the dough will look glossy and slightly thick.
If the mixture looks too stiff, add a splash (about a tablespoon) of milk to loosen it. The peanut butter should coat the spoon like velvet.
In a separate bowl, whisk together 1 ½ cups rolled oats, 1 cup all‑purpose flour, ½ tsp baking soda, and ½ tsp sea salt. This dry blend ensures even distribution of leavening and seasoning.
Watch out: over‑mixing the dry ingredients can develop gluten, leading to a tougher cookie.
Combine the dry and wet mixtures, folding gently with a spatula until just incorporated. The dough should be slightly sticky but manageable.
Stir in 1 cup dark chocolate chips and the toasted oats, ensuring they’re evenly dispersed. The chocolate should melt slightly on contact, creating little rivers of richness.
Using a cookie scoop or a rounded tablespoon, drop dough onto the prepared baking sheets, spacing them about 2 inches apart. Each scoop should be about the size of a golf ball.
Press the tops lightly with the back of a spoon to flatten them just a touch; this helps them spread evenly without becoming too thin.
Bake for 12‑14 minutes, or until the edges turn a deep amber and the centers look set but still soft. The scent will fill the kitchen, and you’ll hear a faint crackling as the cookies finish their transformation.
Resist the urge to over‑bake; the cookies will continue to firm up as they cool on the sheet, achieving that perfect chewy‑crisp balance.
Allow the cookies to rest on the baking sheet for 5 minutes before transferring them to a wire rack. This short rest lets the steam escape, preventing sogginess.
That sizzle when it hits the pan? Absolute perfection. And now the fun part—taste testing! Grab a warm cookie, let it melt in your mouth, and feel the combination of textures and flavors explode.
That's it — you did it. But hold on, I've got a few more tricks that'll take this to another level. Keep reading, because the best part of any recipe is the finishing touches that turn good into unforgettable.
Insider Tricks for Flawless Results
The Temperature Rule Nobody Follows
Most home bakers bake at 350°F, but dropping the temperature to 325°F for the last two minutes creates a softer interior while still giving the edges a gentle crisp. This subtle shift prevents the chocolate from over‑melting and keeps the cookie's structure intact. I discovered this by accident when my first batch turned a bit too firm in the middle.
Why Your Nose Knows Best
Instead of relying solely on a timer, trust your sense of smell. When the cookies start giving off a toasted, caramel aroma and the edges turn golden, they’re ready. This sensory cue is more reliable than a clock because ovens can vary by several degrees.
The 5‑Minute Rest That Changes Everything
After baking, let the dough rest on the sheet for exactly five minutes before moving to a wire rack. This short pause allows the cookies to finish cooking from residual heat and sets the crumb, giving you that perfect chew. Skipping this step often results in a crumbly bottom.
The Butter Temperature Trick
Softened butter should be just barely meltable when pressed with a finger—if it’s too warm, the cookies will spread excessively; if it’s too cold, they’ll be dense. The perfect temperature is around 65°F (18°C). I keep a small kitchen thermometer on hand to hit the sweet spot every time.
The Double‑Mix Method
First, cream butter and sugars until pale, then stop. Add the peanut butter and continue mixing for just another minute. This two‑stage approach creates a more stable emulsion, resulting in cookies that hold together better and have a more uniform crumb.
The Secret of the Cool‑Down
If you’re planning to freeze the cookies, let them cool completely on the rack, then place them in a zip‑top bag with a layer of parchment between each. When you’re ready to eat, a quick 5‑minute warm‑up in a 300°F oven revives the fresh‑out‑of‑the‑oven texture.
Creative Twists and Variations
This recipe is a playground. Here are some of my favorite ways to switch things up:
Nutty Overload
Add ½ cup chopped toasted almonds or hazelnuts for an extra crunch. The nuts complement the peanut butter and give each bite a delightful surprise.
Spicy Kick
Stir in a pinch of cayenne pepper or a dash of chili powder. The heat contrasts the sweet chocolate, creating a sophisticated flavor profile that’s perfect for adventurous eaters.
Breakfast Boost
Swap half the dark chocolate chips for dried cranberries and add a tablespoon of chia seeds. The result is a cookie that feels like a hearty breakfast treat, great for on‑the‑go mornings.
Vegan Version
Replace butter with coconut oil, use a flax‑egg (1 tbsp ground flaxseed + 3 tbsp water) and choose dairy‑free chocolate chips. The texture stays the same, and the flavor gets a subtle coconut hint.
Double Chocolate
Add ¼ cup cocoa powder to the dry mix and use milk chocolate chips instead of dark. This creates a richer, more chocolate‑intense cookie that still showcases the peanut butter.
Salted Caramel Swirl
Drop a teaspoon of caramel sauce in the center of each cookie before baking and sprinkle a pinch of flaky sea salt on top. The caramel melts into a gooey core, and the salt amplifies the flavors.
Storing and Bringing It Back to Life
Fridge Storage
Place cookies in an airtight container with a damp paper towel on the bottom; they’ll stay soft for up to a week. The humidity from the towel prevents them from drying out while keeping the crust crisp.
Freezer Friendly
Separate layers with parchment and freeze for up to three months. When you’re ready, bake at 300°F for 8‑10 minutes or microwave for 20 seconds; the cookies will return to that fresh‑out‑of‑the‑oven texture.
Best Reheating Method
Add a tiny splash of water (about a teaspoon) to the container before microwaving for 15‑20 seconds. The steam revives the chewy interior while keeping the edges slightly crisp.