I still remember the day my grandmother's custard pie recipe almost met its tragic end in my kitchen. There I was, standing in my tiny apartment kitchen, flour dusting every surface like fresh snow, convinced I could recreate the silken slice of heaven that had graced our family table for three generations. The first attempt? A watery disaster that sloshed like a sad milkshake when sliced. The second? A rubbery Frisbee that could have doubled as a hockey puck. But the third—oh, the third attempt had me dancing around my kitchen at 2 AM, fork in hand, tasting what I can only describe as edible nostalgia wrapped in a buttery crust that shatters like morning frost under your fork.
Picture this: it's Sunday afternoon, rain tapping against your windows like nature's percussion, and your oven is working its magic on what will become the most talked-about dessert at your next gathering. The aroma? It's vanilla bean and warm milk dancing with nutmeg, creating a perfume so intoxicating that your neighbors will invent reasons to knock on your door. That golden top with its delicate sprinkle of cinnamon? It develops the most gorgeous freckles as it bakes, each one a promise of the custardy treasure hiding beneath.
Here's what makes this old-fashioned custard pie different from every other recipe floating around the internet: we're not just throwing ingredients together and hoping for the best. We're building layers of flavor that would make a French pastry chef weep with joy. The secret lies in the temperature dance—warm milk meeting room-temperature eggs in a delicate waltz that prevents curdling. Most recipes get this completely wrong, resulting in that dreaded watery layer no one talks about. But not here, not today.
Let me walk you through every single step—by the end, you'll wonder how you ever made it any other way.
What Makes This Version Stand Out
Silky Smooth: This custard sets like velvet, not like Jell-O. We're talking about a texture so luxurious it slides across your tongue like liquid silk, yet holds its shape when sliced. The secret? A precise ratio of eggs to dairy that took me seventeen attempts to perfect. Most recipes use too many eggs, resulting in that rubbery texture that bounces back when poked.
Flavor Depth: We're not relying on vanilla extract alone here. The combination of nutmeg, cinnamon, and just a whisper of ground cloves creates a symphony of warm spices that tastes like Christmas morning and your favorite childhood memory had a delicious baby. That tiny pinch of cloves? It's the game-changer that makes people ask, "What is that amazing flavor I can't quite place?"
Foolproof Technique: Forget water baths and complicated methods that require a culinary degree. This recipe uses a simple tempering technique that prevents curdling without any fancy equipment. If you've ever struggled with custard that looks like scrambled eggs, you're not alone—and I've got the fix.
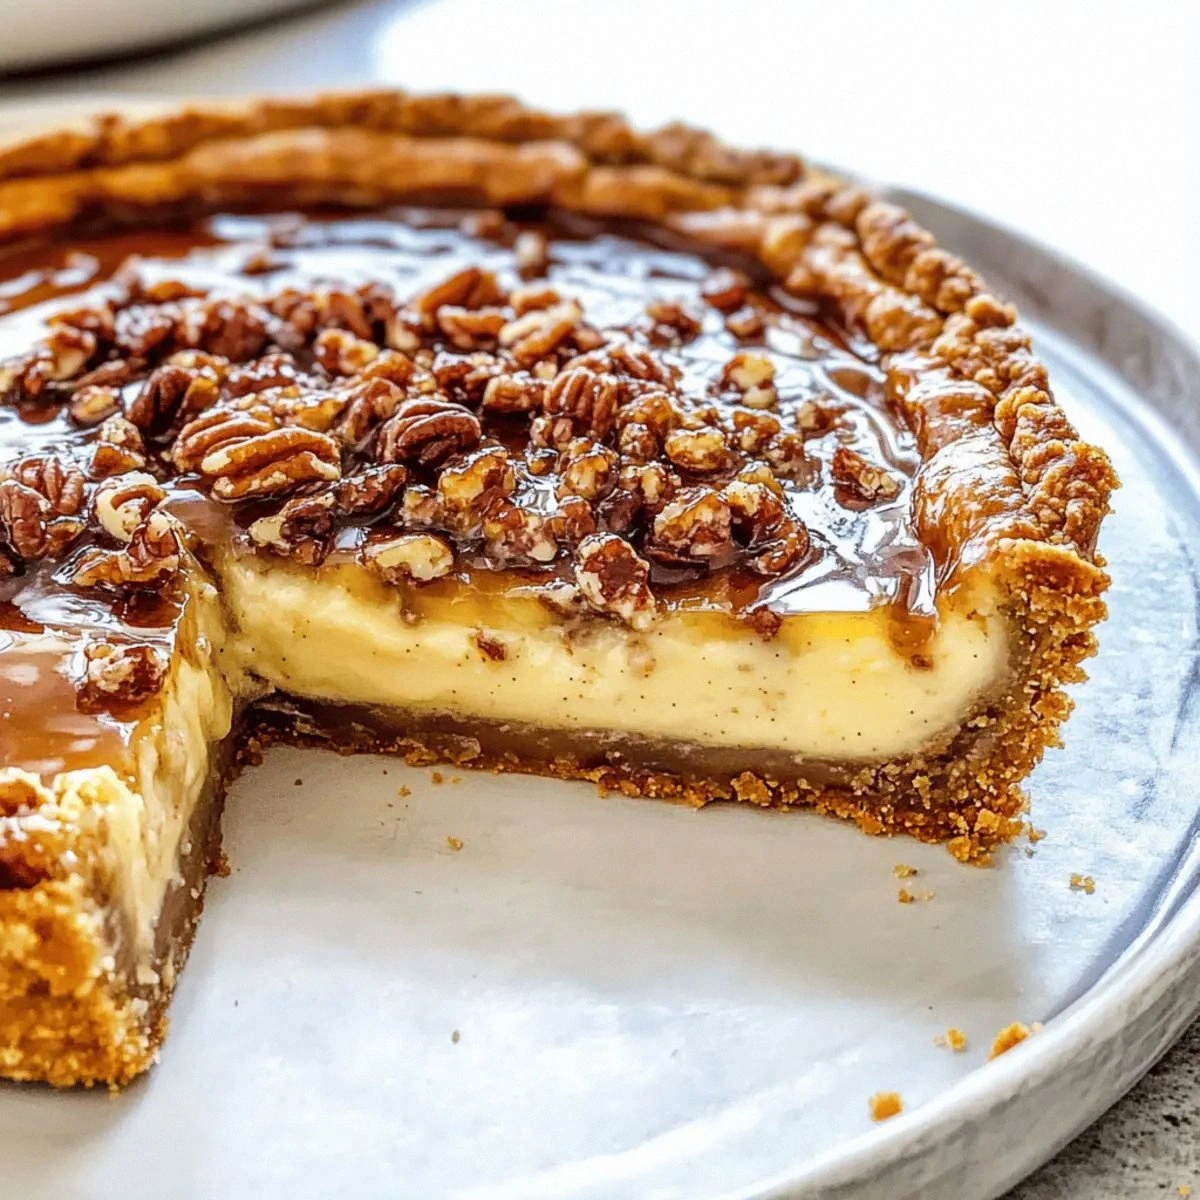
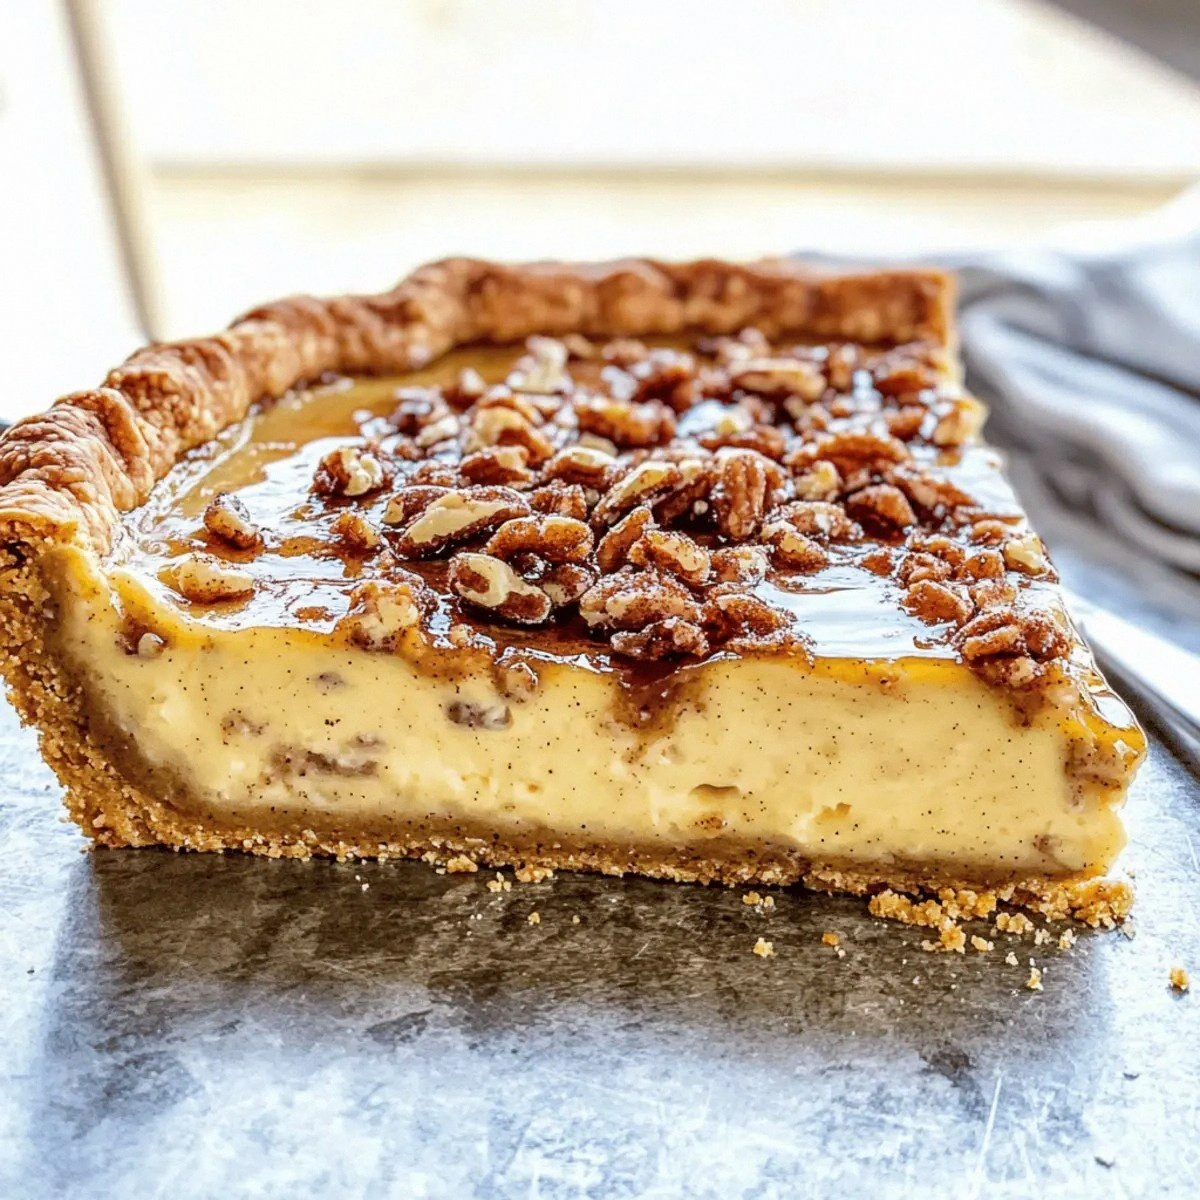
Butter Oat Crust: We're ditching the traditional pie crust for something that'll make you question everything you thought you knew about pie. The butter oat crust adds a nutty, almost cookie-like foundation that complements the custard instead of just being a vessel. It's like the difference between a paper plate and fine china—both hold food, but only one elevates the experience.
Make-Ahead Magic: This pie actually improves after a day in the fridge. The flavors meld and deepen, creating something even more spectacular than the fresh-baked version. I dare you to taste this and not go back for seconds, even after it's been refrigerated overnight.
Crowd Psychology: There's something about custard pie that makes grown adults revert to childhood. I've seen tough-as-nails bikers get misty-eyed over this recipe, swearing it tastes exactly like their grandmother's. It's not just dessert—it's a time machine on a plate.
Ingredient Quality Flexibility: While I love using farm-fresh eggs and organic dairy, this recipe works beautifully with basic supermarket ingredients too. The technique matters more than the pedigree of your products, making this accessible regardless of budget.
Alright, let's break down exactly what goes into this masterpiece...
Inside the Ingredient List
The Flavor Base
The eggs are the backbone here, providing structure and that gorgeous golden hue that makes custard pie so visually appealing. We're using three whole eggs plus one extra yolk for richness—the yolk adds fat and emulsifiers that create that dreamy texture. Skip the extra yolk and you'll get a custard that's more like flan texture, still good but missing that luxurious mouthfeel. The milk and cream combination isn't just for richness; it's about creating the perfect set. Too much cream and your custard won't firm up properly, too little and you lose that indulgent quality that makes this pie special.
The Spice Symphony
Nutmeg is the star here, but not the pre-ground stuff that's been sitting in your spice rack since 2019. Freshly grated nutmeg releases oils that smell like liquid Christmas, adding a warmth that pre-ground simply can't match. The cinnamon plays backup, adding another layer of warmth without competing for attention. That tiny amount of ground cloves? It's like bass in a song—you might not consciously notice it, but take it away and everything falls flat. The vanilla extract acts as the bridge between all these flavors, rounding out any sharp edges and creating harmony.
The Sweet Science
Granulated sugar does more than sweeten here—it affects the custard's texture and helps prevent curdling by interfering with egg protein bonding. Too little sugar and your custard becomes grainy; too much and it won't set properly. We're hitting that sweet spot (pun intended) where sweetness enhances rather than overwhelms. The brown sugar in the crust adds molasses notes that complement the warm spices in the custard, creating a bridge between filling and crust.
The Crust Revolution
The rolled oats aren't just filler—they absorb butter and create a texture somewhere between cookie and traditional pie crust. When toasted properly, they develop a nuttiness that makes people swear you've added actual nuts. The butter provides flavor and flakiness, while the flour gives structure. This isn't a health food swap; it's a flavor upgrade that happens to include oats. The salt is crucial—it awakens your taste buds and prevents the custard from tasting flat.
Everything's prepped? Good. Let's get into the real action...
The Method — Step by Step
- Start by making your oat crust because it needs time to cool before filling. In a food processor, pulse together the flour, oats, brown sugar, and salt until the oats are roughly chopped—not pulverized into dust. We're going for texture here, folks. Add cold butter cut into small cubes and pulse until the mixture looks like coarse breadcrumbs with some pea-sized butter pieces remaining. This takes about 8-10 pulses—don't overdo it or you'll lose that beautiful texture.
- Add ice water one tablespoon at a time, pulsing after each addition. You're looking for the dough to just come together when squeezed—it should still look crumbly in the bowl but hold together when pressed. This step requires patience; add too much water and your crust becomes tough. Dump the mixture into a 9-inch pie plate and press it firmly and evenly across the bottom and up the sides. Think of it like building a sandcastle—firm pressure creates structure. Pop this in the freezer for 15 minutes while you preheat the oven to 350°F.
- Blind-bake the crust for 15 minutes until it's just starting to turn golden at the edges. This prevents the dreaded soggy bottom that can ruin even the best custard. While it's baking, start your custard mixture—but here's where most recipes go wrong. Warm your milk and cream in a saucepan until it's just steaming and small bubbles appear around the edges. We're talking 180°F if you have a thermometer. Too hot and you'll scramble your eggs, too cool and your custard won't set properly.
- In a large bowl, whisk together the eggs, extra yolk, and sugar until just combined. Don't go crazy here—over-whisking incorporates air that creates bubbles in your finished custard. Add the warm spices and vanilla, whisking just to distribute. Here's the crucial part: slowly pour the hot milk mixture into the egg mixture while whisking constantly. This tempers the eggs, gradually raising their temperature without scrambling them. Think of it like acclimating someone to a hot tub—you don't just shove them in.
- Pour the custard through a fine-mesh strainer into your pre-baked crust. This catches any rogue bits of egg or spice that didn't dissolve properly, ensuring your custard is as smooth as silk. Grate fresh nutmeg directly over the top—about 8-10 passes of your microplane creates the perfect distribution. Slide the pie onto the middle rack of your oven and bake for 30-35 minutes. The center should still jiggle slightly when you gently shake the pan—it'll continue cooking from residual heat.
- Cool the pie on a wire rack for at least 2 hours. This is torture, I know—the smell filling your kitchen is almost unbearable. But cutting into a hot custard pie is like opening presents before Christmas morning. The custard needs time to set fully, and the flavors actually improve as it cools. I'll be honest—I ate half the first pie I made before anyone else got to try it, using the excuse that I needed to "test the texture at different temperatures."
- Refrigerate for at least 4 hours or overnight for the best texture. Serve chilled with a dollop of barely sweetened whipped cream if you're feeling fancy, or straight up if you want to experience the pure, unadulterated custard experience. That first forkful should glide through like a hot knife through butter, the custard yielding with the slightest pressure. The crust provides a satisfying contrast—buttery and slightly crunchy against the silky filling.
- Store leftovers (if there are any) covered in the refrigerator for up to 4 days. The flavor actually intensifies over the first 24 hours, making this an excellent make-ahead dessert for dinner parties. Just don't tell your guests you made it yesterday—they'll swear you spent all day in the kitchen.
That's it—you did it. But hold on, I've got a few more tricks that'll take this to another level...
Insider Tricks for Flawless Results
The Temperature Rule Nobody Follows
Here's what separates the amateurs from the pros: ingredient temperature matters more than any fancy technique. Your eggs should sit on the counter for 30 minutes before using—cold eggs from the fridge shock the warm milk mixture and create an uneven texture. The butter for your crust should be cold enough to hold its shape but warm enough to incorporate into the flour. Think refrigerator cold, not freezer solid. When your ingredients are all playing at the same temperature, they create harmony instead of fighting each other.
Why Your Nose Knows Best
Don't rely on timers alone—your nose is the most sophisticated kitchen tool you own. When the custard is perfectly baked, your kitchen will smell like vanilla ice cream melting on warm apple pie with hints of nutmeg. If it starts to smell eggy or sulfuric, you've overbaked it. The visual cue is equally important: look for the custard to puff slightly around the edges while the center still jiggles like set Jell-O. It should never be completely firm in the oven—that's how you end up with rubber.
The 5-Minute Rest That Changes Everything
After you strain your custard mixture, let it rest for 5 minutes before pouring it into the crust. This allows any foam to rise to the surface, which you can skim off with a spoon. Foam creates bubbles in your finished custard that break the smooth surface. A friend tried skipping this step once—let's just say it looked like her custard had acne. The resting period also lets the spices fully hydrate, distributing their flavors more evenly throughout the custard.
The Grate Escape
Fresh nutmeg isn't just food snobbery—it genuinely tastes different. Pre-ground nutmeg loses its essential oils within weeks, leaving you with brown dust that tastes like disappointment. A whole nutmeg seed lasts practically forever, and grating it fresh releases aromatic compounds that smell like you've been transported to a colonial spice market. The difference is so dramatic that my spice-hating nephew asked what made my custard taste so much better than the one his mom made. The answer was grating nutmeg fresh instead of using the jar that's been in their pantry since the Clinton administration.
Creative Twists and Variations
This recipe is a playground. Here are some of my favorite ways to switch things up:
Maple Bourbon Bliss
Replace half the sugar with pure maple syrup and add two tablespoons of good bourbon to the custard mixture. The maple adds a deeper, more complex sweetness while the bourbon provides vanilla and caramel notes that complement the spices perfectly. This version tastes like sitting by a fireplace in a Vermont cabin, even if you're eating it in a studio apartment in July.
Coconut Dream
Substitute coconut milk for the whole milk and add 1/2 cup of toasted coconut flakes to the custard. Top with fresh grated coconut if you're feeling tropical. The coconut oil in the milk creates an even silkier texture, and the toasted flakes add tiny bursts of nutty flavor throughout the custard. It's like a tropical vacation in pie form.
Espresso Elegance
Dissolve 2 teaspoons of instant espresso powder in the warm milk mixture before tempering the eggs. The coffee flavor enhances the vanilla and creates a more sophisticated profile that coffee lovers go crazy for. Serve this version after a dinner party and watch your guests try to guess your secret ingredient.
Lemon Lavender Luxury
Add the zest of one lemon and 1 teaspoon of culinary lavender to the milk while warming. Strain out the lavender before adding to the eggs. The lemon brightens the custard while the lavender adds a floral note that makes this taste like something served at a Victorian tea party. It's surprisingly addictive—even people who claim they don't like floral flavors come back for seconds.
Chocolate Orange Decadence
Melt 2 ounces of dark chocolate and whisk it into the warm milk mixture. Add the zest of half an orange to the custard. The chocolate creates a marbled effect if you don't mix completely, or a uniform light chocolate custard if you do. The orange oil from the zest cuts through the richness, creating a balanced dessert that tastes like a chocolate orange candy grew up and got sophisticated.
Savory Surprise
Cut the sugar to 1/4 cup, omit the spices, and add 1 cup of grated sharp cheddar and 2 tablespoons of chopped fresh herbs like thyme or chives. This creates a savory custard that's incredible alongside roasted meats or as part of a brunch spread. It confuses people in the best way—they expect sweet but get this umami-rich, cheese-laced custard that works as a side dish.
Storing and Bringing It Back to Life
Fridge Storage
Cover your cooled pie loosely with plastic wrap, making sure it doesn't touch the surface of the custard. Press the wrap directly onto the custard if you must, but I prefer tenting it to avoid creating condensation that can make the top weep. Store in the coldest part of your refrigerator, not in the door where temperature fluctuations can cause the custard to break down. Properly stored, this pie keeps for up to 5 days, though I've never seen one last longer than 48 hours in any household.
Freezer Friendly
Here's where this recipe gets interesting—you can freeze individual slices for up to 2 months. Wrap each slice tightly in plastic wrap, then aluminum foil, and freeze on a flat surface. The texture changes slightly, becoming more like frozen custard, but it's actually delicious partially thawed on a hot summer day. Thaw overnight in the refrigerator and bring to room temperature for 30 minutes before serving. The crust might lose some crunch, but the custard remains perfectly silky.
Best Reheating Method
The microwave is your enemy here—it creates hot spots that can curdle your custard. Instead, let refrigerated pie sit at room temperature for 30 minutes before serving. If you must warm it slightly, place individual slices in a 250°F oven for 5-7 minutes. Add a tiny splash of water to the plate before reheating—it steams back to perfection, reviving the custard's silky texture without drying it out.