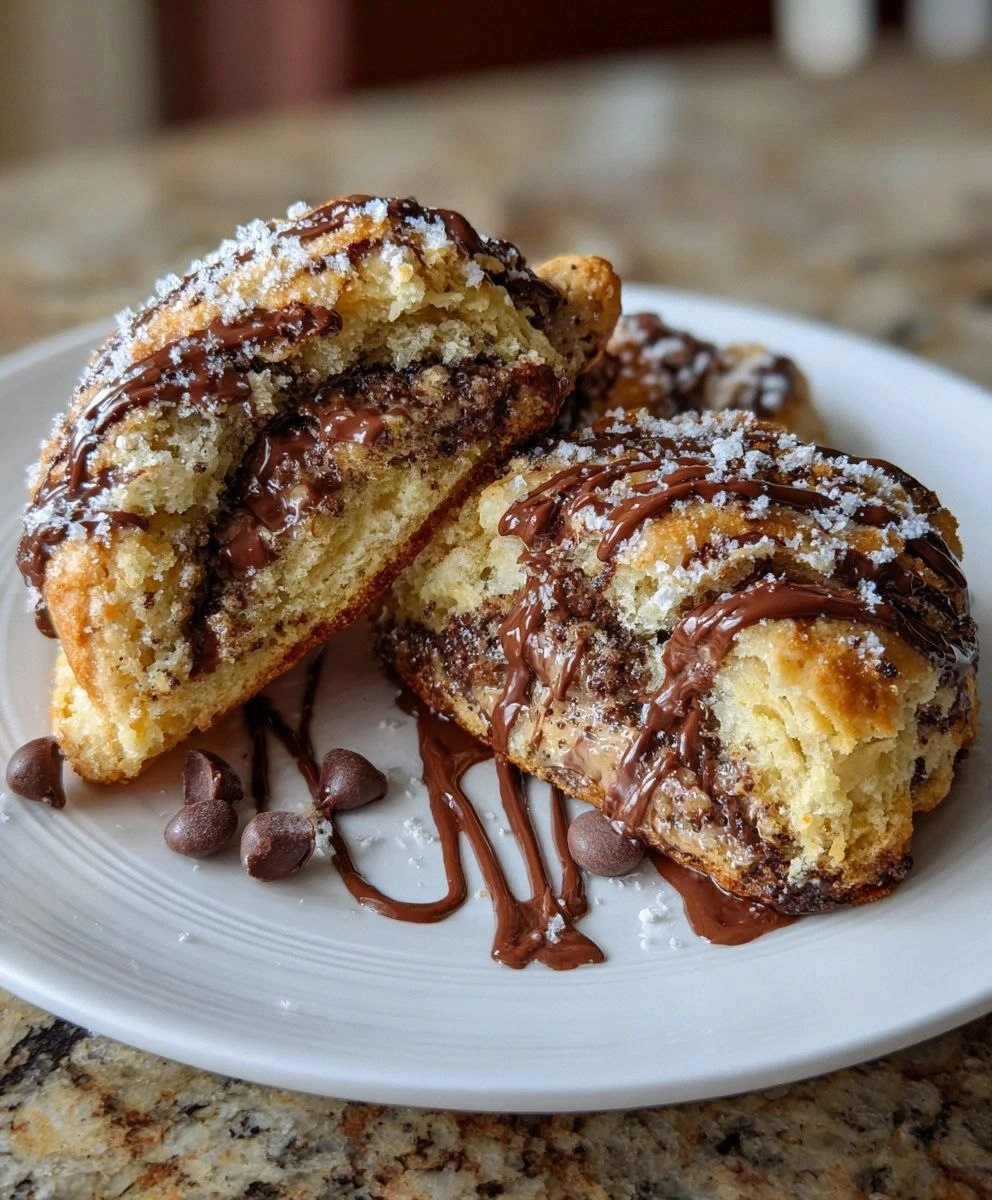
It was 6:17 a.m. on a Tuesday that refused to cooperate. My coffee maker had staged a coup, the dog had buried my left slipper in the snow, and I was nursing a bruised ego after last night's rock-hard blueberry-scone fiasco. I needed something—anything—to redeem breakfast. So I did what any self-respecting, sugar-starved adult would do: I raided the pantry like a raccoon on a mission. Half a jar of creamy peanut butter winked at me, a fistful of chocolate chips tumbled from the cupboard like edible confetti, and inspiration hit harder than the caffeine I still hadn't brewed. Twenty-five frantic minutes later I was pulling the first test batch of Peanut Butter Chocolate Swirl Scones from the oven, the kitchen swirling with smells that could broker world peace. One bite and I muttered the forbidden words, "Well, I'll be—this might be the best thing my oven's ever produced." By 6:45 I'd eaten three, texted photos to every contact who still tolerates me, and scribbled ratios on the back of an electric bill. I dare you to taste these and not go back for seconds; I personally doubled the batch before the sun fully rose, because the only thing worse than a lousy Tuesday is running out of these scones before lunchtime.
Let's get something straight: most peanut-butter-chocolate baked goods are sad, dry affairs that taste like someone waved a peanut over a sponge and called it flavor. Not these. These scones are flaky enough to make a croissant jealous, tender enough to melt on your tongue, and ribboned with a peanut-butter-chocolate swirl that looks like modern art. Picture yourself pulling one apart, steam curling up like it's auditioning for a bakery commercial, the edges shattering like thin ice while the interior stays plush and cloud-like. The peanut butter doesn't just sit there—it marries the chocolate in a swirl so hypnotic you'll consider framing a scone instead of eating it. And that glossy top, lacquered with cream and a snowdrift of coarse sugar, crackles under your teeth the way crème brûlée wishes it could. Future pacing? Absolutely: imagine your future self five hours from now, sneaking into the kitchen for "just one more," swearing you'll freeze the rest, and then polishing off the entire tray while standing over the sink so you don't have to share. Stay with me here—this is worth every buttery, glorious calorie.
Okay, ready for the game-changer? We're going to freeze the peanut butter for ten minutes before dolloping it onto the dough. Sounds fussy, I know, but this little pause transforms it into pliable medallions that hold their shape in the oven, creating those dramatic molten rivers rather than anonymous brown streaks. Most recipes get this completely wrong, stirring room-temp peanut butter straight into the batter and ending up with beige blobs that taste like regret. We're also using cold grated butter—yes, grated, like cheese—because it distributes evenly without melting into the flour, giving us strata of flaky layers that shatter like phyllo. And now the fun part: instead of kneading, we're going to fold the dough like a business letter, three quick turns that create hundreds of buttery pockets. If you've ever struggled with hockey-puck scones, you're not alone—and I've got the fix.
Let me walk you through every single step—by the end, you'll wonder how you ever made it any other way.
What Makes This Version Stand Out
- Peanut-Butter-Freeze Trick: Chilling the peanut butter means it swirls instead of disappearing, so every bite has a distinct ribbon of nutty richness that melts on your tongue like soft caramel.
- Grated-Butter Magic: Using a box grater creates pea-sized shards that stay cold, puffing into thousands of flaky layers—think croissant, but without the three-day commitment.
- Chocolate Chip Placement: We toss the chips with a teaspoon of flour first, suspending them evenly so they don't sink to the bottom and leave you with a tragic, chip-less base.
- Single-Bowl Swirl: Rather than dirtying two bowls for separate batters, we marble everything on the parchment, cutting cleanup in half and giving us those Instagram-worthy tornado swirls.
- Crunch-Cap Factor: A final brush of heavy cream and a snowstorm of coarse sugar bakes into a shiny, crackling crust that shatters like crème brûlée—no soggy tops on my watch.
- Next-Day Revival: These reheat like a dream—five minutes in a toaster oven and they're back to bakery-fresh, making them perfect for meal-prepping brunch without the day-old sadness.
- Crowd Reaction Guarantee: I've served these at baby showers, board meetings, and 2 a.m. study sessions; every single time someone closes their eyes and whispers, "Wait, what's in these?"
Alright, let's break down exactly what goes into this masterpiece...
Inside the Ingredient List
The Flavor Base
All-purpose flour is the reliable best friend who never steals the spotlight but holds the entire production together. It forms the gluten network just enough to give our scones structure without turning them into doorstops—think tender, not rubbery. Granulated sugar does double duty, sweetening subtly and helping the edges caramelize to that deep golden hue that screams "eat me now." Skip the sugar and you'll get pale, bland bricks that taste like regret and flour. Baking powder is our lift-off rocket: two teaspoons may seem timid, but combined with the acidic notes in brown sugar (should you choose the swap), it creates carbon-dioxide bubbles that balloon in the oven, giving us mile-high scones. Salt is the unsung hero; even a measly half-teaspoon amplifies the peanut and chocolate, making them taste more like themselves—omit it and the whole thing falls flat like a joke without a punchline.
The Texture Crew
Unsalted butter—cold, cubed, and preferably grated—functions like tiny ice shards that melt in the oven, leaving behind airy pockets that translate to flaky layers. Use salted butter and you'll wrestle control away from the peanut butter's gentle sweetness; plus, salt levels vary by brand, so unsalted keeps us in the driver's seat. Whole milk adds moisture and a touch of richness, but don't swap for skim unless you enjoy eating sawdust. The fat in the milk coats the flour proteins, limiting gluten development and ensuring tenderness. A single large egg binds everything while adding structure; think of it as the polite bouncer keeping the rowdy butter pockets in line. Vanilla extract is the aromatic high-five that makes people say, "I can't put my finger on it, but these taste fancy."
The Star Attractions
Creamy peanut butter is the Beyoncé of this show—use the processed kind, not natural, because the oil separation in natural peanut butter will sabotage your swirl and leave greasy craters. Natural brands also have variable fat content, which can turn your dough into oily mush faster than you can say "Jif." Semi-sweet chocolate chips bring balanced bitterness that prevents cloying sweetness; if you want to feel like a pastry renegade, chop up a bar of 60% dark instead—the irregular shards melt into painterly streaks. Heavy cream brushed on top is the glamour squad: proteins and lactose brown under heat, creating that glossy mahogany finish that makes bakery cases weep with envy. Coarse sugar (think demerara or turbinado) adds a final crunch that crackles under your teeth like thin ice over a puddle—skip it and you'll still have great scones, but you'll miss the audio satisfaction.
Everything's prepped? Good. Let's get into the real action...
The Method — Step by Step
- Position a rack in the center of your oven and preheat to 400°F (204°C). Line a baking sheet with parchment paper; this is not negotiable unless you enjoy chiseling burnt sugar off metal. While the oven works, pop your peanut butter jar into the freezer—yes, the whole jar—for ten minutes. This is the part that feels ridiculous until you see the results.
- In a large chilled bowl, whisk together 2 cups (250g) all-purpose flour, 1/3 cup (67g) granulated sugar, 1 tablespoon baking powder, and ½ teaspoon kosher salt. Whisk like you mean it; we want even distribution because pockets of baking powder taste like soap. Use a balloon whisk and lift the flour repeatedly to aerate—think of it as giving your scones a head start on fluffiness.
- Grate ½ cup (113g) cold unsalted butter directly into the flour using the large holes of a box grater. Stop every few shreds to toss the butter in flour, preventing it from clumping back into a blob. When you're done, the mixture should resemble coarse cornmeal with pea-sized flecks—those flecks are future flaky layers. If the butter starts to melt, shove the bowl into the freezer for three minutes; nobody wants greasy dough.
- Measure ½ cup (120ml) cold whole milk and whisk in 1 large egg and 2 teaspoons vanilla extract until homogenous. Make a well in the dry ingredients, pour the wet in, and fold with a rubber spatula just until the dough starts to come together. It will look shaggy and borderline too dry—perfect. Over-mixing is the enemy of tenderness; stop while you still see a few floury streaks.
- Turn the dough onto a lightly floured counter and pat into a 1-inch thick rectangle about 8x5 inches. Retrieve your now-firm peanut butter from the freezer and dot heaping teaspoons evenly over the surface. Imagine you're distributing cookie dough chunks; the goal is distinct plops, not a smear. Sprinkle ½ cup (90g) semi-sweet chocolate chips on top, pressing them lightly so they adhere.
- Fold the rectangle like a business letter: bring the bottom third up, then the top third down, encasing the peanut butter and chocolate in a flaky envelope. Give the dough a quarter turn, pat gently back into a 1-inch rectangle, and repeat the fold once more. These turns create layers upon layers—think laminated dough without the butter block drama. If the dough fights back, let it rest for two minutes; gluten is a toddler that needs a time-out. 7
- Using a sharp bench scraper or knife, cut the dough into 8 wedges and transfer to the prepared sheet, spacing them 2 inches apart. Cold scones bake taller, so if your kitchen is warm, slide the whole tray into the freezer for 15 minutes. This rest relaxes the gluten and rechills the butter, ensuring maximum lift. Meanwhile, beat 1 tablespoon heavy cream with 1 teaspoon water for the egg-free glaze.
- Brush the tops with cream and shower with coarse sugar. Bake for 18–22 minutes, rotating the pan halfway, until the scones are puffed and deeply golden with chocolate bubbling like mini lava pools. Your kitchen will smell like a Reese's cup got a PhD—resist opening the oven door before 15 minutes or they'll collapse like a soufflé with stage fright. Cool on the pan for 5 minutes, then transfer to a rack; this prevents soggy bottoms and gives the chocolate time to set so you don't burn your tongue.
That's it—you did it. But hold on, I've got a few more tricks that'll take this to another level...
Insider Tricks for Flawless Results
The Temperature Rule Nobody Follows
Your ingredients should feel like they just came from an arctic vacation. I'm talking fridge-cold milk, freezer-frigid butter, and a bowl that could double as an ice pack. Warm butter smears into flour like sunscreen, coating every strand and preventing the flaky layers we're chasing. If your kitchen is hotter than 75°F, fill a metal mixing bowl with ice water while you measure, dump it, and dry the bowl—insta-chill without the brain freeze.
Why Your Nose Knows Best
Forget the timer evangelists; your olfactory bulb is the most accurate kitchen thermometer. When the scent of roasted peanuts and caramelized sugar wafts through the house, start peeking. If you wait for the prescribed 22 minutes in a slow oven, you'll over-brown the bottoms before the tops reach mahogany. Trust the aroma; it's the same instinct that tells you when popcorn is thirty seconds from burning.
The 5-Minute Rest That Changes Everything
Once baked, let the scones lounge on the pan for five minutes before transferring to a rack. This pause allows the chocolate to firm slightly so it doesn't smear like preschool paint, and the residual steam finishes cooking the centers gently. Skip it and you'll have molten chocolate lava that scalds tongues and collapses the delicate crumb. Patience, grasshopper—five minutes is shorter than a social-media scroll.
Creative Twists and Variations
This recipe is a playground. Here are some of my favorite ways to switch things up:
Chunky Monkey Remix
Swap creamy peanut butter for crunchy, fold in ½ cup diced dried banana chips, and replace chocolate chips with chopped dark chocolate. The banana rehydrates slightly, giving pockets of chewy sweetness that transport you straight to a beachside shack—minus the sand in your shoes.
Salted Caramel Swirl
Stir 2 tablespoons of thick caramel sauce into the peanut butter before freezing, then sprinkle flaky sea salt on top right before baking. The caramel melts into buttery rivers that balance the salt and chocolate like a perfectly choreographed tango.
White Chocolate Raspberry
Trade semi-sweet chips for white chocolate and dot the dough with freeze-dried raspberries. The tart berries cut through the sweetness, and the white chocolate toasts into caramelized nibs that taste like crème brûlée in disguise.
Spicy Mexican Hot Chocolate
Add ½ teaspoon cinnamon and a pinch of cayenne to the dry ingredients, and sub Mexican chocolate tablets for chips. The gentle heat sneaks up after the peanut butter fades, leaving a warm glow that makes coffee taste better and mornings feel bolder.
Storing and Bringing It Back to Life
Fridge Storage
Once completely cool, store scones in an airtight container lined with paper towel to absorb condensation. They'll keep for three days at room temperature or five in the fridge, though honestly they've never lasted more than 24 hours in my house. The paper towel trick prevents soggy bottoms—nobody wants a limp scone.
Freezer Friendly
Flash-freeze unbaked wedges on a tray for two hours, then transfer to a zip-top bag with parchment between layers. Bake straight from frozen, adding 3–4 extra minutes. You'll have fresh scones whenever the craving strikes, which, let's be honest, is always.
Best Reheating Method
Revive day-old scones in a 300°F oven for 5 minutes or a toaster oven for 3. Avoid the microwave unless you enjoy rubbery chocolate and sad, chewy dough. Add a tiny splash of water to the tray before reheating; the steam resurrects the interior crumb without drying the edges.