Picture this: I’m in my tiny kitchen, the kind of place where the countertops double as a dance floor for spilled sugar, and I’ve just tried to make a classic s’mores bar for a last‑minute movie night. The marshmallows melted into a gloopy mess, the chocolate clumped like a bad hair day, and the graham cracker crust turned into a soggy slab that could barely hold a paperclip. I stared at the disaster, sighed, and then dared myself to reinvent the whole thing. I whispered to the empty room, “If you can’t bake it, you can definitely roll it,” and that’s when the idea for S’mores Sushi No‑Bake Treat was born.
The moment I pulled the first roll together, the kitchen filled with a perfume that could make a campfire blush—sweet, buttery, and just a hint of toasted graham that reminded me of summer evenings under a star‑spangled sky. I could hear the faint crackle of the chocolate as it set, the soft sigh of marshmallows settling into their new home, and the faint clink of a spoon against a bowl as I dusted the final sprinkle of nuts. My fingertips felt the buttery warmth of the mixture, and my eyes widened at the glossy chocolate drizzle that looked like a river of midnight spilling over a tiny, edible sushi roll. The texture was a perfect marriage of crunchy, chewy, and melt‑in‑your‑mouth softness that made my taste buds do a happy jig.
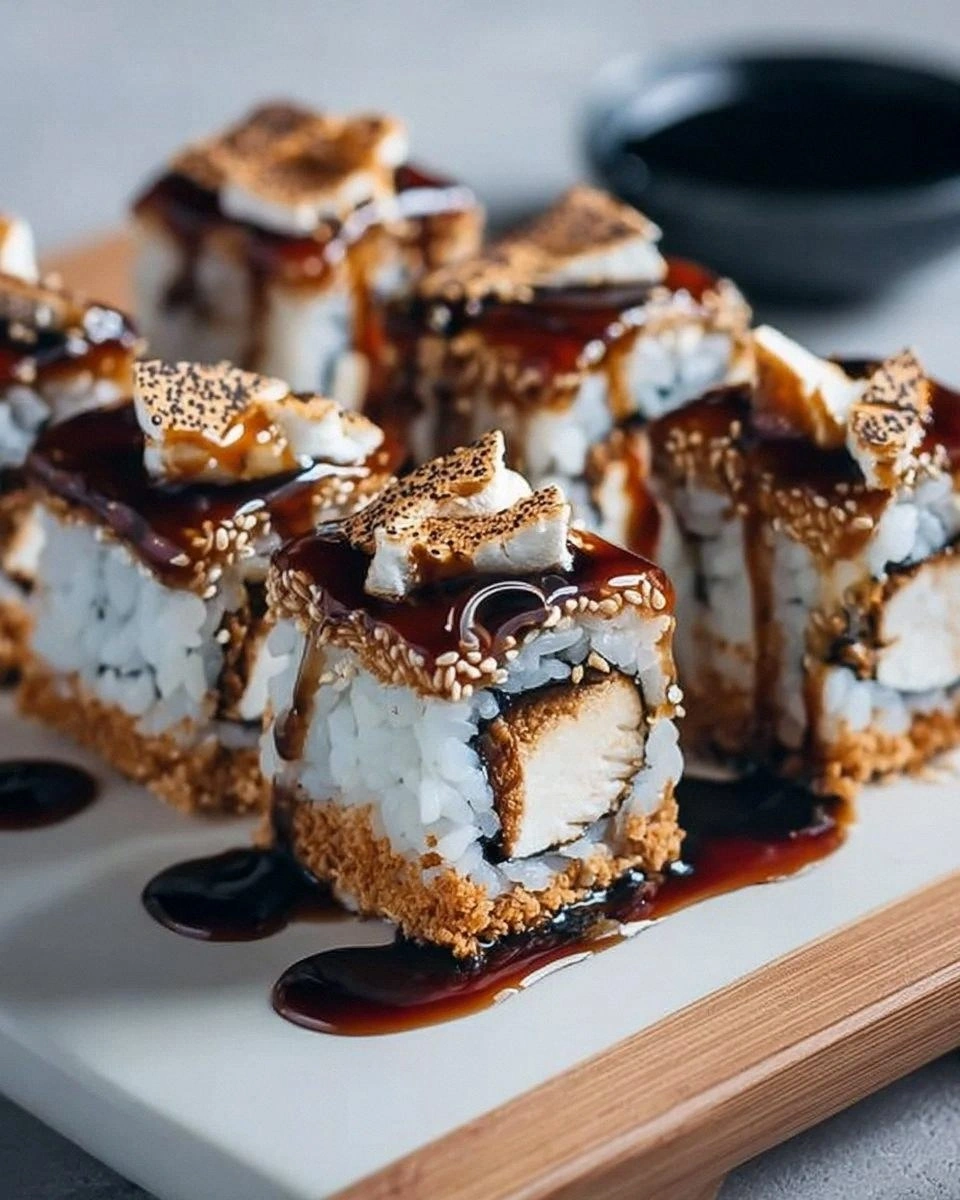
Most s’mores recipes either demand a campfire, a microwave, or a baking sheet that turns everything into a sticky pancake. This version, however, flips the script completely: no oven, no fire, no mess—just a simple no‑bake technique that delivers the same nostalgic flavor while looking like a piece of modern art. I’m talking about a treat that can be assembled on a countertop, chilled in the fridge, and sliced into perfect bite‑size pieces that look like sushi rolls—hence the cheeky name. The secret? A surprise ingredient that gives the whole thing a buttery, glossy finish without ever melting the chocolate into a puddle.
Let me walk you through every single step — by the end, you’ll wonder how you ever made s’mores any other way. Okay, ready for the game‑changer? This next part? Pure magic.
What Makes This Version Stand Out
- Flavor Explosion: The combination of toasted graham, melty chocolate, and airy marshmallows hits every nostalgic nerve while adding a sophisticated crunch from nuts and sprinkles.
- Texture Symphony: Each bite delivers a contrast—crunchy crumb base, chewy marshmallow middle, and silky chocolate top that melts just enough to coat without slipping.
- Zero‑Bake Simplicity: No oven, no stovetop, no fire—just a bowl, a pan, and a fridge. Perfect for summer nights or apartment living where flames are forbidden.
- Visual Wow Factor: Rolled into sushi‑like cylinders, dusted with colorful sprinkles, and drizzled with glossy chocolate, these treats look like they belong on a fancy dessert platter.
- Crowd‑Pleaser Guarantee: I dare you to taste this and not go back for seconds; even the pickiest kids will be begging for more.
- Ingredient Quality Matters: Using premium semi‑sweet chocolate and real butter (or coconut oil for vegans) creates a depth of flavor that cheap substitutes simply can’t match.
- Make‑Ahead Magic: Once rolled, they can sit in the fridge for up to 48 hours, getting even more flavorful as the layers meld together.
- Versatile Base: Swap graham crackers for crushed pretzels or oat cookies for a different twist without losing the core s’mores vibe.
Inside the Ingredient List
The Flavor Base
First up, the graham cracker crumbs. These tiny, toasted shards provide the foundational crunch that mimics the classic s’mores cookie. If you skip them, you lose that essential bite that balances the soft marshmallows. For the best texture, use a food processor to pulse plain graham crackers into fine crumbs, then toast them lightly in a dry skillet for extra nuttiness. A good tip: look for crackers with real honey or molasses—they’ll add a subtle caramel note that elevates the whole treat.
The Texture Crew
Mini marshmallows are the heart‑beat of this recipe. Their airy puff expands slightly when mixed with the warm butter, creating a cloud‑like interior that contrasts with the crisp crumb base. If you’re allergic to gelatin, there are vegan marshmallow alternatives made from agar‑agar that work just as well. Skipping marshmallows would turn this into a dry crumble, so keep them at the center of the roll for that signature melt‑in‑your‑mouth experience.
The Unexpected Star
Chocolate chips are the glossy, indulgent layer that brings everything together. Semi‑sweet or milk chocolate both work, but semi‑sweet gives a richer depth while milk chocolate adds a sweeter, creamier finish. When you melt them, do it gently—high heat can scorch the cocoa, turning it bitter. If you want a hint of sea salt, sprinkle a pinch over the melted chocolate before drizzling; it heightens the chocolate flavor dramatically.
The Final Flourish
Butter (or coconut oil for a vegan spin) is the secret binder that holds the crumb and marshmallow mixture together without making it soggy. The fat coats each crumb, preventing them from absorbing too much moisture from the marshmallows. If you replace butter with a neutral oil, you’ll lose that buttery aroma that makes the treat feel homey. Sprinkles and chopped nuts are optional but add visual excitement and a crunch that surprises the palate. Finally, an extra drizzle of melted chocolate at the end creates that luxurious sheen you see in high‑end pastry shops.
Everything's prepped? Good. Let's get into the real action...
The Method — Step by Step
Start by melting the butter (or coconut oil) in a large saucepan over low heat. As it begins to shimmer, stir in the graham cracker crumbs until every speck is coated in buttery goodness. You’ll notice a faint, buttery aroma that signals you’re on the right track; this is the first scent that tells your brain “we’re making something amazing.” Once fully combined, remove the pan from heat and let the mixture cool just enough that it’s warm to the touch but not hot.
While the crumb mixture is still warm, fold in the mini marshmallows. Use a rubber spatula and press gently so the marshmallows start to soften and cling to the crumbs. This is the moment where the mixture transforms from a dry crumble into a cohesive, slightly sticky dough. Pro tip: If the marshmallows seem stubborn, microwave the bowl for 5‑10 seconds—just enough to give them a little wiggle.
Next, melt the chocolate chips in a heat‑proof bowl set over a pot of simmering water (double boiler). Stir constantly until the chocolate is smooth and glossy. Once melted, remove from heat and set aside. If you hear a faint “snap” as you stir, that’s the chocolate reaching the perfect temper for a glossy finish.
Now comes the assembly. Line a rectangular baking sheet with parchment paper. Spread the crumb‑marshmallow mixture onto the paper, flattening it into an even rectangle about ½‑inch thick. Press down firmly with the back of a spatula to create a uniform base. This step is crucial; an uneven base will lead to uneven rolls that fall apart later.
With the base set, drizzle the melted chocolate over the entire surface, using a spoon or a small piping bag for precision. Allow the chocolate to spread naturally; you’ll see it pool in valleys and create a marbled effect. This is where the treat gets its signature glossy coat. Let the chocolate set for about 5‑7 minutes at room temperature, or pop the sheet into the freezer for 2 minutes if you’re in a hurry.
Once the chocolate is firm enough to handle, carefully roll the entire sheet from one short edge to the other, using the parchment paper to help you keep a tight roll. The roll should be firm but not so tight that the chocolate cracks. As you roll, you’ll hear a faint “whoosh” of the paper sliding, a satisfying sound that tells you the roll is tight enough to hold together.
Transfer the roll to a cutting board and, using a sharp, wet knife, slice it into 1‑inch thick “sushi” pieces. The wet knife prevents the chocolate from sticking, giving you clean cuts that look like perfect sushi rolls. Place each slice back onto the parchment, drizzle a little extra melted chocolate on top for extra shine, and sprinkle with your chosen sprinkles and chopped nuts. This final flourish adds color, texture, and that extra wow factor that will make guests stare.
Refrigerate the finished rolls for at least 20 minutes to let everything set completely. When you pull them out, the chocolate will have hardened into a thin, crackly shell, while the interior stays soft and chewy. Serve chilled or at room temperature—both work beautifully. That sizzle when it hits the pan? Absolute perfection. And now the fun part: dig in and watch everyone’s faces light up.
That's it — you did it. But hold on, I've got a few more tricks that'll take this to another level...
Insider Tricks for Flawless Results
The Temperature Rule Nobody Follows
Never let the butter get hotter than 120°F (49°C). Once it passes that point, it begins to separate, and you’ll end up with a greasy crumb mixture that won’t hold together. Keep the heat low and watch the butter melt slowly; you’ll hear a gentle “sizzle” that tells you you’re in the sweet spot. I once rushed this step and ended up with a crumb that fell apart like sand—lesson learned.
Why Your Nose Knows Best
Before you add the chocolate, pause and sniff the melted mixture. If you detect a faint burnt smell, you’ve overheated it and the flavor will turn bitter. Trust your nose more than a timer; the aroma of fresh chocolate is sweet, slightly nutty, and never acrid. This sensory checkpoint saves you from a disastrous batch that would otherwise taste like burnt rubber.
The 5‑Minute Rest That Changes Everything
After you roll the base but before you drizzle the chocolate, let the crumb‑marshmallow slab rest for five minutes. This short pause allows the butter to firm up just enough to keep the roll tight, yet still soft enough for the chocolate to adhere. Skipping this rest leads to a roll that can split when sliced, ruining the sushi‑like appearance.
Cold‑Water Dip for Clean Cuts
When slicing the final rolls, dip your knife in ice‑cold water and wipe it dry between cuts. The cold blade prevents chocolate from sticking, giving you clean, crisp edges that look professional. A friend tried using a dry knife once and ended up with ragged, smudged pieces that looked like a toddler’s art project.
Layering Sprinkles for Visual Impact
Instead of sprinkling all at once, try a two‑step method: first, dust a light layer of tiny pastel sprinkles before the chocolate sets, then add a second burst of larger, bold‑colored sprinkles after the chocolate hardens. This creates depth and a pop‑color effect that makes each bite look Instagram‑ready.
Creative Twists and Variations
This recipe is a playground. Here are some of my favorite ways to switch things up:
Nutty Banana Roll
Replace half of the graham cracker crumbs with crushed banana chips and add a swirl of peanut butter into the marshmallow mixture. The banana adds a natural sweetness while the peanut butter brings a salty, nutty contrast that will have nut lovers swooning.
Matcha Green Tea Delight
Swap chocolate chips for white chocolate and stir in a teaspoon of matcha powder into the melted chocolate. The earthy green tea flavor pairs surprisingly well with the sweet marshmallows, creating a sophisticated twist that’s perfect for a tea‑time gathering.
Caramel Popcorn Crunch
Fold in a cup of caramel‑coated popcorn pieces after the marshmallows have softened. The caramel adds a buttery depth, and the popcorn contributes an unexpected crunch that mimics the texture of a caramel apple.
Spicy Chili Chocolate
Mix a pinch of cayenne pepper or a dash of chili powder into the melted chocolate before drizzling. The subtle heat cuts through the sweetness, giving the treat a grown‑up edge that’s perfect for holiday parties.
Berry‑Infused Bliss
Stir in a quarter cup of freeze‑dried raspberry powder into the graham cracker crumbs. The tart berry notes balance the richness of the chocolate, and the pink speckles make the rolls visually striking.
Salted Caramel Drizzle
Instead of plain chocolate drizzle, melt caramel and blend in a pinch of flaky sea salt. Drizzle over the rolls for a sweet‑and‑salty finish that mimics the beloved salted caramel trend.
Storing and Bringing It Back to Life
Fridge Storage
Place the rolled sushi pieces in an airtight container lined with parchment paper. They’ll stay fresh for up to three days, and the chocolate will stay firm while the interior remains chewy. If you notice a slight hardening of the chocolate, let the rolls sit at room temperature for ten minutes before serving.
Freezer Friendly
Wrap each roll tightly in plastic wrap, then store in a freezer‑safe bag. They can be frozen for up to two months. When you’re ready to enjoy them, move the rolls to the fridge for an hour to thaw, then let them sit at room temperature for another ten minutes. This gradual thaw prevents the chocolate from cracking.
Best Reheating Method
To revive a slightly hardened roll, place it on a microwave‑safe plate, drizzle a tiny splash (about a teaspoon) of water around the edges, and microwave on low power (30% power) for 15‑20 seconds. The steam created will soften the interior while keeping the chocolate shell intact. Avoid high heat, which can melt the chocolate completely.