Love this? Pin it for later! 📌
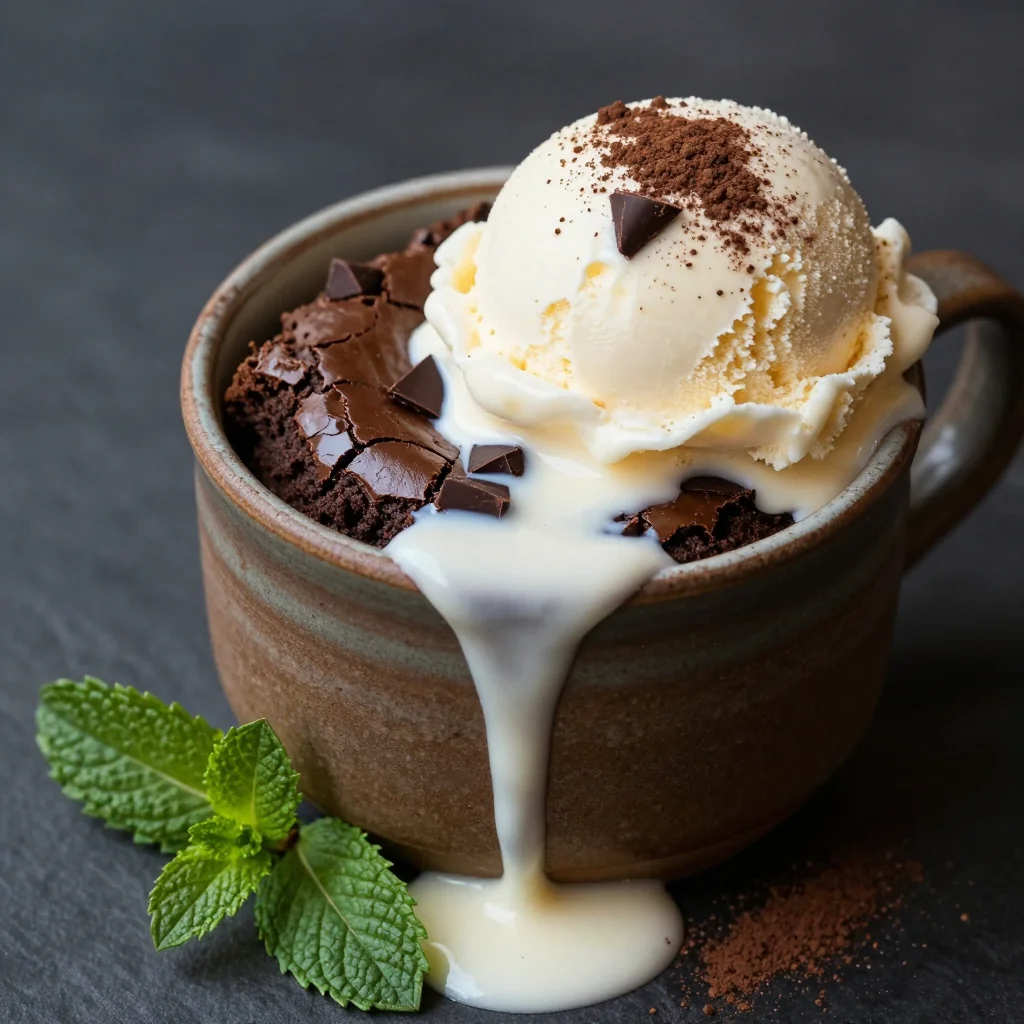
When the chocolate craving hits at 9:47 PM and you need something now—not in 45 minutes, not after the oven preheats, but right this second—this brownie in a mug is your lifeline. I developed this recipe during a particularly brutal finals week in college, when my roommate and I were surviving on instant coffee and sheer willpower. One night, after our third consecutive all-nighter, we found ourselves staring down a bag of cocoa powder and a half-eaten bar of dark chocolate. Ten minutes later, we were spooning molten brownie straight from our chipped coffee mugs, tears of gratitude mixing with chocolate smudges on our faces. That first bite tasted like hope.
Fast-forward a decade, and I still keep this recipe taped inside my pantry door. It’s my Friday-night reward after the kids are asleep, my Tuesday-afternoon pick-me-up between Zoom meetings, and my Sunday-night comfort when the weekend feels too short. The beauty lies in its simplicity: one mug, one microwave, one perfect portion of fudgy, rich brownie that tastes like it came from a Parisian café rather than a dorm-room microwave. No sharing required, no leftovers tempting you at midnight—just pure, unadulterated chocolate bliss that’s ready faster than you can say “delivery fee.”
Why This Recipe Works
- Instant Gratification: From pantry to palate in under 5 minutes—no oven, no waiting, no dishes beyond your spoon.
- Deep Chocolate Flavor: A one-two punch of Dutch-process cocoa and bittersweet chips creates bakery-level complexity.
- Perfect Texture: A precise flour-to-fat ratio guarantees that elusive balance between cakey edges and a fudgy center.
- Customizable: Swirl in peanut butter, top with ice cream, or spike with espresso powder—your mug, your rules.
- College-Student Tested: Survived four years of dorm microwaves with 700-watt power and still emerges gooey every time.
- Portion Control: Satisfies the craving without the siren song of a whole pan lingering on the counter.
- Travel-Friendly: All ingredients are shelf-stable; keep a “brownie kit” in your desk drawer for emergencies.
Ingredients You'll Need
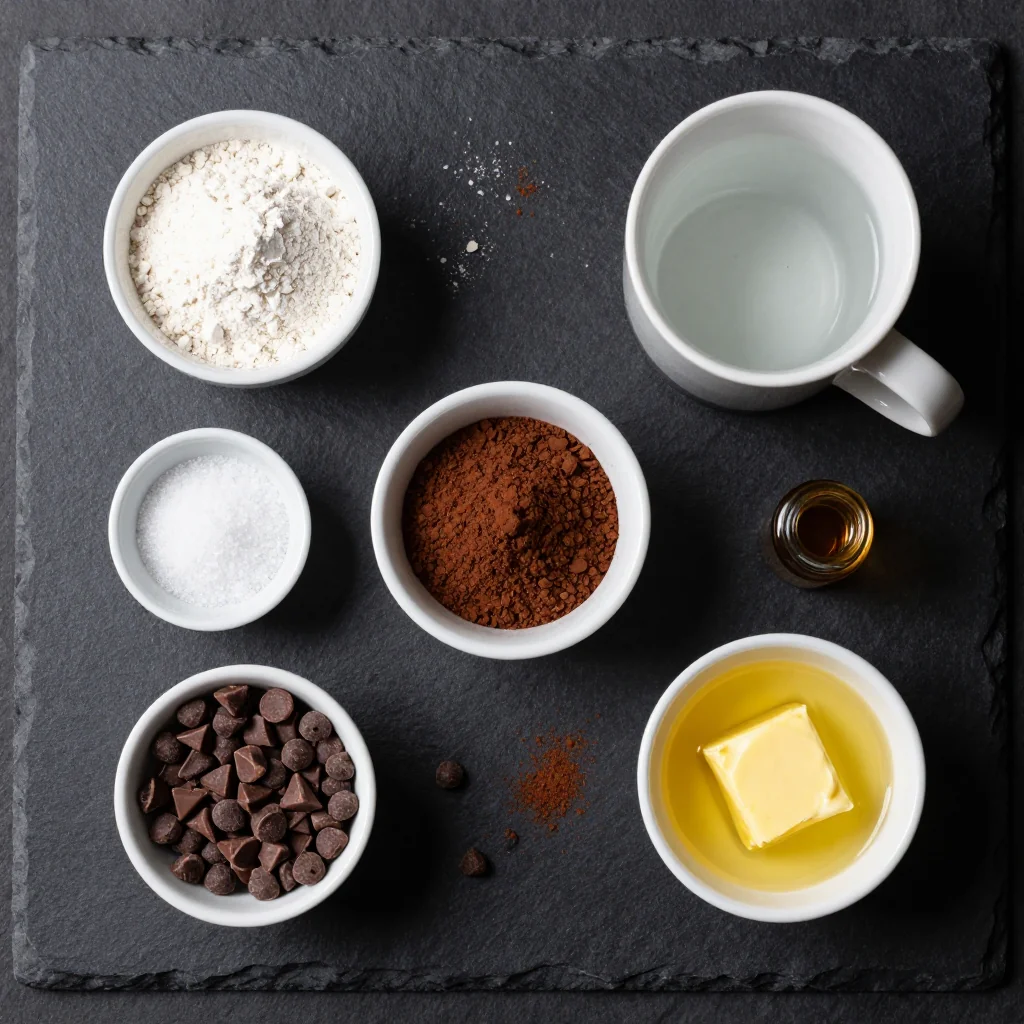
Great brownies—mug or otherwise—start with great chocolate. I splurge on Dutch-process cocoa powder for its smoother, less acidic flavor, but natural cocoa works in a pinch; just know your brownie will taste brighter and slightly tangier. Store cocoa in an airtight tin away from sunlight; it’s remarkably forgiving, yet can absorb funky pantry odors like a sponge.
For the bittersweet chocolate chips, look for 60–70 % cacao. Chips keep their shape under microwave heat, giving you molten pockets of ganache-like richness. If you only have a chocolate bar, chop it into pea-size shards so it melts evenly without scorching.
All-purpose flour needs no introduction, but do spoon it into your measuring spoon instead of scooping. A compacted tablespoon can turn your brownie into chocolate rubber. If you’re gluten-free, substitute a 1:1 baking blend that contains xanthan gum; I’ve had stellar results with King Arthur’s measure-for-measure.
Neutral oil (sunflower, grapeseed, or plain vegetable) keeps the crumb tender even when the microwave zaps away moisture. Butter tastes lovely but can splatter and create greasy edges. If you’re team butter, melt it first and let the foam settle before stirring it in.
Brown sugar adds caramel undertones and extra chew, while a tiny shower of granulated sugar helps create that shiny, tissue-thin crust on top. No brown sugar? Add ½ tsp molasses to white sugar and massage with your fingers until it looks like wet sand.
A pinch of instant espresso powder is my secret weapon; it doesn’t make the brownie taste like coffee—it just amplifies chocolate the way salt amplifies caramel. Keep a jar in your spice drawer for chocolate emergencies.
Finally, vanilla extract rounds sharp edges and adds bakery perfume. Imitation vanilla is fine here; we’re not making crème brûlée. If you’re feeling fancy, swap in ⅛ tsp vanilla paste so those speckles telegraph “I tried.”
How to Make Indulgent Brownie in a Mug for a Single-Serving Dessert
Choose Your Mug Wisely
A 12-oz (350 ml) ceramic mug is the sweet spot—big enough to prevent boil-overs, thick enough to distribute heat evenly. Avoid travel mugs with plastic liners; they can leach chemicals at high temps. White mugs let you spy on the brownie’s progress, but any microwave-safe vessel works. Pro tip: place the mug on a paper towel to catch potential overflow and save yourself midnight sponge duty.
Melt Butter or Measure Oil
If using butter, cube 1 Tbsp and microwave 15–20 seconds until just melted but not sizzling—hot butter cooks the flour and creates tough edges. If using oil, simply measure 1 Tbsp directly into the mug. Swirl to coat the bottom; this prevents sticking and adds a glossy sheen to the crust.
Add Sugars & Vanilla
Toss in 1 Tbsp brown sugar and 1 Tbsp granulated sugar. The molasses in brown sugar attracts moisture, keeping the interior fudgy. Add ⅛ tsp vanilla extract (a generous splash) and stir with a mini silicone spatula or the handle of a spoon until the mixture looks like wet sand and smells like caramel.
Introduce the Cocoa
Sift 1 Tbsp cocoa powder on top (a tea strainer works) to eliminate lumps. Add the espresso powder and a tiny pinch of salt now; salt balances sweetness and heightens chocolate perception. Stir until a dark, glossy paste forms and you start questioning why you ever make boxed mix.
Fold in Flour
Sprinkle 1 Tbsp plus 1 tsp flour evenly over the surface. This prevents clumps from diving into the wet mix and creating flour bombs. Use the spatula to fold—don’t stir aggressively—just until you no longer see streaks of white. Over-mixing activates gluten and yields a cakey, rubbery crumb.
Add the Water & Create Emulsion
Pour 1 Tbsp water down the side of the mug, then ½ tsp milk (any fat percentage). The combo steams gently, keeping the interior molten. Stir just until the batter resembles thick brownie batter—glossy and slow-moving. If it looks like cake batter, you’ve gone too far; add a pinch more cocoa to tighten.
Stud with Chocolate
Press 1 Tbsp bittersweet chips into the top in a rough cross pattern. Pushing them halfway helps them sink slightly, creating rivers of molten chocolate without all congregating at the base. Save 3–4 chips to scatter after cooking for photogenic melty spots.
Microwave with Precision
Cook on HIGH for 35–45 seconds for a 1000-watt microwave, 45–55 seconds for 700-watt. Start with the lower number; you can always add 5-second bursts. The top should look set but still slightly jiggly in the center—carry-over cooking will finish the job. Resist the urge to walk away; 10 seconds too long is the difference between molten and rubber.
Rest & Top
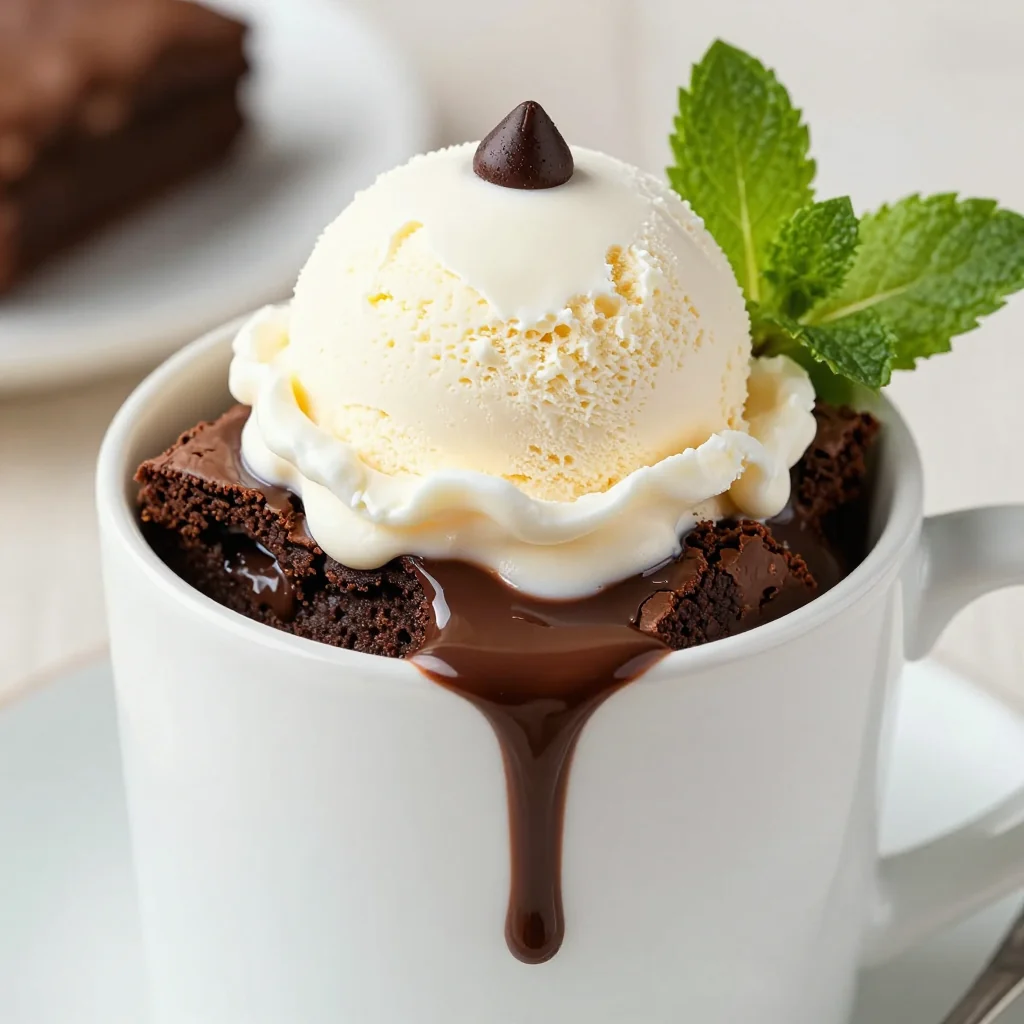
Let the mug stand 2 minutes. This is crucial: the starches hydrate and the temperature equalizes, creating that glossy, truffle-like center. While you wait, pluck a few flakes of sea salt on top or add a scoop of ice cream that will melt into a molten moat. Snap a quick photo if you must, then dive in with the longest spoon you own.
Expert Tips
Know Your Wattage
Write your microwave wattage on a piece of painter’s tape and stick it to the side. Adjust cook times by 5-second intervals until you find your sweet spot—then record it for next time.
Steam, Don’t Boil
If your brownie erupts like a chocolate volcano, reduce water by ¼ tsp next round. The batter should be thick but still spoonable—closer to frosting than cake mix.
Cold Mug Hack
If your mug is chilled from the freezer (hello, ice cream vessel), add 5 seconds to cook time. A cold ceramic sink steals heat and can leave the center raw.
Double-Decker Option
Want to serve two? Split the batter between two 8-oz mugs and cook side by side. Rotate halfway for even heat—microwaves have hot spots.
Flavor Boosters
⅛ tsp orange zest, ¼ tsp mint extract, or a whisper of cayenne can transform the profile without extra calories. Add with the vanilla so they bloom in fat.
Safety First
Never use metallic trim mugs; spark risk is real. If your mug handle gets hot, wrap a damp paper towel around it for a makeshift potholder.
Variations to Try
-
Peanut Butter Swirl
Drop 1 tsp peanut butter on top and marble with a toothpick before cooking. The fat insulates pockets, creating ribbons of molten PB that taste like a Reese’s cup got a PhD.
-
S’mores Edition
Substitute crushed graham crackers for 1 tsp of flour, press mini marshmallows on top during the last 10 seconds of cooking, and finish with a quick torch for campfire char.
-
Mocha Madness
Replace water with cold brew concentrate and add ¼ tsp cinnamon. Top with a dollop of whipped coffee foam for a café-style treat that rivals anything from Starbucks.
-
White Chocolate Raspberry
Fold in 1 tsp freeze-dried raspberry powder and sub white chips for bittersweet. The tart fruit balances the sweetness and turns the batter a romantic millennial pink.
-
Healthy-ish
Swap equal amounts of unsweetened applesauce for oil, use 1 tsp maple syrup instead of granulated sugar, and add 1 tsp ground flax for omega-3 boost. Texture will be cakier but still crave-worthy.
-
Mexican Hot Chocolate
Whisk ⅛ tsp each of cinnamon and cayenne into the cocoa, and stir in ⅛ tsp almond extract. Top with cinnamon-sugar-dusted churro cereal for crunch.
Storage Tips
Let’s be honest—this brownie rarely survives longer than the time it takes to find your favorite Netflix intro. But if you do possess superhuman restraint, cover the mug with plastic wrap pressed directly onto the surface to prevent a skin from forming. Refrigerate up to 24 hours; rewarm 10–15 seconds with a fresh sprinkle of chips for that just-baked gooeyness.
Freezing is possible but not ideal: the microwave texture suffers once thawed. If you must, freeze the batter instead: prepare through step 6, cover tightly, and freeze up to 1 month. Cook from frozen, adding 15–20 seconds. The result is 90 % as good as fresh—perfect for meal-prepping dessert emergencies.
Want a care package gift? Layer the dry ingredients in a 4-oz mason jar: flour, cocoa, sugars, espresso powder, salt. Attach a tag with wet ingredient quantities and cook time. Recipients only need to add oil, water, vanilla, and chips—college care packages reimagined.
Frequently Asked Questions
Indulgent Brownie in a Mug for a Single-Serving Dessert
Ingredients
Instructions
- Melt: In a 12-oz microwave-safe mug, melt butter 15–20 sec until just liquid. Swirl to coat.
- Sweeten: Stir in both sugars and vanilla until paste-like and glossy.
- Cocoa: Add cocoa, espresso powder, and salt; mix until dark and lump-free.
- Flour: Sprinkle flour evenly; fold gently until no streaks remain.
- Liquids: Add water and milk; stir to thick brownie batter consistency.
- Chip: Press half the chocolate chips into the batter; reserve remainder.
- Cook: Microwave on HIGH 35–45 sec (1000 W) or 45–55 sec (700 W) until edges set but center jiggles.
- Rest: Let stand 2 minutes to finish cooking. Top with remaining chips and a pinch of flaky salt.
Recipe Notes
Microwave wattages vary wildly; start with the lower cook time and add 5-second bursts. The brownie continues cooking as it rests, so pull it when it looks slightly underdone for maximum fudginess.