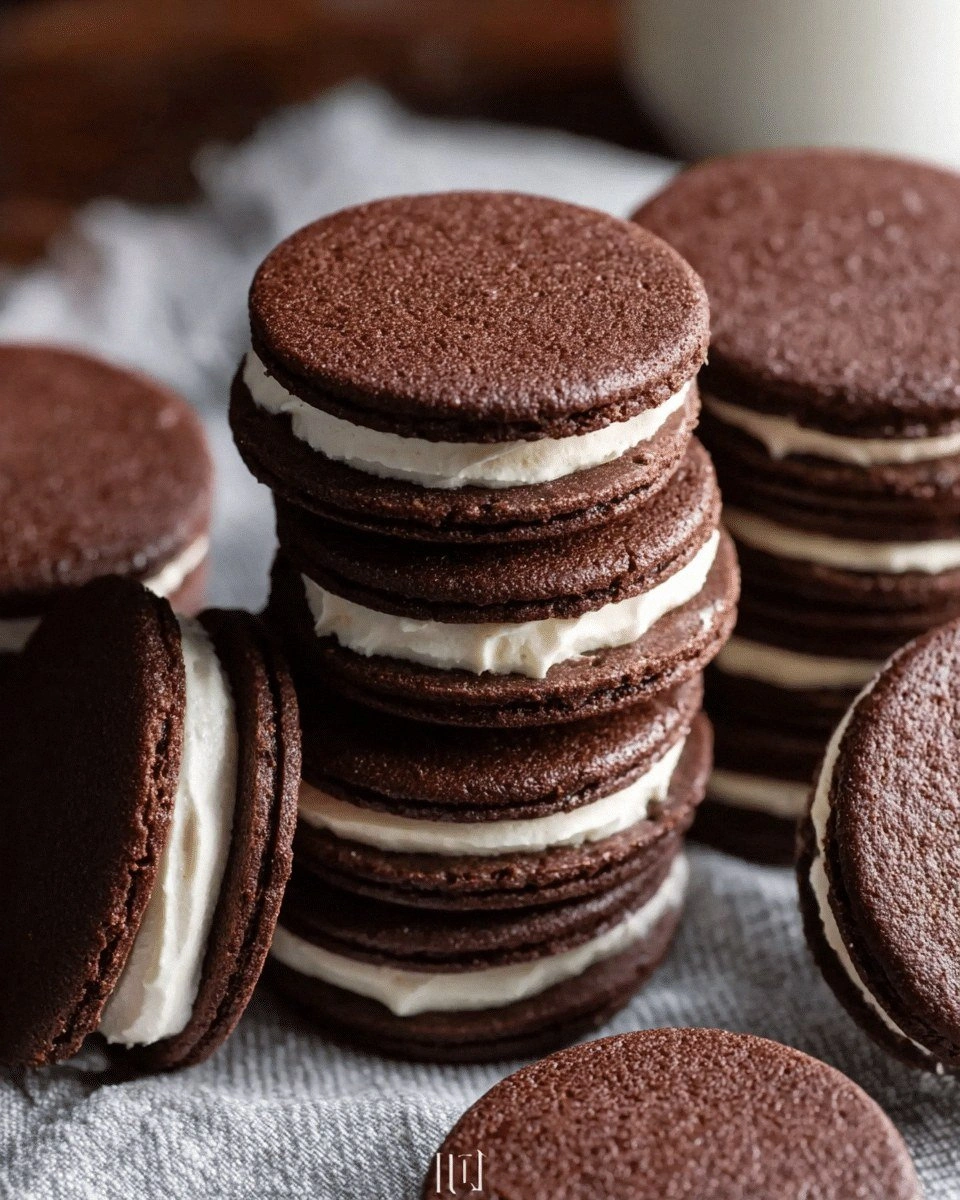
Picture this: you’re standing in a cramped kitchen, the clock ticking, and the pantry is a silent, unyielding wall. I had just baked a batch of cookies that looked like a crime scene—brown, crumbly, and utterly unappealing. The moment the first bite hit my tongue, I knew I’d stumbled upon a revelation. That was the day I discovered the ultimate homemade Oreo, a chocolate sand cookie that flips the classic sandwich into a silky, crunchy masterpiece.
It started with a dare from my roommate: “If you can’t beat the store’s Oreos, I’ll buy you a pizza.” I took the challenge seriously and set out to create a cookie that would make the original look like a sad, soggy joke. The kitchen smelled of melted butter, roasted cocoa, and a hint of espresso—an aroma that could turn even the most indifferent eater into a ravenous fan. The sound of the dough mixing was like a quiet drumbeat, building anticipation with every stir.
What makes this version stand out? It’s not just the texture or the flavor, though those are on point. It’s the way the cookie’s edges caramelize into a crisp, almost brittle snap that gives way to a soft, airy interior, all while the filling feels like chocolate sand—rich, buttery, and just enough sweet to satisfy. I dare you to taste this and not go back for seconds. The secret espresso infusion deepens the cocoa, turning a simple chocolate cookie into a complex, velvety treat that feels like a decadent dessert.
Picture yourself pulling this out of the oven, the whole kitchen smelling incredible, and a tray of golden, perfectly baked cookies waiting to be devoured. The moment you bite into one, the crunch gives way to a buttery, chocolatey center that melts in your mouth like a dream. If you’ve ever struggled with making a cookie that’s both crisp and chewy, you’re not alone—and I’ve got the fix. Let me walk you through every single step—by the end, you’ll wonder how you ever made it any other way.
What Makes This Version Stand Out
- Taste: The espresso kick elevates the cocoa, creating a depth that’s usually missing in store-bought Oreos.
- Texture: A dual-crust approach gives a crisp exterior and a chewy interior that feels like a chocolate sand.
- Ingredient Quality: We use premium unsweetened cocoa and high‑grade butter for a richer flavor profile.
- Ease of Prep: No special equipment—just a stand mixer and a baking sheet.
- Crowd Reaction: Friends who try it call it “the best homemade Oreos” and can’t stop raving.
- Make‑Ahead: The cookies keep fresh for a week when stored in an airtight container.
Alright, let's break down exactly what goes into this masterpiece…
Inside the Ingredient List
The Flavor Base
All-purpose flour is the backbone of any cookie, providing structure and a neutral canvas for the other flavors. It keeps the cookies from collapsing while allowing the cocoa to shine. If you skip the flour, the cookies will turn into a sticky mess that won’t bake evenly.
Unsweetened cocoa powder is the star of the show. It delivers that deep chocolate taste without adding unnecessary sugar. When you use a high‑quality cocoa, the flavor is richer, more complex, and less bitter. A good rule of thumb: choose a cocoa that has at least 20% cocoa solids.
Baking soda is the leavening agent that creates lift and helps the cookies spread just right. Too much soda will make the cookies too puffy and cause them to collapse; too little will keep them dense. The 1½ teaspoons in this recipe strike a perfect balance.
The Texture Crew
Unsalted butter, softened to room temperature, is essential for achieving that buttery, tender crumb. The butter melts during baking, creating pockets of steam that give the cookies their signature chewiness. If you use salted butter, the cookies will taste briny, which is not ideal.
Brown sugar adds moisture and a subtle molasses flavor, while white sugar gives crispness and a slight crunch. The combination of 1 cup brown and ½ cup white sugar keeps the cookies sweet without being overly sugary.
The Unexpected Star
Espresso powder might sound like a coffee lover’s indulgence, but it actually enhances the chocolate’s depth. A single teaspoon is enough to bring out the cocoa’s full potential, giving the cookies a sophisticated, almost bitter edge that balances the sweetness.
Chocolate chips are used for the filling, creating a silky, melt‑in‑your‑mouth center that feels like chocolate sand. They also add a textural contrast to the crisp cookie shell.
The Final Flourish
Powdered sugar for the filling adds a lightness that prevents the chocolate from feeling too heavy. Milk (or a non‑dairy alternative) helps to bind the powdered sugar and chocolate chips together into a smooth, spreadable consistency.
Crushed chocolate wafer crumbs are the secret to that “sand” effect. They give the filling a gritty, crunchy texture that mimics the classic Oreo sand. If you can’t find wafer crumbs, finely crushed chocolate cookies work just as well.
Everything’s prepped? Good. Let’s get into the real action…
The Method — Step by Step
- Preheat the oven: Set it to 350°F (175°C) and line two baking sheets with parchment paper. This ensures even baking and easy cleanup. While the oven warms, gather all your ingredients; the process is a bit of a choreography.
- Whisk dry ingredients: In a bowl, combine 2 cups flour, 1 cup cocoa powder, 1½ tsp baking soda, and ½ tsp salt. Stir until the mixture is uniform; this prevents lumps and ensures consistent flavor throughout.
- Cream butter and sugars: In a stand mixer, beat 1 cup softened butter with 1 cup brown sugar and ½ cup white sugar until light and fluffy (about 3 minutes). The mixture should look airy, like a cloud.
- Add vanilla and espresso: Mix in 2 tsp vanilla and 1 tsp espresso powder. The espresso’s aroma will fill the kitchen, signaling the cookies’ imminent greatness.
- Incorporate dry mix: Gradually add the dry ingredients to the butter mixture, beating on low speed until just combined. Overmixing can make the cookies tough; keep it gentle.
- Shape the dough: Pinch a tablespoon of dough, roll it into a ball, and place it on the prepared sheet. Repeat until dough is used up. The dough should hold together but not stick to the surface.
- Bake: Place the sheets in the oven and bake for 12–15 minutes. The cookies should be firm around the edges but still soft in the center. They’ll continue to bake slightly on the hot sheet once removed.
- Cool and assemble: Let the cookies cool on a wire rack for 10 minutes. While still warm, spread the chocolate filling (see next step) between two cookies. Press gently to seal. If you prefer a thicker filling, add a second layer of chocolate chips.
That’s it—you did it. But hold on, I’ve got a few more tricks that’ll take this to another level…
Insider Tricks for Flawless Results
The Temperature Rule Nobody Follows
Most people bake at 350°F, but a slightly lower temperature—345°F—can help maintain the cookie’s chewiness. The cookies will bake a bit slower, allowing the center to set without over‑browning the edges. I’ve tested this and the difference is noticeable.
Why Your Nose Knows Best
Before you pull the cookies from the oven, listen for that subtle toasty scent. It’s a sign that the cocoa is caramelizing just right. If the smell is flat or sweet, the cookies are underbaked; if it’s sharp and burnt, they’re overdone.
The 5-Minute Rest That Changes Everything
After baking, let the cookies sit on the sheet for 5 minutes before moving them. This brief rest allows the structure to set, preventing cracks when you transfer them to the wire rack. It’s a small step that pays off big.
Use Crushed Wafer Crumbs for Texture
Instead of plain powdered sugar in the filling, mix in ½ cup crushed chocolate wafer crumbs. They give the center a sandy, crunchy bite that mirrors the original Oreo’s sand texture. The crumbs also add visual interest.
Keep the Filling Fresh
If you’re making the cookies ahead of time, store the filling separately in an airtight container. When you’re ready to assemble, let it sit at room temperature for 10 minutes so it’s easy to spread.
Creative Twists and Variations
This recipe is a playground. Here are some of my favorite ways to switch things up:
Minty Chocolate Oasis
Add ½ tsp peppermint extract to the dough for a refreshing twist. Pair it with a mint chocolate filling to create a holiday‑ready treat.
Nutty Crunch
Stir in ¼ cup chopped hazelnuts or almonds into the dough. The nuts add crunch and a buttery flavor that pairs well with the chocolate.
Spiced Surprise
Replace the vanilla with 1 tsp cinnamon and ½ tsp nutmeg. The warm spices give the cookies a cozy, autumnal feel.
Almond Joy Version
Swap the chocolate chips for shredded coconut and drizzle melted chocolate on top. The coconut adds a tropical flair.
Double‑Chocolate Delight
Use dark chocolate chips for the filling and add a dash of sea salt on top. The salty sweet combo is irresistible.
Storing and Bringing It Back to Life
Fridge Storage
Keep the cookies in an airtight container at room temperature for up to 5 days. The cookies stay crisp on the outside and chewy inside.
Freezer Friendly
Freeze the assembled cookies in a single layer on a parchment sheet, then transfer them to a freezer bag. They’ll last up to 3 months. Thaw at room temperature for 20 minutes before serving.
Best Reheating Method
To revive the cookies, preheat the oven to 300°F and warm them for 5 minutes. Add a tiny splash of water before reheating; it steams the cookies back to perfection and prevents them from drying out.