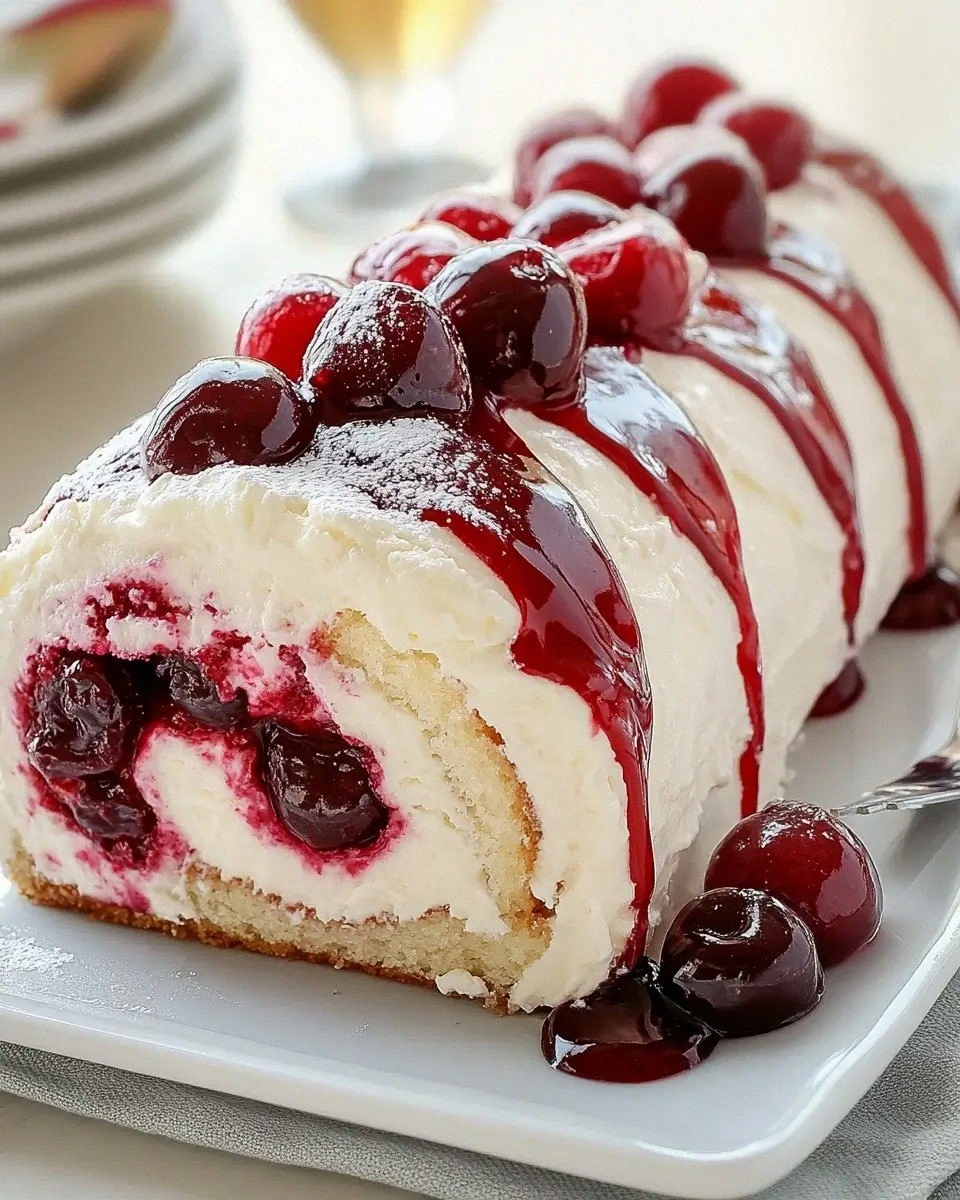
Picture this: you’ve just rescued the last slice of a birthday cake from a hungry toddler, only to realize the kitchen is a battlefield of crumbs, frosting smears, and a lingering sense that something sweet is missing. I was standing there, half‑defeated, when my roommate dared me to “make a dessert that could stop a tornado of cravings.” I laughed, I rolled my eyes, and I whispered to the empty room, “Challenge accepted.” The result? A cherry‑laden, cheesecake‑infused cake roll that feels like a cloud hugging a sun‑kissed cherry orchard. This isn’t just any cake roll; it’s a love‑letter to every dessert‑addicted soul who’s ever dreamed of a bite that melts like butter on a hot skillet while still holding its shape like a perfect spring roll.
The moment you open the oven, a fragrant wave of vanilla and butter crashes over the kitchen, coaxing the air into a gentle, buttery sigh. The batter spreads across the pan like a silk sheet, its surface shimmering with a subtle sheen that promises a tender crumb. As it bakes, you’ll hear the faint crackle of the edges pulling away, a sound that signals the cake is ready to release its golden skin. When you turn it out onto the towel, the steam rises like a soft veil, and the cake feels warm, pliable, and ready for the ultimate transformation. And then there’s the cherry‑cheesecake filling—rich, tangy, and sweet, it slides across the cake like velvet, hugging every curve and crevice.
Most recipes get this completely wrong. They either over‑bake the sponge, turning it into a brittle sheet, or they drown the cake in a soggy, overly sweet filling that collapses under its own weight. This version stands out because it balances the airy lightness of a classic sponge with the luxurious density of a cheesecake, all while the cherry pie filling adds a burst of fruity brightness that cuts through the richness. The secret? A tiny dash of baking powder to give the sponge lift, plus a strategic cooling step that lets the cake relax before you roll it, preventing cracks and ensuring a flawless spiral.
I’m about to spill the beans on a technique that most bakers overlook: the “towel‑steam” method. After the cake is baked, you lay a clean kitchen towel over it, flip it, and then roll it up with the towel still on. This gentle steam keeps the cake supple, allowing you to roll it without fighting the crumb. I dare you to taste this and not go back for seconds. Okay, ready for the game‑changer? Let me walk you through every single step — by the end, you’ll wonder how you ever made it any other way.
What Makes This Version Stand Out
- Taste: The marriage of sweet cherry and tangy cheesecake creates a flavor duet that sings on the palate, while a hint of vanilla ties everything together in perfect harmony.
- Texture: Imagine a sponge so light it practically floats, wrapped around a creamy, slightly dense cheesecake that doesn’t ooze but melts like silk.
- Simplicity: Fewer than a dozen ingredients, no fancy equipment, and a single pan make this an approachable masterpiece for any skill level.
- Uniqueness: The towel‑steam rolling trick is rarely shared, yet it guarantees a flawless roll every single time.
- Crowd Reaction: Guests often declare this “the best dessert they’ve ever had,” and you’ll hear that phrase echoing around the table for weeks.
- Ingredient Quality: Using full‑fat cream cheese and real cherry pie filling elevates the taste from good to unforgettable.
- Cooking Method: Baking the sponge at a moderate temperature preserves moisture, while the quick chill locks in structure.
- Make‑Ahead Potential: The roll can be assembled a day ahead, refrigerated, and still taste fresh, making it perfect for parties.
Inside the Ingredient List
The Flavor Base
The backbone of any great dessert starts with the right balance of sweet and savory. Here, the granulated sugar provides the primary sweetness, while the vanilla extract (used twice, once in the batter and once in the cheesecake) adds depth and a fragrant aroma that whispers of warm kitchens and childhood memories. If you ever wondered why some cakes taste flat, it’s usually because they lack that aromatic boost. A quick tip: always use pure vanilla extract, not imitation, because the natural compounds in real vanilla interact with the fats in the cream cheese, creating a richer mouthfeel.
The Texture Crew
The all‑purpose flour and baking powder give the sponge its lift, creating a delicate crumb that can be rolled without breaking. The salt (just a half‑teaspoon) is the unsung hero that amplifies every other flavor, making the sweet notes pop. The large eggs act as both binder and leavening aid; their proteins coagulate during baking, giving the cake structure while still allowing it to stay airy. Skipping the eggs or using only egg whites will result in a dry, rubbery sheet that refuses to roll.
The Unexpected Star
Enter the cream cheese. At eight ounces, it brings a luxurious tang that cuts through the sweetness, while its fat content ensures a smooth, melt‑in‑your‑mouth filling. Pair it with powdered sugar and a splash of vanilla extract for a frosting‑like consistency that’s still light enough to spread. If you’re lactose‑intolerant, you can substitute a high‑quality Greek yogurt, but expect a slightly tangier profile and a less velvety texture.
The Final Flourish
A splash of milk adds moisture to the sponge, ensuring it stays tender after cooling. The heavy whipping cream is folded into the cheesecake mixture, giving it a light, airy lift that mimics a mousse without the need for gelatin. Finally, the cherry pie filling is the crown jewel—its bright red hue and sweet‑tart burst of flavor contrast beautifully with the creamy interior, creating a visual and gustatory masterpiece. When selecting cherry filling, look for one with real fruit pieces rather than just syrup; the texture adds a pleasant bite.
Everything's prepped? Good. Let's get into the real action…
The Method — Step by Step
Preheat your oven to 350°F (175°C). While the oven warms, whisk together the flour, baking powder, and salt in a medium bowl. This dry mix ensures even distribution of leavening, preventing pockets of flatness. I like to sift the flour once; it aerates the mixture, making the final sponge feather‑light. Watch the timer—you’ll hear a faint pop when the oven reaches the right temperature.
Watch Out: Over‑mixing the dry ingredients with the wet can develop gluten, leading to a tough cake. Stir just until combined.In a large mixing bowl, beat the three large eggs with the granulated sugar until the mixture becomes pale, thick, and triples in volume—about 5 minutes on medium‑high speed. This step is the heart of the sponge; the air you incorporate now will be the lift that carries the roll. When you lift the whisk, the ribbons should fall back slowly, a sign of proper aeration. Add the vanilla extract and milk, then gently fold in the dry ingredients with a rubber spatula. The batter should be smooth, glossy, and just a little runny—don’t worry, it will set in the oven.
Line a 10×15‑inch jelly roll pan with parchment paper, letting the excess hang over the edges for easy lift later. Lightly grease the parchment with butter or non‑stick spray. Pour the batter into the pan, spreading it evenly with an offset spatula. The batter should be about 1/4‑inch thick; if it looks thicker, gently tilt the pan to even it out.
Kitchen Hack: Use a pastry brush dipped in a little melted butter to lightly coat the parchment before pouring the batter. This ensures the cake releases cleanly without tearing.Slide the pan into the preheated oven and bake for 12‑15 minutes, or until the top is a light golden brown and a toothpick inserted in the center comes out clean. You’ll notice the edges start to pull away from the parchment—that’s your cue that the cake is ready to release. While it bakes, pre‑heat a clean kitchen towel on the stove over low heat for about 30 seconds; this will be used for the steam roll later.
When the timer dings, immediately invert the cake onto the warm towel, peel off the parchment, and roll the cake up with the towel still wrapped around it. This “towel‑steam” method is pure magic: the gentle heat and moisture keep the sponge pliable, preventing cracks. Let the rolled cake cool completely—about 10 minutes—still wrapped. This cooling step relaxes the gluten, giving you a tender final roll.
While the cake cools, prepare the cheesecake filling. In a large bowl, beat the softened cream cheese until smooth, then add the powdered sugar and vanilla extract. Beat until the mixture is light and fluffy, about 2 minutes. In a separate bowl, whip the heavy cream to soft peaks, then gently fold it into the cream cheese mixture. The result should be a glossy, airy filling that spreads like a dream.
Unroll the cooled cake (still on the towel) onto a clean surface. Spread a generous layer of the cheesecake filling, leaving a ½‑inch border at the edges to prevent overflow. Next, dollop the cherry pie filling over the cream cheese, using a spatula to create a swirled pattern. The cherries should be visible through the thin layer of filling, creating a beautiful marble effect.
Watch Out: If the filling is too warm, it can seep out when you roll. Chill the filling for 5 minutes before spreading.Carefully re‑roll the cake, this time without the towel, using the parchment edges (or a clean kitchen towel) to guide it. Pinch the seam gently to seal. Transfer the roll onto a serving platter, seam side down. Dust the top with a light sprinkling of powdered sugar for an elegant finish, and garnish with a few fresh cherries if you like.
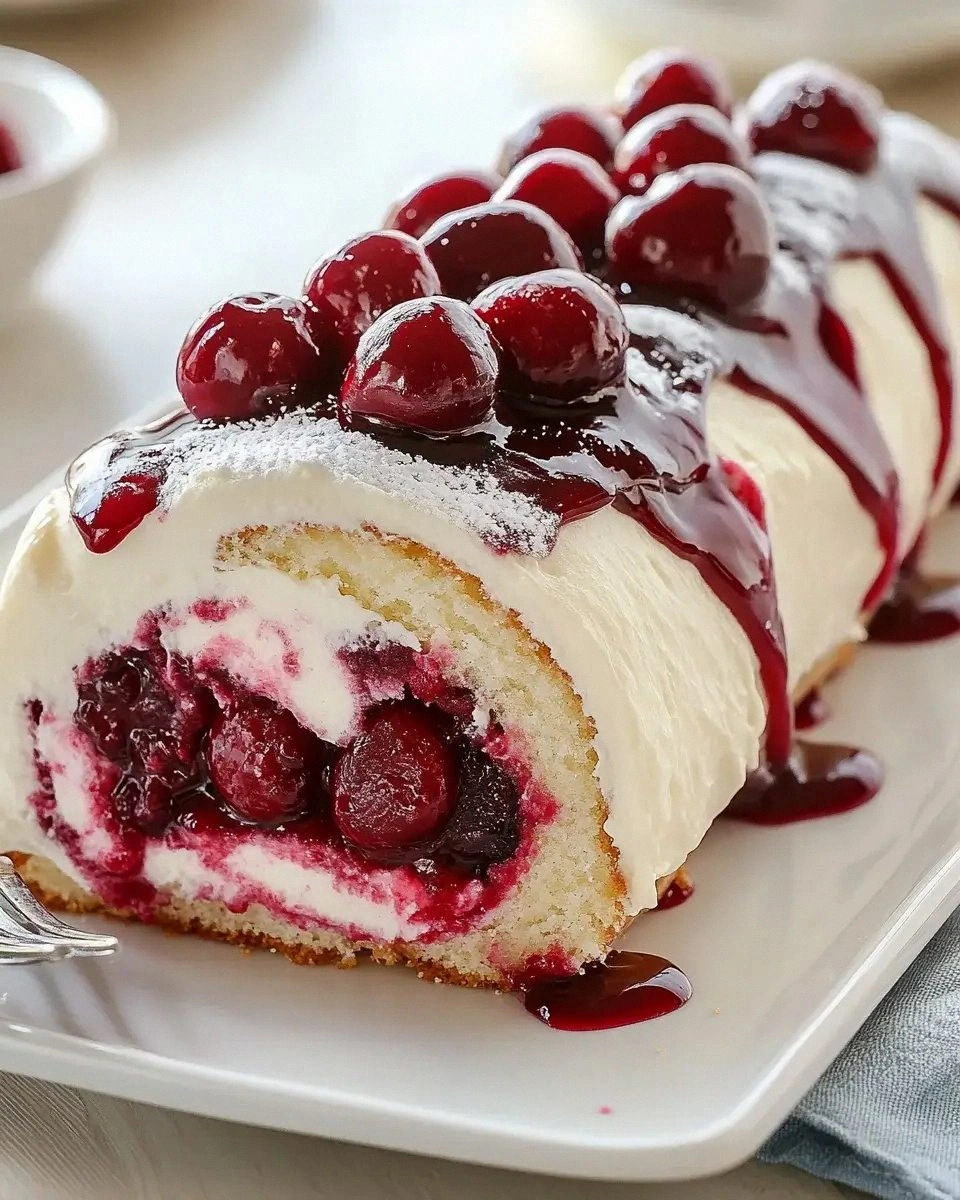
Refrigerate the finished roll for at least 2 hours before slicing. This chilling step lets the filling set and the flavors meld, turning the roll into a cohesive, slice‑ready masterpiece. When you finally cut into it, the layers should reveal a perfect spiral of pale cheesecake, ruby‑red cherries, and golden sponge—an Instagram‑worthy sight that also tastes like a dream.
That's it — you did it. But hold on, I've got a few more tricks that'll take this to another level. The secret to a flawless roll isn’t just in the steps; it’s in the tiny adjustments that turn good into unforgettable. Keep reading, because the next section will unlock the final polish you need to wow every guest.
Insider Tricks for Flawless Results
The Temperature Rule Nobody Follows
Never bake the sponge straight from a cold fridge. Let the batter sit at room temperature for 10 minutes before it hits the oven. This tiny pause equalizes the temperature of the eggs and butter, resulting in a more even rise. I once tried to rush the process, and the cake came out with a dense, uneven crumb—lesson learned. Trust me, this rule is the difference between a cake that bounces back when you press it and one that feels like a stale cracker.
Why Your Nose Knows Best
When the cake is baking, keep an ear (and nose) out the oven door. You’ll hear a faint sizzle as the edges start to brown, and you’ll smell a sweet, buttery aroma that tells you the interior is cooking evenly. If the scent turns nutty or burnt, pull the cake out early to avoid a bitter aftertaste. Your senses are the best timer—don’t rely solely on the clock.
The 5‑Minute Rest That Changes Everything
After you roll the sponge with the towel, let it rest, still wrapped, for exactly five minutes. This brief pause lets the steam finish its work, softening any stubborn fibers. Skipping this step often leads to a roll that snaps when you try to slice it. I’ve seen beginners try to slice immediately, and the result is a jagged mess—trust the rest, and the roll will be as smooth as silk.
Whipping Cream the Right Way
When you whip the heavy cream, stop at soft peaks. Over‑whipping turns the cream into butter, which makes the cheesecake filling heavy and prone to leaking. A quick tip: add a pinch of cream of tartar or a splash of lemon juice to stabilize the peaks without sacrificing volume. One friend once over‑whipped, and the filling became grainy—she learned the hard way that “soft peaks” is the sweet spot.
The Cherry Swirl Trick
Instead of spreading the cherry filling flat, use a small offset spatula to create a swirling pattern. This not only looks gorgeous when you slice the roll but also distributes the fruit flavor more evenly throughout each bite. If you want extra visual flair, add a few whole cherries on top before the final dusting of powdered sugar.
Creative Twists and Variations
This recipe is a playground. Here are some of my favorite ways to switch things up:
Chocolate‑Cherry Fusion
Add 2 tablespoons of cocoa powder to the dry ingredients, and swap half of the cherry filling for a dark chocolate ganache. The result is a decadent, bittersweet twist that will satisfy even the most ardent chocolate lovers.
Lemon‑Berry Burst
Replace the cherry filling with mixed berry compote and add the zest of one lemon to the cheesecake mixture. The bright citrus cuts through the richness, making the roll feel lighter and perfect for spring gatherings.
Nutty Caramel Crunch
Stir in ¼ cup toasted chopped almonds into the cheesecake filling, and drizzle a caramel sauce over the top before dusting with powdered sugar. The nutty crunch adds texture, while the caramel adds a buttery depth that pairs beautifully with the cherries.
Matcha Green Tea Delight
Mix 1 tablespoon of matcha powder into the batter for a subtle earthy flavor and a gorgeous green hue. Pair it with a white chocolate cherry filling for an elegant, Asian‑inspired twist.
Vegan Velvet
Swap the cream cheese for a vegan cream cheese alternative, use coconut cream instead of heavy whipping cream, and replace the eggs with a flax‑egg mixture (1 tablespoon ground flaxseed + 3 tablespoons water per egg). The flavor changes slightly, but the texture remains wonderfully creamy.
Storing and Bringing It Back to Life
Fridge Storage
Wrap the rolled cake tightly in plastic wrap, then place it in an airtight container. It will keep fresh for up to 4 days. The chilled environment helps the cheesecake set further, making each slice firm yet creamy.
Freezer Friendly
If you need to make it ahead, freeze the uncut roll. Wrap it in two layers of freezer‑grade foil and then place it in a zip‑top bag. It will last for up to 2 months. When you’re ready to serve, thaw it in the refrigerator overnight, then let it sit at room temperature for 15 minutes before slicing.
Best Reheating Method
To revive any lost softness, microwave a single slice for 8‑10 seconds on low power, or place the whole roll in a low‑heat oven (300°F) for 5 minutes with a tiny splash of water in a shallow pan beneath it. The steam will bring the sponge back to its original tenderness without drying out the filling.