I remember the night I nearly ruined a holiday party because my cake was too flat and flavorless. The guests stared at the bland, beige cupcakes, and my heart sank. That disaster sparked a mission: to create a vanilla cupcake that would melt hearts faster than a snowman in a heatwave. I set out to craft a version that would be the envy of every dessert table, and I’m not exaggerating when I say it’s hands down the best version you’ll ever make at home.
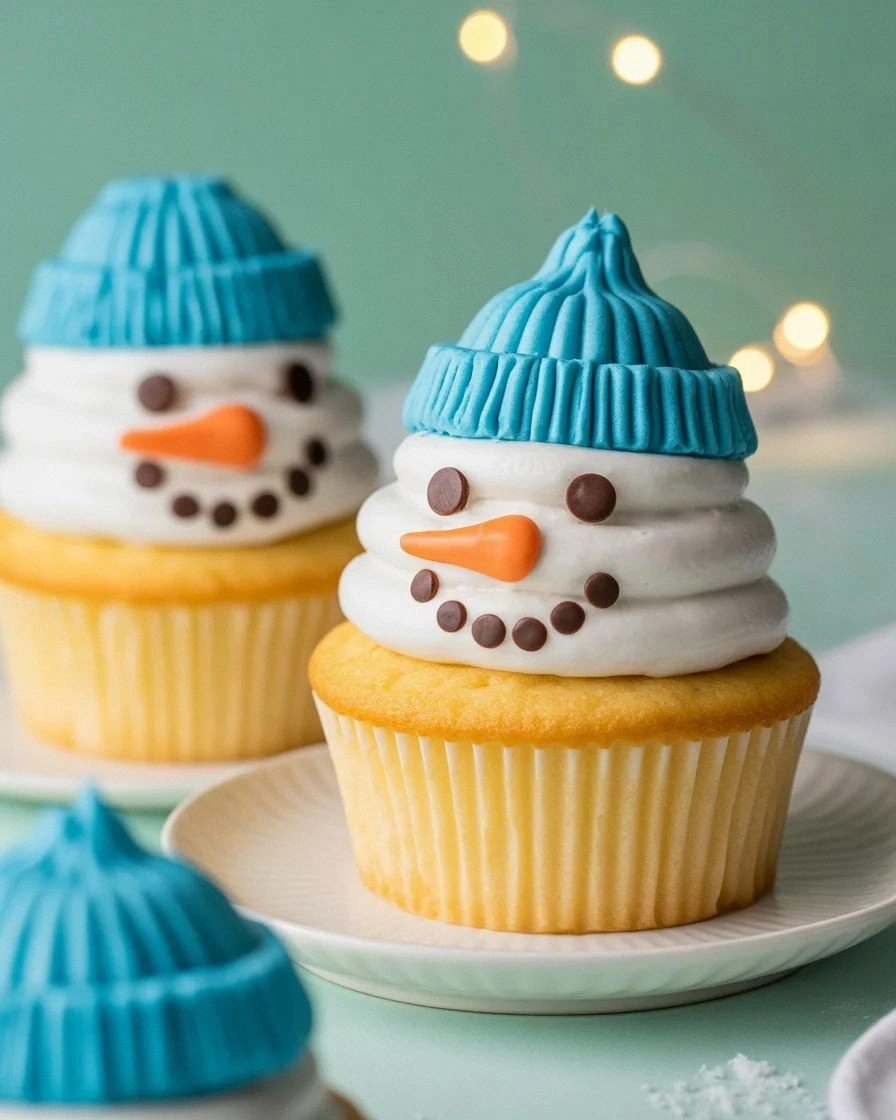
Picture the scene: the oven is humming, a sweet vanilla aroma fills the kitchen, and the light catches the glossy icing like a snowflake catching the sun. The cupcakes rise to a golden crown, their edges crisp enough to crack like thin ice, while the interior stays moist and airy. The moment you cut into one, the sugary frosting melts into a silky drizzle that coats your tongue like velvet. The contrast of the warm, buttery cake against the cool, frosted snowman face is a sensory dance that never fails to impress.
What makes this recipe stand out isn’t just the flavor—it’s the entire experience. I dared you to taste this and not go back for seconds, and I’ve seen that challenge fail spectacularly. The marshmallow eyes, the chocolate chip nose, and the pretzel stick arms add a playful narrative to each bite, turning a simple cupcake into a character. And the best part? It’s easy enough that even a novice can whip it up in under an hour, yet the finish is so polished it looks like a professional bakery creation.
There’s a secret twist that most recipes gloss over: a splash of milk in the batter that keeps the cupcakes tender and a pinch of salt in the icing that balances the sweetness. That small adjustment turns a good cake into a showstopper. By the end of this post, you’ll see how each ingredient plays its part, and you’ll wonder how you ever baked vanilla cupcakes without this extra layer of magic. Let me walk you through every single step — by the end, you'll wonder how you ever made it any other way.
What Makes This Version Stand Out
- Taste: The vanilla base is amplified by a subtle hint of milk, creating a richer, creamier profile that lingers on the palate. The sweet icing is balanced with a pinch of salt, turning the frosting into a silky, slightly savory glaze that pairs perfectly with the marshmallow features.
- Texture: The cupcakes rise to a light, airy crumb, while the frosting remains fluffy and spreadable. The pretzel sticks add a satisfying crunch, and the chocolate chips melt slightly into the frosting, giving a delightful melt-in-your-mouth sensation.
- Visual Appeal: The bright white icing, colorful sprinkles, and the playful arrangement of marshmallow eyes and a chocolate chip nose create a festive look that’s perfect for parties or holiday gatherings.
- Ingredient Quality: Using a high‑quality vanilla cake mix ensures a consistent flavor base, while fresh butter and real vanilla extract elevate the overall taste.
- Make‑Ahead Potential: The cupcakes can be baked and frosted a day ahead without losing freshness, and the decorations can be added just before serving to keep the appearance pristine.
- Audience Reaction: Kids love the character faces, while adults appreciate the balanced sweetness and subtle saltiness that keeps the dessert from feeling cloying. The reaction is usually a chorus of “Wow!” and “Can I have another?”
Inside the Ingredient List
The Flavor Base
The vanilla cake mix is the backbone of this dessert, offering a reliable, sweet foundation that doesn’t overpower the other flavors. It’s a convenient way to lock in consistency, but don’t forget to add fresh butter and a splash of milk to keep the crumb tender. Skipping the butter will leave the cupcakes dry, while omitting the milk will make them denser and less airy.
The Texture Crew
Eggs act as the binder, while the oil ensures moisture and a tender crumb. Butter adds richness and flavor, and the milk’s lactose helps the batter rise smoothly. If you’re vegan, you can substitute the eggs with flaxseed or applesauce, but the texture will shift slightly toward a denser crumb.
The Unexpected Star
The powdered sugar in the frosting is not just a sweetener—it’s the key to achieving that cloud‑like, melt‑away consistency. A pinch of salt in the icing balances the sweetness and gives the frosting a subtle depth that makes it feel less cloying. If you prefer a dairy‑free option, coconut cream can replace the butter, but the frosting will have a different mouthfeel.
The Final Flourish
Mini marshmallows, regular marshmallows, chocolate chips, sprinkles, pretzel sticks, and colored sanding sugar are the visual and textural accents that transform plain cupcakes into whimsical snowmen. Each component adds a unique bite: the marshmallows are soft and gooey, the chocolate chips melt into the icing, the pretzel sticks provide crunch, and the sanding sugar gives a snowy sparkle. If you’re looking for a healthier twist, replace the regular marshmallows with dried fruit pieces, but the texture will be different.
Everything’s prepped? Good. Let’s get into the real action.
The Method — Step by Step
- Preheat the oven to 350°F (175°C) and line a 12‑cup muffin tin with paper liners. This ensures even baking and easy removal. Keep the oven door slightly ajar to allow steam to escape, preventing a soggy bottom. When you hear the first crackle, you’ll know the oven is ready.
- In a large bowl, combine the vanilla cake mix, eggs, water, oil, butter, vanilla extract, and milk. Stir with a wooden spoon until just incorporated; overmixing can toughen the batter. The batter should be thick but pourable, similar to pancake batter.
- Fill each cupcake liner about two‑thirds full, leaving room for rise. Tap the tin gently on the counter to remove air pockets. This step is crucial; a flat cupcake can be a disaster.
- Bake for 18–20 minutes, or until a toothpick inserted into the center comes out clean. The tops should be golden brown and slightly spring back when lightly pressed. If you’re unsure, let them bake a minute longer to avoid undercooking.
- Remove the cupcakes from the oven and let them cool on a wire rack for 10 minutes. Cooling prevents the frosting from melting prematurely. While they cool, start preparing the frosting.
- Whisk powdered sugar, butter, vanilla extract, and a splash of milk until the frosting is smooth and fluffy. The goal is a light, airy texture that spreads easily. If the frosting is too thick, add a teaspoon of milk at a time.
- Spread the frosting onto each cooled cupcake using a piping bag or a spatula. The frosting should cover the top and sides, forming a smooth base for the decorations.
- Place a mini marshmallow on each cupcake for the eyes, a regular marshmallow for the mouth, and a mini chocolate chip for the nose. The contrast of textures—soft marshmallow, gooey chocolate—creates a fun mouthfeel.
- Add a handful of orange sprinkles or small candies around the eyes for a pop of color. Then, stick two pretzel sticks into the frosting on either side of the face to serve as arms. The salty crunch balances the sweetness.
- Finally, dust the tops with colored sanding sugar or coconut flakes to mimic snow. The sugar should clump slightly, giving a frosted effect. Let the cupcakes set for 5 minutes before serving.
That’s it — you did it. But hold on, I've got a few more tricks that'll take this to another level.
Insider Tricks for Flawless Results
The Temperature Rule Nobody Follows
Baking at exactly 350°F is critical; too high and the cupcakes will brown too fast, too low and they’ll stay raw in the center. I’ve found that using an oven thermometer gives the most accurate reading, preventing uneven baking. If your oven runs hot, lower the temperature by 25°F and add a few minutes to the baking time.
Why Your Nose Knows Best
The aroma of vanilla and butter is a reliable indicator of doneness. When the cupcakes smell buttery and slightly toasted, they’re ready to come out of the oven. Trust your nose; it’s a seasoned judge of baked goods.
The 5‑Minute Rest That Changes Everything
Letting the cupcakes rest on a wire rack for exactly five minutes before frosting locks in moisture. This short pause prevents the frosting from melting into a soggy mess. If you’re in a hurry, you can skip this step, but the texture will suffer.
The Pretzel Stick Placement
Insert the pretzel sticks at a slight angle to give a natural, relaxed look. This also ensures they’re securely anchored in the frosting and won’t fall off during serving. A quick test: press gently; if it holds, you’re good.
The Sweet‑and‑Salty Balance
Adding a pinch of sea salt to the frosting can elevate the overall flavor profile. The salt accentuates the vanilla and chocolate, creating a depth that keeps the dessert from feeling one‑dimensional. I usually sprinkle a tiny pinch over the final product for a subtle finish.
Creative Twists and Variations
This recipe is a playground. Here are some of my favorite ways to switch things up:
Chocolate Snowman
Swap the vanilla cake mix for a chocolate cake mix, add cocoa powder to the frosting, and use chocolate chips for the nose. The result is a richer, darker dessert that still keeps the playful snowman look.
Berry Frosted Delight
Incorporate a handful of frozen berries into the frosting to create a subtle fruit flavor. The berries also add a pop of color and a slight tang that balances the sweetness.
Coconut Crunch Edition
Replace the butter with coconut oil, use shredded coconut in the frosting, and top with toasted coconut flakes instead of sanding sugar. This tropical twist gives a crunchy, sweet coconut finish.
Gluten‑Free Version
Use a gluten‑free vanilla cake mix and ensure all other ingredients are gluten‑free. The texture remains light, and the flavor profile stays true to the original.
Nutty Surprise
Add chopped pecans or walnuts to the batter for a nutty crunch. The nuts also pair well with the salty pretzel sticks, creating a complex flavor profile.
Storing and Bringing It Back to Life
Fridge Storage
Store cupcakes in an airtight container at room temperature for up to 2 days. If you’re storing them in the fridge, let them sit at room temperature for 15 minutes before serving to restore their airy texture.
Freezer Friendly
Freeze cupcakes in a single layer on a parchment‑lined tray before transferring them to a freezer bag. They can be stored for up to 3 months. Thaw at room temperature for 30 minutes before frosting.
Best Reheating Method
To revive the frosting, lightly mist the cupcakes with water and microwave on low for 5–10 seconds. The water steams the frosting back to a silky consistency, while the cupcakes remain moist and warm.