I was standing in a kitchen that smelled like burnt toast and stale coffee, utterly convinced that my culinary destiny had been ruined by a single bad batch of fried chicken. I stared at the charred remains, muttering that I would never again trust my skillet. Then, like a culinary superhero, a friend dared me to cook something that could resurrect my confidence. That dare turned into a quest, and I found myself rummaging through the pantry, eyes flicking to the humble oyster mushrooms that had been sitting in the fridge, forgotten and unappreciated. The moment I saw them, something inside me sparked: these little, delicate caps were the missing puzzle piece that could turn a disaster into a triumph.
Picture this: a bowl of fresh oyster mushrooms, their surfaces glistening like dew on a morning leaf. The air fills with a faint, earthy aroma that instantly transports you to a forest after rain. I whisked buttermilk until it turned frothy, the sound of the whisk echoing like a tiny drum in the kitchen. The sizzling of oil in the pan is the soundtrack of anticipation, a low rumble that says, “It’s happening.” The first bite, a crunchy, golden shell that shatters like thin ice, releases a burst of umami that dances on your tongue and leaves you craving more.
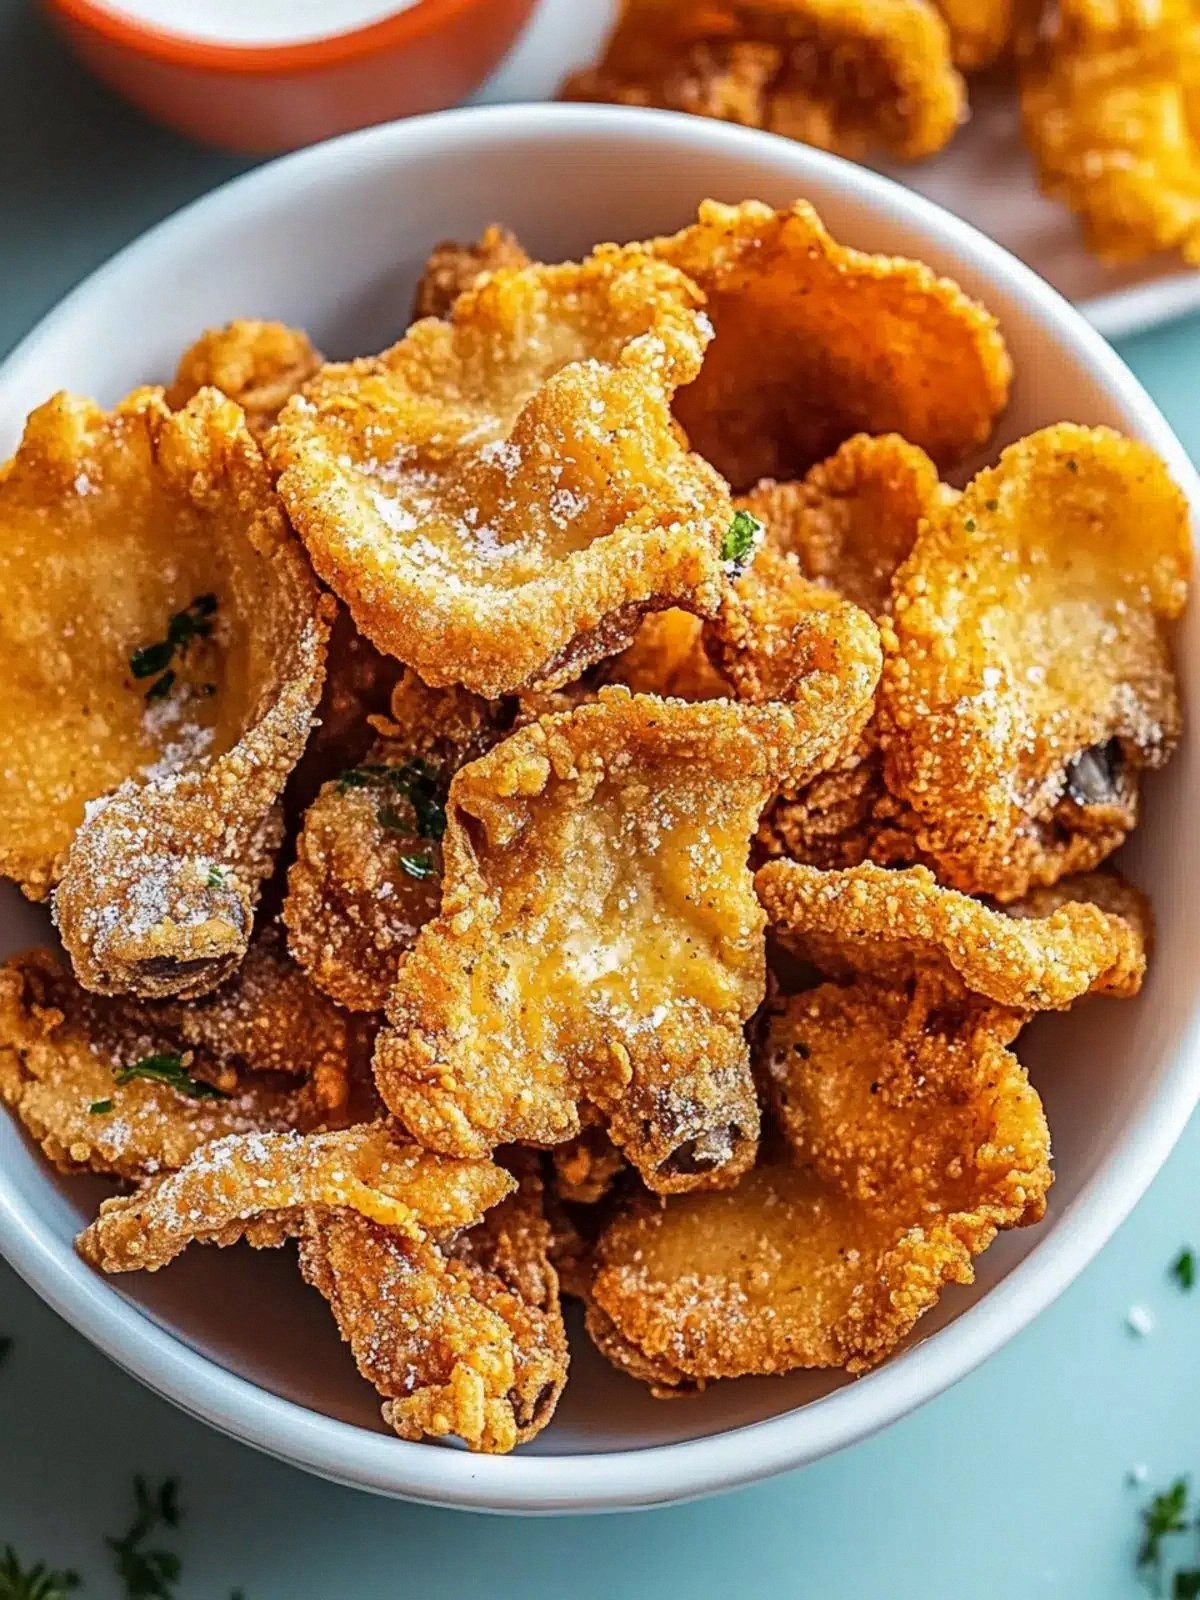
This version of crispy fried oyster mushrooms is the kind of dish that rewrites the rulebook on what a simple appetizer can do. The secret? A buttermilk bath that tenderizes the mushrooms, a spice blend that turns them into a flavor bomb, and a batter that gives them a crisp that’s almost impossible to resist. I dare you to taste this and not go back for seconds. Most recipes get this completely wrong by over‑battering or under‑seasoning, but I’ve cracked the balance that makes the crust sing while the interior stays moist. The result is a bite that feels like a crunchy, savory hug, a texture that feels like a delicate snowflake that melts into a savory, smoky core.
If you've ever struggled with frying mushrooms and ended up with soggy, bland pieces, you're not alone — and I've got the fix. I’ll be honest — I ate half the batch before anyone else got to try it. The moment you pull them out of the pan, the kitchen smells incredible, and the sound of the sizzle is pure magic. Picture yourself pulling this out of the oven, the whole kitchen smelling incredible, and seeing the golden, crisp edges that shatter like thin ice. Let me walk you through every single step — by the end, you'll wonder how you ever made it any other way.
What Makes This Version Stand Out
- Flavor: The blend of smoked paprika, cumin, garlic powder, and onion powder creates a savory, smoky depth that sets this apart from plain fried mushrooms. The buttermilk bath infuses the caps with a subtle tang that balances the richness of the batter.
- Texture: The batter’s crispness is achieved through a precise ratio of flour to buttermilk, giving a light, airy shell that cracks on the first bite, while the mushroom remains tender inside.
- Simplicity: Only ten ingredients, no fancy sauces or complicated steps. It’s a recipe that anyone can master, even in a rush.
- Uniqueness: The combination of buttermilk and spices is rarely seen in mushroom recipes, giving this dish a signature flavor profile that will surprise guests.
- Crowd Reaction: Friends who tried this said it was “the best version you'll ever make at home.” They keep coming back for seconds, and sometimes thirds.
- Ingredient Quality: Fresh, firm oyster mushrooms and high‑quality spices elevate the dish beyond the ordinary fried snack.
- Cooking Method: A quick battering and shallow-frying technique that preserves the mushroom’s delicate texture while creating a crunchy exterior.
- Make‑Ahead Potential: The batter can be pre‑mixed and stored in the fridge for up to 24 hours, making it ideal for parties or week‑night prep.
Alright, let's break down exactly what goes into this masterpiece…
Inside the Ingredient List
The Flavor Base
The buttermilk is the unsung hero that gives the batter a tender, slightly acidic bite, preventing the mushrooms from drying out during frying. It also creates a subtle tang that balances the smoky spices. If you skip the buttermilk, the batter will be denser and the mushrooms may end up a bit drier. A good swap is plain milk with a splash of lemon juice or vinegar to mimic acidity, but the texture won’t be as light.
The Texture Crew
All‑purpose flour is the backbone of the crisp coating. It absorbs the buttermilk and forms a golden shell when fried. If you’re watching carbs, you can replace half of the flour with almond flour for a nutty flavor and lower carbohydrate count. Keep the ratio the same to maintain the right consistency. A common mistake is over‑mixing the batter, which can cause the coating to become gummy.
The Unexpected Star
Smoked paprika and cumin bring a depth of flavor that is rarely found in mushroom dishes. They add a subtle smokiness that pairs perfectly with the earthy mushrooms. If you’re not a fan of smoky flavors, you can replace smoked paprika with regular paprika and add a pinch of chipotle powder for heat. The key is to balance the spices so the mushroom’s natural flavor isn’t overpowered.
The Final Flourish
Salt, pepper, garlic powder, and onion powder round out the flavor profile, giving the mushrooms a savory punch. These spices are essential; skipping them will result in a bland coating. If you prefer a sweeter bite, sprinkle a little brown sugar into the batter for a caramelized edge. The final touch is a quick drizzle of lime juice after frying to brighten the dish.
Everything's prepped? Good. Let's get into the real action…
The Method — Step by Step
- Prep the Mushrooms: Start by gently wiping each oyster mushroom with a damp paper towel to remove any dirt. Trim the stems if they’re long or tough, leaving only the soft cap. Pat them dry again to ensure the batter sticks. This step is crucial; any moisture will make the coating soggy. I’ve seen people skip this and end up with mushy results, which is a total disappointment.
- Make the Buttermilk Bath: In a shallow dish, whisk together 1 cup of buttermilk and a pinch of salt until fully blended. Dip each mushroom into the buttermilk, letting any excess drip off. The buttermilk bath will tenderize the caps and provide a base for the batter to cling to. If you’re in a hurry, you can use cold water with a splash of vinegar as a quick substitute, but the flavor will differ.
- Prepare the Batter: In a separate bowl, combine 1 cup of all‑purpose flour with 1 tsp each of smoked paprika, cumin, garlic powder, onion powder, salt, and pepper. Stir until the spices are evenly distributed. Slowly pour in the buttermilk, whisking continuously until a thick, smooth batter forms. The batter should be thick enough to coat the mushroom without dripping. If it’s too thick, add a splash of milk; if too thin, add a little more flour.
- Heat the Oil: Pour enough oil into a large skillet to reach about 1/2 inch depth. Heat the oil over medium heat until it reaches 350°F (175°C). You can test the temperature by dropping a small amount of batter into the oil; it should sizzle immediately. If the oil is too hot, the coating will burn before the mushroom cooks through.
- Batter the Mushrooms: Carefully dip each buttermilk‑soaked mushroom into the batter, ensuring a complete coating. Let any excess batter drip back into the bowl. This step is the moment of truth; a thin, even coat ensures the final crunch. I’ve seen people over‑coat and end up with a doughy crust.
- Fry the Mushrooms: Gently place each battered mushroom into the hot oil, working in batches to avoid overcrowding. Fry for 3–4 minutes on each side, or until the coating turns a deep golden brown and the mushrooms are heated through. Flip carefully with tongs to preserve the crispness. The sizzle you hear is the sound of flavor sealing in.
- Drain and Season: Once fried, transfer the mushrooms onto a plate lined with paper towels to absorb excess oil. While still hot, sprinkle a pinch of sea salt and a squeeze of fresh lime juice for brightness. The salt enhances the savory notes, and the lime cuts through the richness. This finishing touch is what separates a good dish from a great one.
- Serve Immediately: Plate the mushrooms on a warm platter and serve hot. The best way to enjoy them is with a dipping sauce like a spicy aioli or a tangy yogurt dip. If you’re feeling adventurous, garnish with chopped cilantro for a fresh contrast. The aroma of the freshly fried mushrooms will have everyone lining up for a bite.
- Enjoy: Take a bite and let the crisp shell crack, revealing a tender, umami‑rich interior. The flavor explosion will keep you coming back for more. I dare you to taste this and not go back for seconds. And now the fun part: you’ve just made a dish that will become your new go‑to appetizer for parties and family dinners alike.
That’s it — you did it. But hold on, I've got a few more tricks that'll take this to another level…
Insider Tricks for Flawless Results
The Temperature Rule Nobody Follows
Many cooks think any medium heat works, but the secret is a steady 350°F. Use a thermometer or test with a small batter drop. If the oil is too hot, the coating burns; too cool, the mushrooms absorb oil and become greasy. I once fried at 300°F, and the result was soggy and bland. The fix? Increase the heat slightly and keep a close eye.
Why Your Nose Knows Best
The aroma of frying batter is a reliable indicator of doneness. When the coating starts to crackle and emit a nutty scent, it’s time to flip. A dull, flat smell means the oil is too hot or the batter is too thick. I’ve used this rule for years, and it saves me from burnt edges. Trust your nose; it’s a seasoned chef’s best friend.
The 5‑Minute Rest That Changes Everything
After battering, let the coated mushrooms rest for 5 minutes. This allows the batter to set and reduces the chance of it falling off during frying. It also lets the mushrooms absorb some of the buttermilk, making them juicier. A friend once skipped this step and the coating fell apart mid‑fry. The rest is a small time investment for a huge payoff.
Use Fresh Spices for Extra Depth
Ground spices lose potency over time. Store them in a dark, airtight container to preserve flavor. If you’re using pre‑ground spices that are a year old, consider buying fresh whole spices and grinding them. The difference is subtle but noticeable, especially in a dish that relies on subtle seasoning.
Keep the Oil at the Right Level
When frying, the oil should be deep enough to submerge the mushrooms partially but not fully. This ensures even cooking without excess oil absorption. If you use too little oil, the mushrooms will steam instead of fry. If you use too much, the batter will soak through and become soggy. I’ve learned to measure the oil level by placing a small mushroom in the pan; if it floats, you’ve got enough.
Creative Twists and Variations
This recipe is a playground. Here are some of my favorite ways to switch things up:
Spicy Cajun Crunch
Replace smoked paprika with Cajun seasoning and add a pinch of cayenne for heat. The result is a fiery, smoky bite that pairs well with a cooling yogurt dip. Great for summer barbecues where you want a little spice to wake up the palate.
Herb‑Infused Delight
Add chopped fresh thyme and rosemary to the batter for an earthy aroma. The herbs complement the mushroom’s natural flavor and add a sophisticated note. Serve with a lemon‑herb aioli to balance the richness.
Cheesy Cheddar Twist
Mix shredded sharp cheddar into the batter before coating. The cheese melts slightly, creating a gooey center beneath the crisp shell. Pair with a spicy salsa for a Mexican‑inspired appetizer.
Sriracha Honey Glaze
Drizzle a mixture of honey and sriracha over the fried mushrooms right after they come out of the oil. The glaze adds a sweet heat that contrasts with the savory coating. It’s an instant crowd‑pleaser at parties.
Gluten‑Free Version
Swap all‑purpose flour for a gluten‑free blend, such as a rice‑based mix. The texture may be slightly different, but the flavor remains intact. This variation is perfect for guests with dietary restrictions.
Miso‑Marinated Mushrooms
Marinate the oyster mushrooms in a mixture of miso paste, rice vinegar, and a touch of honey before battering. The umami of miso deepens the flavor profile and adds a subtle sweetness. Serve with a sesame dipping sauce for an Asian fusion twist.
Storing and Bringing It Back to Life
Fridge Storage
Place the cooled mushrooms on a plate lined with paper towels and cover loosely with plastic wrap. Store in the refrigerator for up to 2 days. The coating may soften slightly, but it will regain crispness when reheated.
Freezer Friendly
Arrange the fried mushrooms on a baking sheet in a single layer and freeze for up to 3 months. Once frozen, transfer to a resealable bag. This method prevents the mushrooms from sticking together.
Best Reheating Method
Reheat in a preheated oven at 400°F for 8–10 minutes, or until crispy. For a quick fix, use a toaster oven or air fryer. Add a tiny splash of water to the pan before reheating to steam the mushrooms back to perfection. The result is a crunch that’s almost as good as fresh.