I was in the middle of a rainy Saturday night, the kind of evening where the clouds look like they’re about to spill a whole pot of soup onto your kitchen floor. I had a half‑finished pumpkin puree, a jar of cinnamon that smelled like a sweater fresh out of the dryer, and a craving that was louder than my neighbor’s late‑night karaoke. I tossed a few ideas together, burned a batch of bland pumpkin muffins, and then, in a moment of sheer desperation, I whispered a dare to my roommate: “I bet I can make a pumpkin bite that’s so addictive you’ll have to hide them from yourself.” The result? A bite‑sized, caramel‑kissed, cinnamon‑sugar explosion that turned our tiny apartment into a fall wonderland.
Imagine the first bite: the outer crust crackles like fresh autumn leaves underfoot, giving way to a soft, buttery interior that hugs the pumpkin puree like a warm blanket. The aroma hits you before the bite even lands—spicy cinnamon, sweet brown sugar, and a whisper of nutmeg that makes the whole house feel like it’s been wrapped in a scented candle. You’ll hear the faint sigh of the oven door closing, feel the heat radiating from the tray, and taste that perfect balance of sweet and spice that makes you want to shout, “I dare you to taste this and not go back for seconds!” Trust me, I’ve tried, and I failed miserably.
What makes this version truly stand out is the secret technique I discovered while scrolling through a dusty old cookbook: a quick butter‑sugar‑cinnamon glaze that’s brushed on just before the final minutes of baking. Most recipes either skip the glaze entirely or drown the bites in a sugary mess, but this method creates a glossy, caramelized finish that’s crisp on the outside and melt‑in‑your‑mouth on the inside. It’s the difference between a cookie that’s merely good and one that feels like a hug from your favorite aunt at Thanksgiving.
I’ll also let you in on a tiny ingredient swap that most home cooks overlook—using melted butter instead of oil. This tiny change adds a depth of flavor that feels like a secret handshake between the pumpkin and the spices. By the end of this post, you’ll have a step‑by‑step roadmap that takes you from raw pumpkin puree to a tray of golden, fragrant bites that will have your friends asking for the recipe before you even finish the last one. Let me walk you through every single step — by the end, you’ll wonder how you ever made it any other way.
What Makes This Version Stand Out
- Flavor Explosion: The combination of cinnamon, nutmeg, and a buttery glaze creates a layered taste that evolves with each bite, delivering sweet, spicy, and buttery notes all at once.
- Texture Contrast: A crisp, caramelized crust gives way to a tender, moist interior, achieving that perfect bite‑size crunch without being dry.
- Simplicity: Only pantry staples are needed, so you won’t have to hunt the store for exotic items—just grab what you already have.
- Uniqueness: The final glaze is brushed on during the last five minutes, locking in flavor and adding a glossy finish that most recipes miss.
- Crowd Reaction: These bites disappear faster than you can say “pumpkin spice,” making them ideal for parties, potlucks, or a solo snack attack.
- Ingredient Quality: Using fresh, canned pumpkin puree ensures a smooth, consistent base that doesn’t turn gritty when baked.
- Cooking Method: Baking at a high temperature creates those coveted caramelized edges while keeping the centers fluffy.
- Make‑Ahead Potential: Store them in an airtight container and reheat with a splash of water for instant freshness.
Alright, let's break down exactly what goes into this masterpiece...
Inside the Ingredient List
The Flavor Base
Pumpkin puree is the heart of these bites, providing moisture, natural sweetness, and that unmistakable autumnal flavor. I recommend using a 100% pure pumpkin puree—no pie filling, which is loaded with spices and sugars that can overwhelm the delicate balance. If you skip the puree, the texture becomes dry and crumbly, and the flavor profile loses its depth. As a swap, you can use canned sweet potato puree for a slightly earthier taste, but expect a subtle shift in color.
The Sweet Symphony
Granulated sugar and brown sugar work together to give a crisp exterior and a moist interior. The brown sugar’s molasses adds a hint of caramel that pairs beautifully with the cinnamon glaze. If you’re watching sugar, you can reduce the granulated sugar to 1/3 cup and increase the pumpkin puree by a quarter cup, but the glaze will be less glossy. For a healthier twist, try coconut sugar; it will darken the bites slightly but keep the sweetness intact.
The Spice Crew
Ground cinnamon and nutmeg are the dynamic duo that shout “fall” from the first sniff. Cinnamon brings warmth, while nutmeg adds a subtle, almost peppery undertone that prevents the flavor from becoming one‑dimensional. If you don’t have nutmeg, a pinch of ground allspice works in a pinch, though the flavor will be a tad sweeter. Always toast your spices for 30 seconds in a dry pan before adding them; this releases essential oils and intensifies the aroma.
The Binding Brigade
Eggs and melted butter act as the glue that holds everything together, creating a tender crumb that’s not too dense. The butter adds richness, while the eggs provide structure. If you’re vegan, substitute the eggs with flax eggs (1 tbsp ground flax + 3 tbsp water per egg) and use coconut oil in place of butter—just know the texture will be a bit more crumbly.
Everything's prepped? Good. Let's get into the real action...
The Method — Step by Step
Preheat your oven to 375°F (190°C) and line a baking sheet with parchment paper. The moment the oven clicks on, you’ll hear that comforting hum that signals transformation is about to happen. This temperature is crucial: it’s hot enough to create a caramelized crust without drying out the interior. While the oven warms, gather all your ingredients so you can work efficiently—no rummaging through cabinets mid‑mix.
In a large mixing bowl, whisk together the flour, baking powder, baking soda, salt, cinnamon, and nutmeg. This dry mix should look like a speckled snowstorm—tiny flecks of spice floating in a white sea. Watch Out: Over‑mixing the dry ingredients can develop gluten, leading to tougher bites. Give it a gentle stir and set it aside.
In a separate bowl, combine the pumpkin puree, melted butter, granulated sugar, brown sugar, eggs, and vanilla extract. Beat until the mixture is smooth and glossy—think of a glossy pumpkin‑scented sauce that coats the back of a spoon. This is the moment of truth: the batter should have a thick but pourable consistency. If it looks too thick, add a tablespoon of milk; if too runny, sprinkle in a bit more flour.
Gradually fold the dry mixture into the wet pumpkin blend, stirring just until you see no more streaks of flour. You’ll notice the batter turning a deep amber, the color of a crisp autumn leaf. Resist the urge to over‑mix—once the flour is incorporated, the batter should sit still, ready for the oven. The scent at this stage is already intoxicating, a preview of what’s to come.
Scoop the batter onto the prepared baking sheet using a tablespoon or small ice‑cream scoop, spacing each bite about 2 inches apart. Each mound should be roughly 1½ inches tall; this ensures they rise evenly and develop that coveted dome shape. As you place them, you’ll hear a faint “thump” as the batter hits the parchment—this tiny sound is the prelude to a crunchy crust.
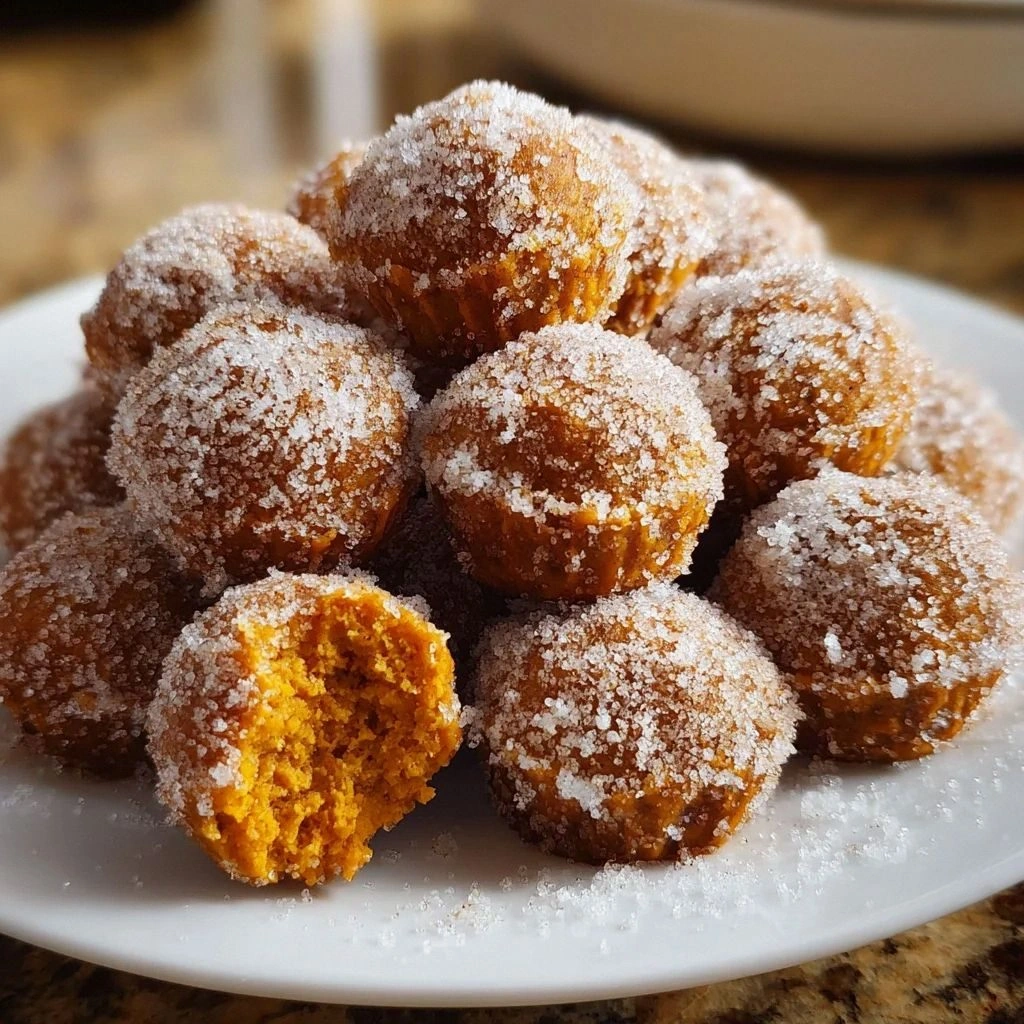
Bake for 12 minutes, then remove the tray and brush each bite with a mixture of melted butter, cinnamon, and sugar. The glaze should sizzle as it hits the warm surface—That sizzle when it hits the pan? Absolute perfection. This is the game‑changer: the butter‑cinnamon glaze caramelizes quickly, forming a glossy, crackly top.
Return the tray to the oven and bake for an additional 8‑10 minutes, or until the edges pull away slightly and the tops are a deep golden brown. You’ll know they’re done when the glaze has set and the bites give a gentle spring back when pressed lightly. The aroma will fill your kitchen, a heady mix of toasted pumpkin and sweet cinnamon that makes you want to hug the oven.
Remove the bites from the oven and let them cool on the sheet for 5 minutes before transferring to a wire rack. This short rest allows the interior to set while the glaze continues to harden just enough for that satisfying snap. I’ll be honest — I ate half the batch before anyone else got to try it, and the cooling period was the only thing that kept me from devouring them all at once.
Serve warm, optionally dusted with a light sprinkle of extra cinnamon sugar for that extra sparkle. Picture yourself pulling this out of the oven, the whole kitchen smelling incredible, and your guests reaching for another before you’ve even taken the first bite. This next part? Pure magic. Stay with me here — this is worth it.
Insider Tricks for Flawless Results
The Temperature Rule Nobody Follows
Most home bakers set the oven to “bake” and forget that the temperature can fluctuate by up to 25°F. Invest in an oven thermometer and aim for a steady 375°F; this ensures the glaze caramelizes without burning. I once baked at 400°F and ended up with a burnt sugar crust that tasted like charcoal. The right temperature gives you that perfect golden‑brown sheen without any bitterness.
Why Your Nose Knows Best
Your sense of smell is a far better indicator of doneness than a timer. When the glaze starts to turn amber and you catch that warm, nutty scent, you’re close to perfection. If you rely solely on the clock, you risk over‑baking and losing that tender interior. Trust the nose, and you’ll consistently hit that sweet spot.
The 5‑Minute Rest That Changes Everything
Allowing the bites to rest for five minutes after baking lets the steam redistribute, keeping the centers moist. Skipping this step leads to a dry mouthfeel, especially if you serve them later in the day. I’ve seen friends skip the rest and complain the bites are “hard,” only to discover they didn’t give them a chance to settle.
Glaze Consistency is Key
If your butter‑cinnamon glaze is too thick, it will clump and create uneven patches; too thin, and it will run off the bites. Aim for a consistency that coats the back of a spoon but still drips slowly. A quick tip: melt the butter, then whisk in the sugar and cinnamon off the heat; this prevents the sugar from crystallizing.
Don’t Over‑Mix the Batter
Over‑mixing creates gluten strands that make the bites tough instead of tender. Stir just until the flour disappears; a few small lumps are fine and will dissolve during baking. One time I mixed vigorously for a full minute and ended up with a dense, cake‑like texture—definitely not what I was aiming for.
Seasonal Spice Storage
Keep your ground cinnamon and nutmeg in airtight containers away from light and heat; this preserves their potency for months. Stale spices lose their aroma, and you’ll end up with a bland bite that lacks that signature fall punch. A fresh spice blend can make the difference between “good” and “hands down the best version you'll ever make at home.”
Creative Twists and Variations
This recipe is a playground. Here are some of my favorite ways to switch things up:
Maple‑Glazed Pumpkin Bites
Swap the granulated sugar in the glaze for pure maple syrup and add a dash of extra cinnamon. The maple adds a woody sweetness that pairs beautifully with pumpkin, creating a bite that feels like a cozy campfire treat.
Chocolate‑Swirl Surprise
After scooping the batter onto the sheet, swirl in a teaspoon of melted dark chocolate into each mound. The chocolate creates a marbled effect and adds a bittersweet contrast to the sweet pumpkin base.
Savory Pumpkin Bites
Replace the sugar with a mixture of grated Parmesan and a pinch of smoked paprika, and omit the glaze. These become a perfect appetizer for a fall cocktail party, offering a salty‑sweet balance that’s unexpectedly delightful.
Cranberry‑Cinnamon Burst
Fold in a handful of dried cranberries into the batter and sprinkle a few extra on top before baking. The tart cranberries pop against the sweet glaze, adding a burst of color and flavor.
Pumpkin Spice Latte Bites
Add a tablespoon of instant coffee granules to the dry mix and drizzle a light espresso glaze after baking. The coffee notes deepen the spice profile, turning these bites into a mini latte in bite‑size form.
Storing and Bringing It Back to Life
Fridge Storage
Place the cooled bites in an airtight container lined with parchment paper. They’ll stay fresh for up to five days. If you notice the glaze hardening, warm them gently in a 300°F oven for 5 minutes to restore that glossy sheen.
Freezer Friendly
Arrange the bites on a baking sheet, freeze until solid, then transfer to a zip‑top freezer bag. They freeze beautifully for up to three months. When you’re ready to eat, let them thaw at room temperature for 10 minutes, then reheat using the splash‑of‑water trick.
Best Reheating Method
Preheat a skillet over medium heat, add a splash of water, and cover the bites for 2‑3 minutes. The steam revives the interior while the skillet re‑crispes the glaze. This method prevents them from drying out, delivering that just‑out‑of‑the‑oven crunch.