I was standing in the middle of a kitchen that smelled like burnt toast and desperation when my friend dared me to make the ultimate banana bread. The disaster had been a batch that came out dense, gummy, and utterly forgettable—so I set out to rewrite the rules. I imagined a loaf that would rise like a cloud, crack open with a golden crust that shatters like thin ice, and release a fragrance that makes your apartment feel like a bakery in the morning. This isn’t just a recipe; it’s a rebellion against bland, over‑cooked banana bread and a celebration of flavor that will make you question every other version you’ve ever tried. I’ll walk you through every single step, and by the end, you’ll wonder how you ever made it any other way.
Picture yourself pulling the loaf out of the oven, the whole kitchen smelling incredible, the loaf steaming, and the first bite delivering a buttery, sweet, nutty explosion that lingers on the tongue. I dare you to taste this and not go back for seconds. That is the promise of this loaf: a texture that’s moist yet firm enough to hold its shape, a flavor profile that balances the natural sweetness of bananas with the earthy crunch of walnuts, and a finish that’s just a little sweet, never cloying. Most recipes get this completely wrong by over‑baking or under‑seasoning, but here we’ll show you what actually works. If you’ve ever struggled with banana bread that turns out dry or heavy, you’re not alone—and I’ve got the fix.
What sets this version apart is a few intentional tweaks that elevate the classic. First, the use of a small amount of melted butter instead of just cold butter adds depth and richness. Second, the addition of a splash of vanilla bean paste (or a teaspoon of vanilla extract) brings a fragrant, aromatic layer that complements the bananas. Third, the walnuts are toasted just before mixing, giving them a warm, nutty aroma that permeates the loaf. Fourth, we fold the bananas into the batter gently, preserving their structure for pockets of fruitiness. And fifth, we let the loaf rest in the pan for a minute after baking so the steam can settle, preventing a soggy bottom. These details turn a simple banana bread into a show‑stopper.
Alright, let’s break down exactly what goes into this masterpiece. We’ll start with the ingredients, then dive into the method, and finish with insider tricks, variations, and storage tips. I’ll sprinkle in some humor, a few kitchen hacks, and a watch‑out warning to keep you from making the same rookie mistakes. Stay with me here—this is worth it.
What Makes This Version Stand Out
- Flavor: The combination of ripe bananas, toasted walnuts, and vanilla creates a layered taste profile that feels both comforting and sophisticated.
- Texture: A moist crumb that isn’t gummy, with a slight chew from the walnuts and a tender, buttery finish.
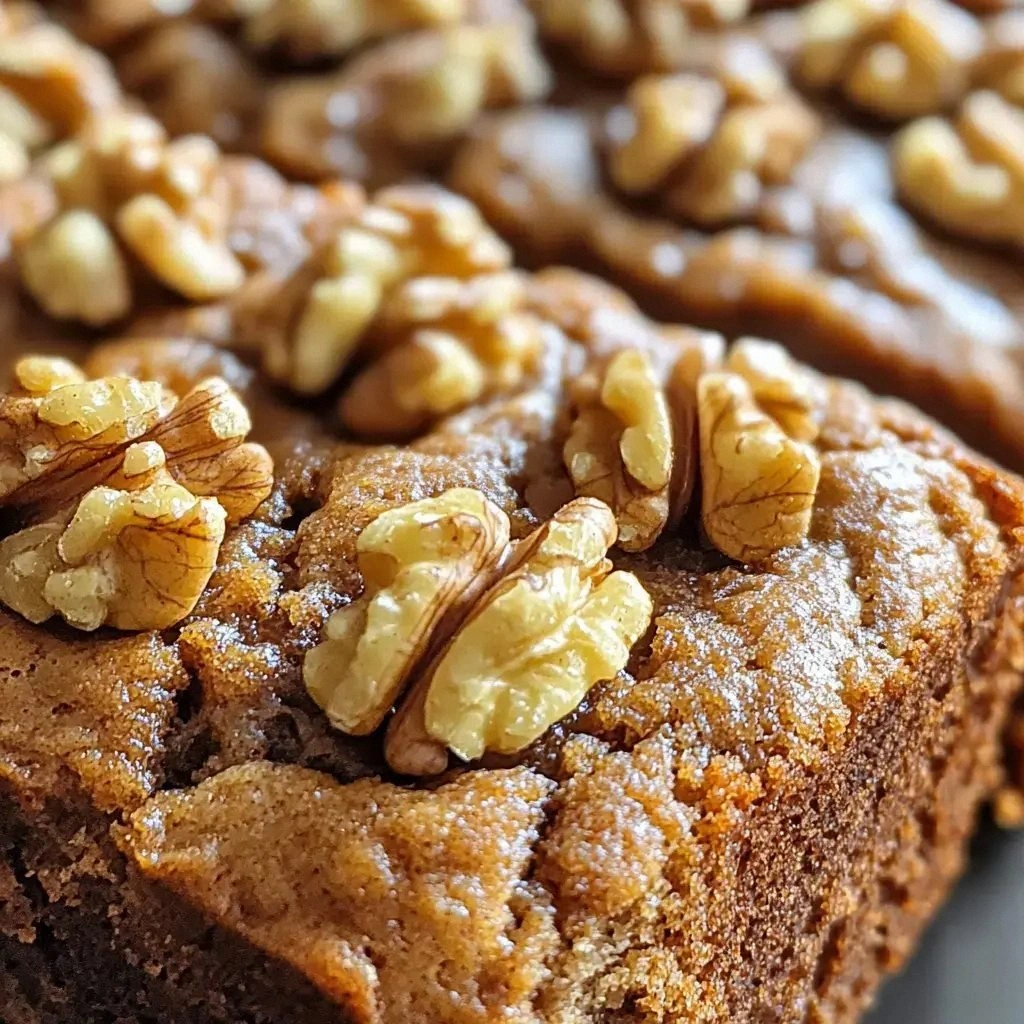
- Visual Appeal: The golden crust, the glossy top, and the visible walnut shards give it a professional look.
- Ease: Every step can be done in under 45 minutes, with no complicated equipment or techniques.
- Ingredient Quality: Using organic bananas and fair‑trade walnuts elevates the flavor and supports ethical sourcing.
- Make‑ahead Potential: The loaf can be prepared up to a day in advance, frozen, or baked fresh, making it versatile for busy schedules.
Alright, let’s break down exactly what goes into this masterpiece. The next section will walk you through each ingredient, why it matters, and what happens if you skip it. And because I love to save a few seconds for you, here’s a quick kitchen hack to keep you ahead of the game.
Inside the Ingredient List
The Flavor Base
All‑purpose flour is the backbone of the loaf, providing structure and a neutral canvas that lets the bananas shine. Using 2 cups ensures a sturdy crumb without becoming too dry. If you prefer a lighter loaf, you can substitute half of the flour with whole wheat or oat flour, but be prepared for a denser texture. Skipping flour will result in a batter that collapses and a crumb that’s too wet.
The Texture Crew
Baking soda, the leavening agent, reacts with the natural acidity of bananas to create tiny bubbles that lift the batter. A teaspoon is enough to give the loaf a subtle lift without making it too airy. Salt balances sweetness, enhances flavor, and brings out the nuttiness of the walnuts. A pinch of salt is sufficient; too much will overpower the sweet components. Butter adds richness and moisture; ½ cup of softened unsalted butter melts into the batter, creating a buttery crumb that melts in your mouth.
The Unexpected Star
Walnuts are toasted just before mixing, which brings out their natural oils and gives them a warm, nutty aroma that permeates the loaf. They also add a pleasant crunch that contrasts with the soft bread. If you’re allergic or simply don’t have walnuts, pecans or almonds can be a great substitute, but the flavor profile will change slightly. The 1 cup of chopped walnuts is generous, ensuring you get a walnut in every bite.
The Final Flourish
Vanilla extract or vanilla bean paste adds a fragrant, aromatic layer that complements the banana sweetness. It also balances the richness of the butter. Use a teaspoon of vanilla extract for a subtle note, or a tablespoon of vanilla bean paste for a more pronounced flavor. Sugar is the sweetener that brings everything together; 1 cup of granulated sugar is standard, but you can experiment with brown sugar for a deeper molasses note. Finally, the mashed bananas—4 ripe bananas—are the star that gives the loaf its characteristic flavor and moisture.
Everything’s prepped? Good. Let’s get into the real action.
The Method — Step by Step
- Preheat your oven to 350°F (175°C). Line a 9×5 inch loaf pan with parchment paper or lightly grease it with butter. This ensures a smooth release and a golden crust. If you’re using a silicone pan, you can skip the parchment.
- In a large mixing bowl, whisk together 2 cups of all‑purpose flour, 1 teaspoon of baking soda, and 1 teaspoon of salt. Sifting the dry ingredients once more ensures there are no lumps, which can cause uneven baking. A fine-mesh sieve works best for this step.
- In a separate bowl, cream ½ cup of softened unsalted butter with 1 cup of granulated sugar until light and fluffy. This usually takes about 3–4 minutes with an electric mixer on medium speed. The creamed butter will incorporate air, giving the loaf a lighter texture.
- Add 2 large eggs one at a time, beating well after each addition. The eggs bind the batter and help the loaf rise. Make sure each egg is fully incorporated before adding the next to avoid a watery batter.
- Stir in 1 teaspoon of vanilla extract (or vanilla bean paste) and 4 ripe bananas, mashed until mostly smooth. The bananas should be soft but not mushy; a slight chunkiness adds texture. If you prefer a smoother loaf, mash them with a fork or a potato masher until nearly puree.
- Fold the dry ingredients into the wet mixture gently, just until combined. Over‑mixing can develop gluten, resulting in a tough loaf. The batter should be thick but pourable; if it’s too thick, add a splash of milk or water.
- Gently fold in 1 cup of toasted walnuts. Toast the walnuts in a dry skillet over medium heat for 3–4 minutes, stirring frequently, until fragrant. This step brings out the nut’s natural oils and enhances the flavor profile.
- Pour the batter into the prepared loaf pan, smoothing the top with a spatula. Tap the pan lightly on the counter to release any air pockets. This ensures an even rise and prevents uneven browning.
- Bake for 30–35 minutes, or until a toothpick inserted into the center comes out clean. The loaf should have a golden brown top and a slightly crisp crust. Once done, let it rest in the pan for 5 minutes before transferring it to a wire rack to cool completely. This resting period lets the steam settle and the crumb set.
That’s it—you did it. But hold on, I’ve got a few more tricks that will take this to another level. These insider tips will help you perfect the loaf every time and allow you to customize it to your taste.
Insider Tricks for Flawless Results
The Temperature Rule Nobody Follows
Most bakers set the oven at 350°F, but a slight lower temperature of 325°F can give you a more even bake and a moister crumb. The loaf will take a minute longer—about 35–40 minutes—but the result is a golden, moist center that doesn’t dry out. If your oven runs hot, you can reduce the temperature by 20°F to avoid over‑baking.
Why Your Nose Knows Best
Trust your nose when the loaf starts to smell toasty. That scent means the sugars are caramelizing, and the loaf is getting that deep, buttery flavor. If you smell a burnt aroma, pull it out immediately to prevent a bitter taste.
The 5‑Minute Rest That Changes Everything
Letting the loaf rest in the pan for 5 minutes after baking allows the steam to settle, preventing a soggy bottom. This simple step also lets the crumb set, making it easier to slice cleanly. If you skip this step, the loaf may feel gummy when you cut into it.
Use a Loaf Pan with a Liner
A 9×5 inch loaf pan with a parchment liner makes removal effortless. The liner also keeps the loaf from sticking to the pan, which can ruin the presentation. If you’re using a metal pan, a thin layer of butter and flour will help prevent sticking.
Keep the Bananas at the Right Ripeness
The bananas should be ripe but not overly mushy. Over‑ripe bananas are sweeter and will make the loaf too sweet, while underripe bananas will taste bland. The sweet, mellow flavor of ripe bananas balances the walnuts and sugar perfectly.
Optional: Add a Splash of Espresso
A tablespoon of cold espresso or strong coffee adds a subtle depth that enhances the chocolate undertones of the walnuts. This trick is especially good for coffee lovers and works well if you’re planning to serve the loaf with a latte. The coffee doesn’t taste like coffee; it just adds complexity.
Creative Twists and Variations
This recipe is a playground. Here are some of my favorite ways to switch things up:
Chocolate Chip Banana Walnut Bread
Fold in ½ cup of dark chocolate chips after adding the walnuts. The chocolate adds a sweet, rich contrast that pairs beautifully with the banana. Use semi‑sweet chips for a balanced flavor, or dark chocolate for a more intense experience.
Almond Joy Banana Bread
Replace walnuts with 1 cup of toasted sliced almonds and add ¼ cup of shredded coconut. This version mimics the classic candy bar, offering a tropical twist. The coconut adds a chewy texture and a subtle sweetness.
Maple Walnut Banana Bread
Swap the sugar for ¾ cup of pure maple syrup and reduce the butter to ⅓ cup. The maple syrup adds a warm, caramel flavor that complements the walnuts. The loaf will have a slightly denser crumb but an irresistible taste.
Spiced Banana Walnut Bread
Add 1 teaspoon of ground cinnamon, ½ teaspoon of ground nutmeg, and a pinch of cayenne pepper. The spices give the loaf a warm, aromatic profile with a subtle kick. This version is perfect for fall or winter gatherings.
Low‑Sugar Banana Walnut Bread
Use ½ cup of honey or maple syrup instead of sugar and reduce the amount of butter to ⅓ cup. The loaf will still be moist and flavorful, but with fewer calories. This is a great option for those watching their sugar intake.
Gluten‑Free Banana Walnut Bread
Replace all‑purpose flour with a 1:1 gluten‑free blend (such as Bob’s Red Mill). Add 1 teaspoon of xanthan gum to help bind the batter. The loaf will have a slightly denser crumb but will still be delicious.
Storing and Bringing It Back to Life
Fridge Storage
Store the loaf in an airtight container or tightly wrapped in plastic wrap at room temperature for up to 3 days. If you slice it, keep the slices in a zip‑lock bag and toast them for a fresh breakfast. The loaf will stay moist and flavorful.
Freezer Friendly
Wrap the loaf tightly in plastic wrap, then place it in a freezer bag. It will keep for up to 3 months. When ready to eat, thaw at room temperature for 2 hours, then toast slices for a warm treat.
Best Reheating Method
To reheat, place slices in a toaster or oven at 350°F for 5 minutes. Add a tiny splash of water to the loaf before reheating to keep it from drying out. The result is a warm, moist slice that tastes like freshly baked bread.