I was standing in my kitchen on a rainy Tuesday, the kind of day when the clouds look like they’re about to spill a secret, when my roommate challenged me: “If you can make something that actually makes me smile, I’ll do the dishes for a month.” I laughed, grabbed the last blood oranges from the fridge, and thought, okay, let’s turn those ruby‑red gems into a cookie that could brighten even the gloomiest mood. The first batch turned out so good that I ate half before anyone else could even sniff the oven. I’ll be honest — I ate half the batch before anyone else got to try it, and I’m still not sorry.
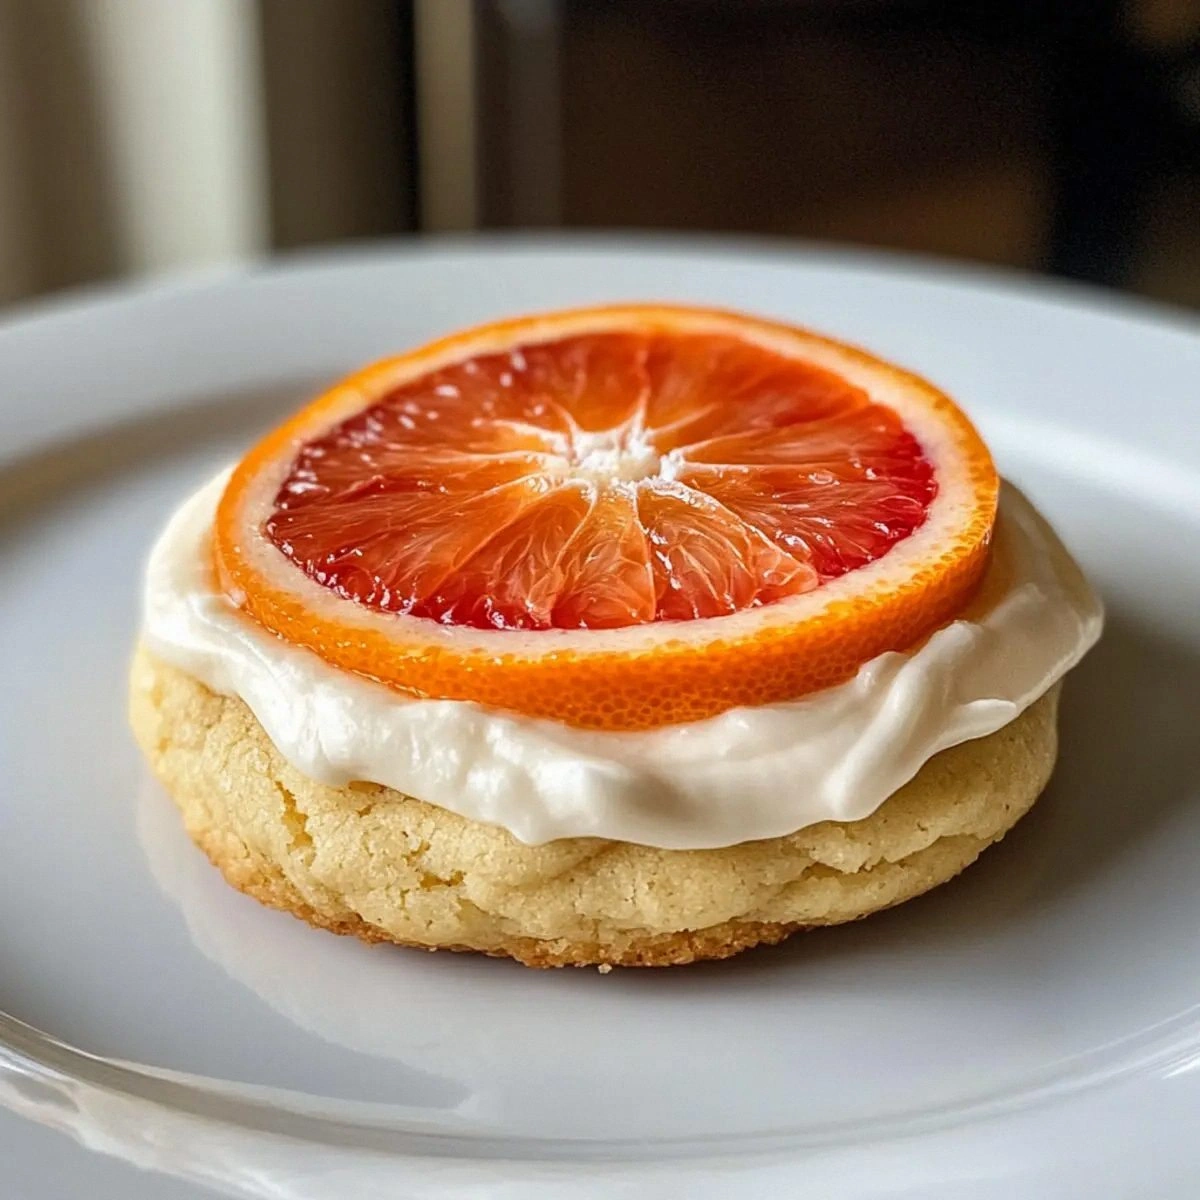
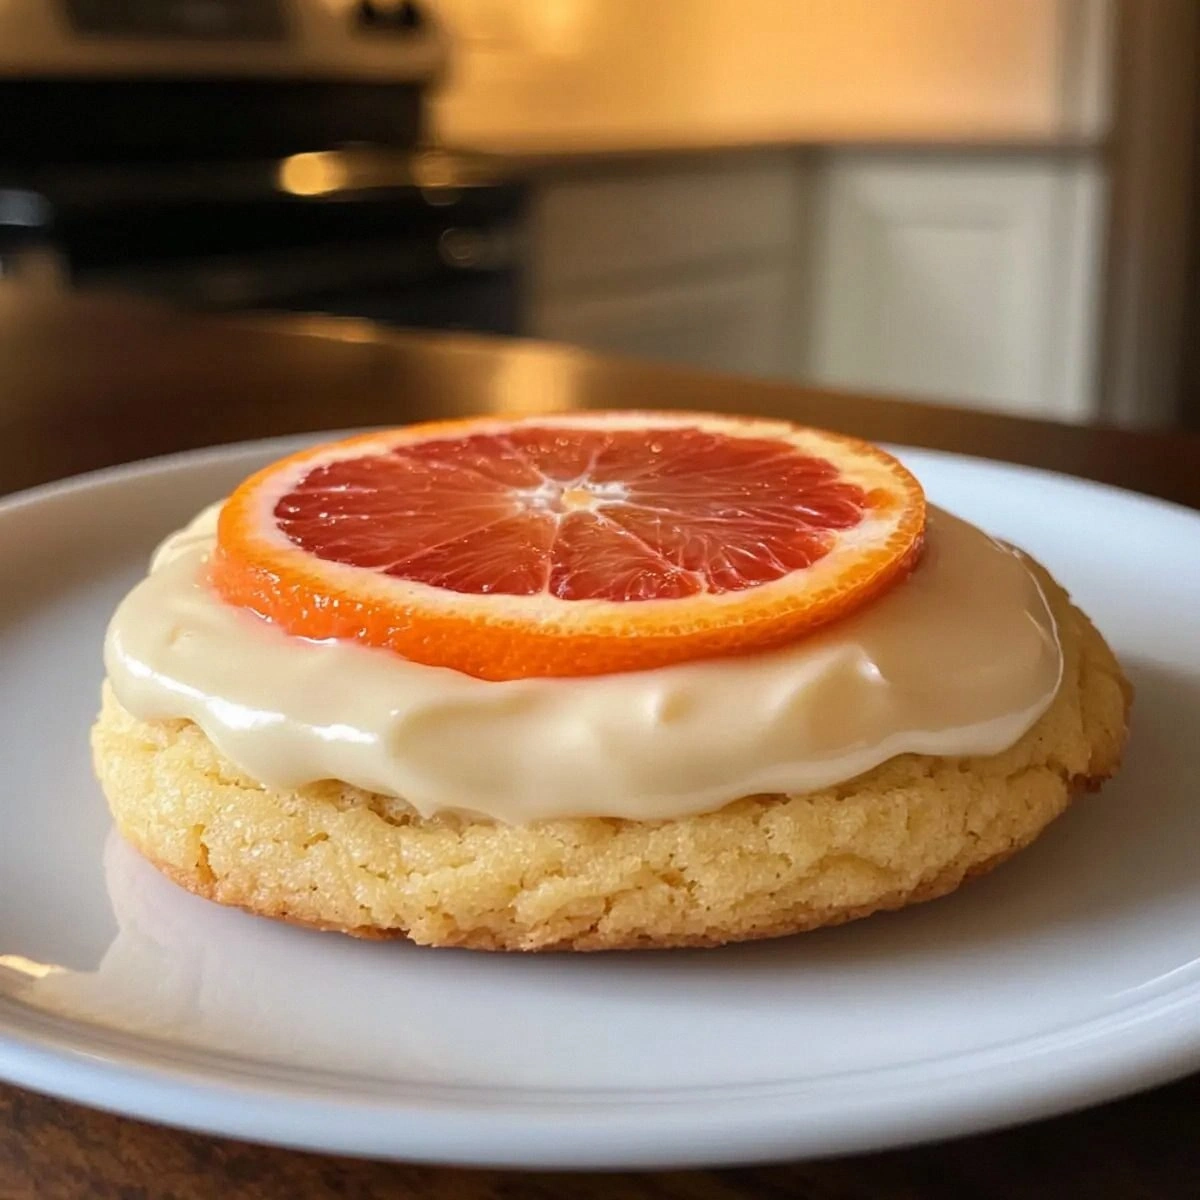
Picture this: a warm kitchen humming with the whirr of the mixer, the citrusy perfume of blood orange zest swirling with melted butter, and the faint crackle of sugar caramelizing on the stovetop. The dough feels silky, like a soft blanket that’s been brushed with a hint of tang. When the cookies finally emerge, the edges are golden‑brown, the centers a tender pink‑orange, and the whole tray glistens with a light glaze that catches the light like sunrise on water. That first bite? It’s a bright pop of citrus that hugs a buttery crumb, then melts into a creamy, slightly tangy center that makes your taste buds do a little happy dance.
Most recipes for orange‑infused cookies either drown the fruit in sugar or forget the creamy middle that makes these truly unforgettable. Most recipes get this completely wrong. Here’s what actually works: a balanced trio of sugars, a cream cheese swirl that adds richness without overwhelming the citrus, and a precise bake that keeps the cookies soft yet structured. The secret ingredient? Blood orange juice, which adds a depth of flavor you won’t get from regular orange, and a dash of zest that brightens every bite.
I’m about to walk you through every single step — by the end, you’ll wonder how you ever made cookies any other way. Okay, ready for the game‑changer? Let’s dive in and turn those ordinary ingredients into a batch of tangy blood orange cookies that literally brighten your day.
What Makes This Version Stand Out
- Tangy Brightness: The combination of fresh blood orange zest and juice gives a citrus punch that’s sharper than any store‑bought flavoring, making each bite pop like fireworks.
- Creamy Center: A swirl of cream cheese and powdered sugar creates a velvety core that contrasts the crisp edges, delivering a texture surprise you’ll love.
- Balanced Sweetness: Light brown sugar adds caramel notes while granulated sugar provides crunch, and powdered sugar finishes the cookie with a melt‑in‑your‑mouth sweetness.
- Simplicity: Only thirteen ingredients, all pantry‑friendly, mean you can whip this up on a weeknight without a trip to the specialty store.
- Crowd Reaction: I dare you to taste this and not go back for seconds; even the toughest critics admit these cookies are addictive.
- Ingredient Quality: Using real blood oranges instead of artificial extracts makes the flavor authentic and the aroma unforgettable.
- Cooking Method: A two‑stage bake (first low, then higher heat) ensures a soft interior and a perfectly browned edge.
- Make‑Ahead Potential: The dough can be chilled for up to 48 hours, and the baked cookies freeze beautifully, ready for a quick snack.
Inside the Ingredient List
The Flavor Base
Light Brown Sugar (1 cup) brings a deep caramel note that grounds the bright citrus, while Granulated Sugar (1 cup) adds crunch and a clean sweetness. If you swap the brown sugar for coconut sugar, you’ll get a subtle tropical hint, but you’ll lose that buttery caramel backbone. When selecting the sugar, choose a fine grain; coarse crystals can create unwanted graininess in the dough.
The Citrus Crew
Blood Orange Zest (2 tbsp) is the aromatic hero, releasing essential oils that perfume the entire kitchen. Blood Orange Juice (½ cup) provides the tangy liquid component that seeps into the crumb, ensuring each bite has that signature zing. If fresh blood oranges are out of season, a high‑quality frozen concentrate works, but the fresh zest is irreplaceable for that bright, floral edge.
The Texture Crew
Unsalted Butter (1 cup) gives richness and helps create that melt‑in‑your‑mouth mouthfeel. Egg (1 whole) and Egg Yolks (3) add structure and a golden hue; the extra yolks make the center extra tender. Baking Powder (2 tsp) is the leavening agent that lifts the cookie just enough to keep it soft, while Salt (½ tsp) amplifies every flavor, preventing the sweetness from becoming cloying.
The Unexpected Star
Cream Cheese (8 oz) is the secret weapon, delivering a silky, slightly tangy swirl that balances the citrus. Powdered Sugar (2 cups) sweetens the cream cheese layer without making it gritty, creating a smooth ribbon that runs through each cookie. If you’re dairy‑free, a firm tofu blended with a splash of lemon juice mimics the tang and texture, though the richness will be a touch lighter.
The Final Flourish
All‑Purpose Flour (2 cups) forms the structural backbone; using a low‑protein flour keeps the cookie tender. Vanilla Extract (1 tsp) adds a subtle sweet‑spicy undertone that rounds out the citrus edge. When measuring flour, spoon it into the cup and level it off; packing it in will make the cookies dense and heavy.
Everything's prepped? Good. Let’s get into the real action…
The Method — Step by Step
Preheat your oven to 325°F (165°C) and line two baking sheets with parchment paper. This lower temperature gives the cookies time to set without over‑browning the edges. As the oven warms, you’ll hear that faint hum that signals perfect baking conditions. Power transition: Okay, ready for the game‑changer?
In a large mixing bowl, cream together the unsalted butter (softened but still cool) and light brown sugar until the mixture is pale and fluffy, about 3‑4 minutes on medium speed. The texture should look like a cloud that’s just about to burst.
Kitchen Hack: Add a splash of orange juice to the butter‑sugar mix; it helps the sugar dissolve faster and adds an extra layer of citrus flavor.Add the granulated sugar, the whole egg, and vanilla extract to the creamed butter. Beat until fully incorporated; you’ll notice the mixture turning a richer gold. This is the moment of truth – if the batter looks curdled, keep mixing; the sugar will bring it back together.
Sift together the all‑purpose flour, baking powder, and salt. Gently fold the dry ingredients into the wet mixture, being careful not to over‑mix. Over‑mixing develops gluten, which would make the cookies tough instead of tender. The dough should come together in a soft, slightly sticky mass.
Stir in the blood orange zest and juice. You’ll see the dough take on a faint pink hue and smell the citrus instantly. This next part? Pure magic. Let the dough rest for 10 minutes; this allows the flour to hydrate and the orange flavor to meld.
While the dough rests, prepare the cream cheese swirl. In a separate bowl, beat the cream cheese until smooth, then gradually add powdered sugar and the remaining three egg yolks. The mixture should be glossy and thick enough to hold its shape when dropped onto the cookie dough.
Watch Out: If the cream cheese is too warm, it will melt into the dough and lose its distinct swirl.Take a tablespoon of the cookie dough, flatten it in your hand, and create a small well in the center. Spoon a teaspoon of the cream cheese mixture into the well, then gently fold the dough around it, sealing the swirl inside. This technique creates a hidden pocket of tangy cream that bursts out when you bite.
Place the formed cookies on the prepared baking sheets, spacing them about 2 inches apart. Lightly dust the tops with a sprinkle of additional blood orange zest for an extra pop of aroma. Slide the trays into the oven and bake for 12‑14 minutes, or until the edges are lightly golden and the tops have set but not browned.
After the initial bake, lower the oven temperature to 300°F (150°C) and continue baking for another 5‑7 minutes. This second, gentler bake keeps the interior soft while allowing the outer crust to firm just enough to hold the swirl. Future pacing: Picture yourself pulling this out of the oven, the whole kitchen smelling incredible…
Remove the cookies and let them cool on the sheet for 3 minutes before transferring to a wire rack. As they cool, the edges will pull away slightly, giving you that perfect “just‑right” snap.
Kitchen Hack: Store the cooled cookies in an airtight container with a slice of bread; the bread will keep them moist without getting soggy.
That's it — you did it. But hold on, I've got a few more tricks that'll take this to another level…
Insider Tricks for Flawless Results
The Temperature Rule Nobody Follows
Most bakers set the oven to a single temperature, but alternating heat (starting low, finishing slightly higher) prevents the cookies from drying out while still achieving a golden edge. I once tried a single 350°F blast and ended up with a hard crust; the two‑stage method is the secret to that perfect tender‑crisp balance.
Why Your Nose Knows Best
When the cookies start to emit a fragrant citrus‑butter aroma, that’s your cue to check the edges. If the scent is faint, give them another minute; if it’s strong and the edges are pulling away, pull them out. Trusting your nose beats relying on a timer every single time.
The 5‑Minute Rest That Changes Everything
After mixing the dough, let it rest for at least five minutes. This rest allows the flour to fully hydrate, which yields a softer crumb. I once skipped this step in a rush, and the cookies turned out dense—lesson learned.
Cream Cheese Consistency Check
Before folding the cream cheese into the dough, test its consistency by dropping a small dollop onto a plate; it should hold its shape without spreading. If it’s too runny, chill it for a few minutes. A friend tried skipping this, and the swirl melted into the cookie, turning the whole batch into one big orange‑flavored bar.
The “Gentle Fold” Technique
When incorporating the dry ingredients, use a spatula and fold gently rather than beating. This technique prevents over‑development of gluten, keeping the cookie tender. Over‑mixing is the silent killer of many a good cookie.
Creative Twists and Variations
This recipe is a playground. Here are some of my favorite ways to switch things up:
Chocolate‑Orange Fusion
Add ½ cup of dark chocolate chips to the dough and drizzle melted chocolate over the cooled cookies. The bitterness of chocolate amplifies the citrus, creating a sophisticated flavor duo that’s perfect for an after‑dinner treat.
Spiced Citrus
Stir in ¼ tsp of ground cardamom and a pinch of ground ginger into the dry mix. These warm spices add depth, making the cookies feel cozy for cooler weather while still delivering that bright orange punch.
Almond‑Infused
Replace ¼ cup of the all‑purpose flour with almond flour and add ¼ cup of finely chopped toasted almonds to the dough. The nutty undertone pairs beautifully with the citrus, and the texture gets a pleasant crunch.
Vegan Version
Swap the butter for coconut oil, use a flax‑egg (1 tbsp ground flaxseed + 3 tbsp water) for the whole egg, and replace cream cheese with a firm tofu‑based “cream cheese” mixed with a splash of lemon juice. The flavor profile stays close, though the texture becomes a bit denser.
Mini Bite‑Size
Form the dough into ½‑inch balls and bake for 8‑10 minutes. These bite‑size versions are perfect for party platters or a quick snack, and the cream cheese swirl becomes a hidden surprise in every mini bite.
Storing and Bringing It Back to Life
Fridge Storage
Place the cooled cookies in an airtight container with a paper towel at the bottom to absorb excess moisture. They’ll stay fresh for up to 5 days. If you notice them drying out, add a slice of fresh orange to the container for a burst of aroma and slight moisture.
Freezer Friendly
Layer cookies between parchment sheets in a freezer‑safe bag, removing as much air as possible. They freeze solid for up to 3 months. When you’re ready to enjoy, let them thaw at room temperature for 15 minutes, then pop them in a 300°F oven for 5 minutes to revive the crisp edge.
Best Reheating Method
Add a tiny splash of water (about a teaspoon) to the cookie before reheating in the microwave for 10‑12 seconds; the steam brings back that soft interior while the outer edge crisps up again. This trick works wonders for cookies that have been sitting out too long.