
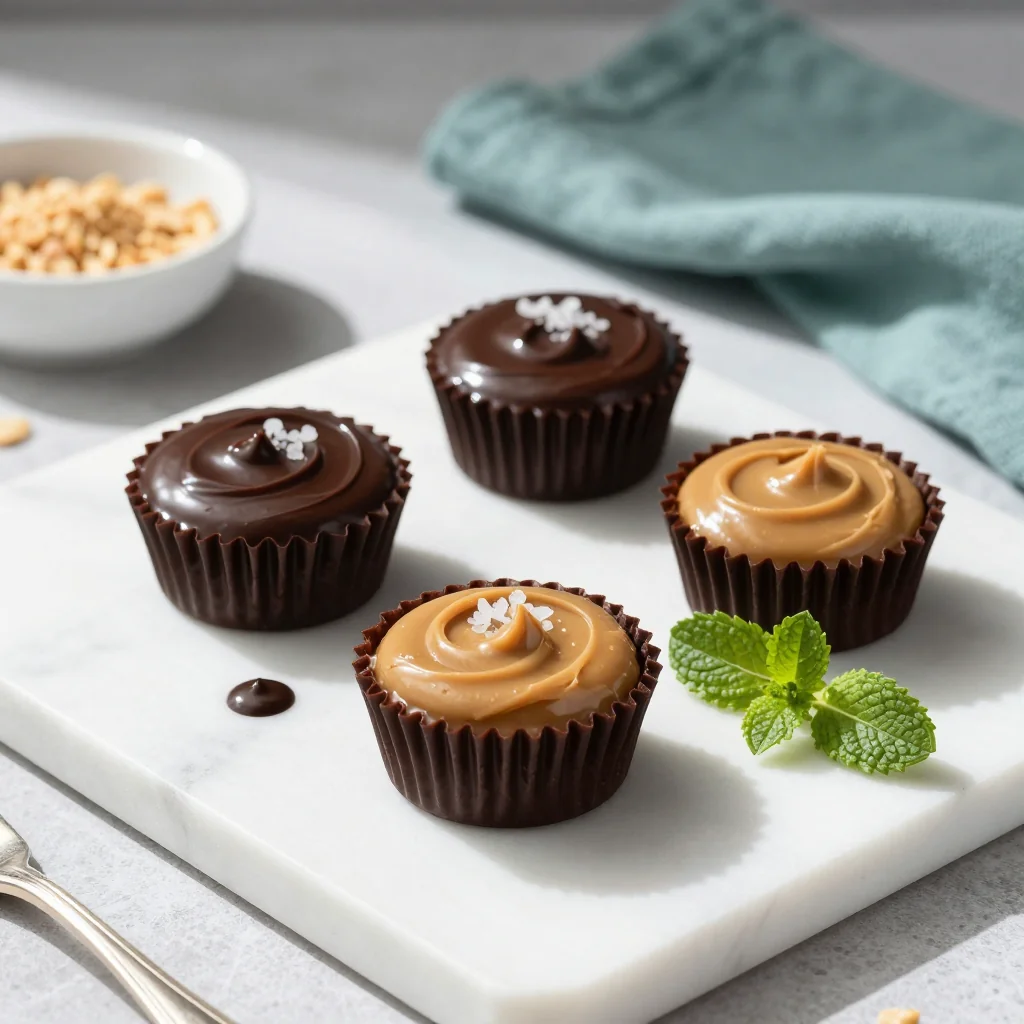
Indulge in silky homemade chocolate shells filled with a creamy, salty‑sweet peanut butter center – a timeless treat that never fails to delight.
There’s something magical about the first bite of a peanut butter cup – the crisp snap of chocolate, the velvety rush of peanut butter, and that whisper of salt that makes every sense sing. I still remember the first time I tried a store‑bought version at a summer fair; the flavor lingered in my mind long after the fair lights dimmed, and I vowed to recreate that perfection in my own kitchen. Years later, after countless experiments with tempering chocolate and balancing the sweet‑salty ratio, I finally nailed a version that rivals any confectionery shop.
Peanut butter cups have roots in classic American candy culture, originating in the 1960s when the combination of smooth peanut butter and rich chocolate became a staple of movie‑theater snacks. Today they’re a beloved treat for all ages, perfect for celebrations, movie nights, or a simple afternoon indulgence. By making them at home, you gain full control over the ingredients, allowing you to use premium chocolate, natural peanut butter, and even tweak the sweetness to your liking.
This guide will walk you through every step – from tempering the chocolate to achieving the perfect glossy finish, to crafting a luscious peanut butter filling that’s neither too sweet nor too salty. You’ll learn how to scale the recipe, substitute ingredients for dietary needs, and store the cups so they stay fresh for weeks. By the end, you’ll have a batch of gorgeous, melt‑in‑your‑mouth peanut butter cups that you can proudly call your own.
So roll up your sleeves, preheat the oven (just kidding, no oven needed for the shells), and let’s dive into the delicious world of homemade chocolate delights!
🌟 Why This Recipe Will Captivate You
From the moment you taste the silky chocolate to the lingering peanut butter afterglow, this recipe delivers a perfect harmony of textures and flavors that keep you reaching for more.
- ✨ Perfect Balance of Sweet and Salty: The subtle sea‑salt crystals on the chocolate shell enhance the natural richness of the peanut butter, creating a sophisticated taste experience.
- ✨ No Baking Required: All steps are hands‑on, which means you can make these treats any time of year, even in apartments without ovens.
- ✨ Customizable Sweetness: By adjusting the amount of sugar in the filling, you can tailor each cup to your personal sweet spot – from light and airy to decadently sweet.
- ✨ High‑Quality Ingredients: Using premium dark chocolate (70% cacao) and natural peanut butter ensures a clean flavor profile without artificial additives.
- ✨ Great for Gifting: Packaged in a decorative tin or a simple mason jar, these cups become an elegant homemade gift for birthdays, holidays, or thank‑you gestures.
- ✨ Fun to Make with Kids: The process of spooning filling and tapping chocolate shells is a safe, mess‑controlled activity that kids love, fostering culinary confidence.
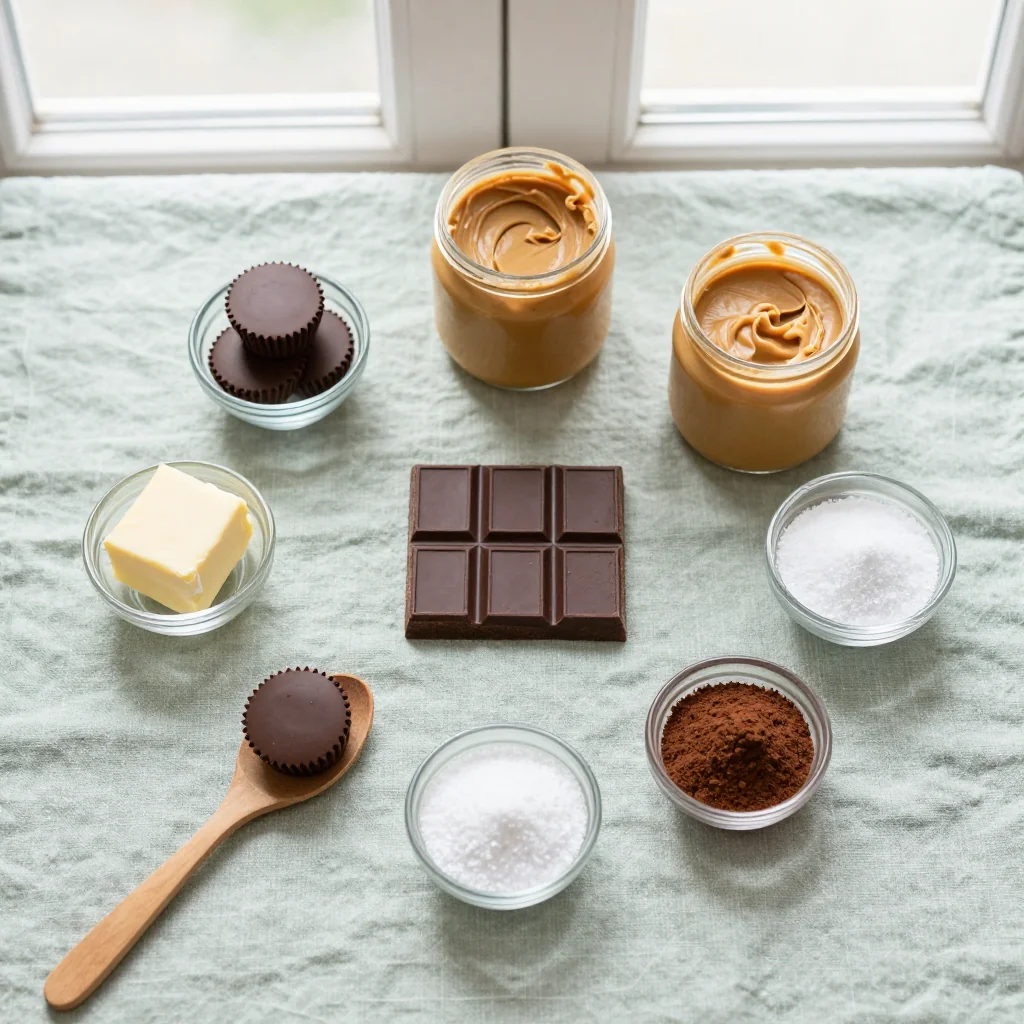
🥗 Ingredients
📝 Complete Ingredient List
For the Chocolate Shells:
For the Peanut Butter Filling:
Optional Topping:
🔍 Focus on Key Ingredients
Dark Chocolate (70% cacao)
This chocolate provides a deep, slightly bitter base that balances the sweetness of the filling. Look for a bar with minimal added sugar and no artificial flavors. The higher cocoa content also means more antioxidants and a smoother melt when tempered.
Natural Peanut Butter
Choosing a natural peanut butter ensures a pure nutty flavor without the waxy texture that some commercial brands add. It also contains healthy monounsaturated fats, making the filling creamy yet not overly greasy.
Coconut Oil (optional)
Adding a teaspoon of coconut oil to the chocolate gives it a glossy finish and makes the shells easier to release from the molds. If you prefer a firmer bite, you can omit the oil entirely.
🔄 Quick Substitutions
| If you don’t have... | Use instead... |
|---|---|
| Dark chocolate (70% cacao) | Milk chocolate (for sweeter cups) or 60% dark chocolate |
| Natural peanut butter | Almond butter (for a nutty twist) or cashew butter |
| Coconut oil | Vegetable oil or omit entirely |
👨🍳 Step‑by‑Step Instructions
Follow these detailed steps to create perfectly shaped chocolate shells and a silky peanut butter filling that will impress any chocolate lover.
📋 Phase 1: Preparation & Setup
Gather your tools and prepare the work area before you start melting chocolate.
Prepare the silicone molds
Arrange a 12‑cavity silicone muffin or cupcake mold on a clean countertop. Ensure each cavity is level; if any are tilted, gently press them flat with your fingertips. This will guarantee uniform chocolate shells and a professional appearance.
Set up a double‑boiler
Fill a medium saucepan with 2 inches of water and bring it to a gentle simmer. Place a heat‑proof bowl on top, making sure the bottom of the bowl does not touch the water. This indirect heat will melt the chocolate evenly without scorching.
🔥 Phase 2: Melting & Assembling
Create glossy chocolate shells and a smooth peanut butter filling.
Melt the dark chocolate
Break the chocolate into small pieces and add them to the bowl over the simmering water. Stir constantly with a silicone spatula until the chocolate reaches 45‑48 °C (113‑118 °F). Remove the bowl from heat and stir in the coconut oil (if using) and a pinch of sea salt. The oil adds shine, while the salt enhances flavor.
Fill the molds with chocolate
Using a small spoon or a pastry bag, pour about 1 tablespoon of melted chocolate into each mold cavity, swirling the bowl to coat the sides evenly. Tap the mold gently on the countertop to release any air bubbles. Return the mold to the refrigerator for 5 minutes to set the first layer.
Prepare the peanut butter filling
In a separate bowl, combine the natural peanut butter, powdered sugar, vanilla extract, and a pinch of sea salt. Mix with an electric hand‑mixer's paddle attachment until the mixture is light, fluffy, and holds its shape. It should be thick enough to hold a spoonful without spreading.
Pipe the filling
Transfer the filling to a pastry bag fitted with a medium round tip. Pipe a generous dollop (about 1 teaspoon) into the center of each chocolate shell, leaving a small gap to the top edge. This space will later be sealed with the final chocolate layer.
Seal the cups
Re‑heat the remaining chocolate if it has thickened. Spoon a thin layer over each filled cup, ensuring the filling is completely covered. Tap the mold lightly again to smooth the surface and eliminate air pockets.
Refrigerate to set
Place the mold back in the refrigerator for at least 20 minutes, or until the chocolate is firm to the touch. Once set, gently pop each cup out of the silicone mold and place them on a parchment‑lined tray.
✨ Phase 3: Finishing Touches & Serving
Add final garnishes and enjoy.
Optional garnish
Sprinkle crushed roasted peanuts and a light dusting of sea‑salt flakes over the tops of the cups for added texture and a burst of flavor. This step is optional but adds a professional finish.
Serve and store
Arrange the cups on a decorative platter and serve at room temperature. If you’re not serving immediately, keep them refrigerated in an airtight container for up to one week.
💡 Expert Tips & Tricks
🛒 Choosing the Best Ingredients
When selecting chocolate, aim for a bar that lists cocoa solids as the first ingredient and contains less than 30% sugar. For peanut butter, read the label carefully – the best choices have only peanuts and maybe a pinch of salt. Avoid brands with added hydrogenated oils, which can make the filling greasy and affect shelf life.
🔪 Preparation Techniques
Shave chocolate with a vegetable peeler rather than chopping it; smaller shards melt more uniformly. When mixing the filling, start on low speed to avoid splattering, then increase to medium‑high until the mixture becomes glossy and holds peaks. This aerates the filling, giving it a lighter mouthfeel.
🌡️ Mastering the Tempering
Temper the chocolate by heating it to 45‑48 °C, then cooling it to 27‑28 °C before gently reheating to 31‑32 °C (for dark chocolate). This process aligns the cocoa butter crystals, resulting in a glossy finish that snaps cleanly. Using a thermometer is essential; visual cues alone can be misleading.
🍽️ Presentation & Service
Serve the cups on a matte black or dark wooden board to make the chocolate shine. Pair them with a small ramekin of sea‑salted caramel sauce for dipping, or a dollop of whipped coconut cream for contrast. A dusting of cocoa powder or edible gold leaf adds a touch of elegance for special occasions.
🏆 Pro Tips
Master chefs understand that the difference between good and spectacular lies in precision, technique, and attention to detail.
- 🎯 Temperature Control is King: Use a digital thermometer for chocolate tempering. Even a 2 °C deviation can cause the chocolate to lose its snap and become dull. Consistent temperature ensures a glossy, crack‑free shell.
- 🎯 Layer Thickness Matters: Aim for a shell thickness of about 2 mm. Too thin and the cup will break; too thick and the chocolate overpowers the peanut butter. Use a spoon to spread the chocolate evenly before it sets.
- 🎯 Air Bubble Elimination: After filling each cavity, gently tap the mold on the countertop three times. This releases trapped air, preventing unsightly bubbles that can weaken the shell.
- 🎯 Flavor Balance: Add a pinch of flaky sea salt on top of each cup just before the final chocolate layer sets. The salt enhances the chocolate’s bitterness and elevates the peanut butter’s natural sweetness.
- 🎯 Portion Scaling: The built‑in portion adjuster lets you increase or decrease servings without recalculating each ingredient manually. The script updates quantities in real time, preserving the recipe’s balance.
- 🎯 Storage Science: Store the cups in a single layer, separated by parchment paper, to avoid sticking. A temperature‑controlled pantry (around 18‑20 °C) keeps the chocolate glossy for longer.
"The secret to great chocolate is patience – let the cocoa butter crystals align, and the flavor will speak for itself." — Jacques Torres
🔄 Variations & Adaptations
Feel free to experiment with flavors, textures, and dietary needs. Below are several creative twists that keep the core concept while offering something new.
🥬 Vegan Version
Replace the dairy‑free dark chocolate with a vegan-certified brand and use a plant‑based peanut butter that contains only peanuts and salt. Swap powdered sugar for coconut sugar for a lower‑glycemic option.
- Substitution 1: Use almond milk chocolate (70% cacao) for a milder flavor.
- Substitution 2: Add 1 tsp of maple syrup to the filling for extra sweetness without refined sugar.
🌶️ Flavor Variations
Play with complementary flavors to suit different palates. The following ideas keep the core structure but introduce exciting taste profiles.
Spicy Chili Version:
Mix ½ tsp of cayenne pepper into the peanut butter filling and sprinkle a tiny pinch of smoked paprika on the top chocolate layer.
Minty Fresh Version:
Add ¼ tsp of peppermint extract to the chocolate melt and garnish each cup with a tiny mint leaf before the chocolate sets.
Matcha Green Tea Version:
Stir 1 tsp of high‑quality matcha powder into the melted chocolate for a subtle earthy note and a vibrant green hue.
⚠️ Dietary Adaptations
Gluten‑Free:
All ingredients are naturally gluten‑free. Ensure any added toppings (e.g., crushed pretzels) are certified gluten‑free if you choose to incorporate them.
Lactose‑Free:
Use dairy‑free dark chocolate and verify that the peanut butter contains no added milk solids.
Low‑Calorie:
Replace half of the dark chocolate with unsweetened cocoa nibs and reduce powdered sugar to 30 g. This cuts calories while maintaining texture.
👶 Kid‑Friendly Version
Kids often prefer sweeter flavors. Use milk chocolate (45% cacao) for the shell, add a drizzle of honey to the filling, and skip the sea‑salt garnish. Serve with a side of sliced strawberries for a colorful, balanced snack.
📦 Storage & Reheating
🧊 Conservation
In the Refrigerator:
- Duration: 7 days
- Recommended container: Airtight glass jar
- Tip: Place a sheet of parchment between layers to prevent sticking.
In the Freezer:
- Duration: 2 months
- Method: Freeze in a single layer on a tray, then transfer to a zip‑top bag.
- Defrosting: Move to the refrigerator overnight; do not microwave directly.
💡 For optimal texture, allow frozen cups to reach room temperature for 10 minutes before serving.
♨️ Reheating
🔥 Oven (Recommended):
- Preheat to 150 °C (300 °F).
- Place cups on a parchment‑lined baking sheet.
- Heat for 5‑7 minutes until the chocolate softens slightly.
- Remove and let cool for 2 minutes before serving.
⚡ Microwave (Quick):
- Place cup on a microwave‑safe plate.
- Heat on medium power for 10‑12 seconds.
- Check softness; repeat in 5‑second bursts if needed.
🍳 Stovetop (Optional):
Wrap the cup in foil and warm in a skillet over low heat for 1‑2 minutes, turning gently. This method is useful for a quick melt without drying out the filling.
🍷 Perfect Pairings
🥗 Side Dishes
- Fresh Berry Salad: A mix of strawberries, blueberries, and mint provides a bright contrast to the rich chocolate.
- Light Citrus Sorbet: The tartness cleanses the palate between bites.
- Roasted Almonds: Adds crunch and reinforces the nutty theme.
🍷 Wine & Beverage Pairings
- Port Wine (Ruby): Its sweet, fruity notes complement the chocolate’s bitterness.
- Cold Brew Coffee: The bitter coffee balances the sweetness and highlights the peanut butter.
- Non‑Alcoholic: Sparkling Apple Cider: The effervescence lifts the dense flavors.
🍰 Completing the Meal
Begin with a light arugula and pear salad dressed with a citrus vinaigrette, follow with the peanut butter cups as a dessert, and finish with a small serving of vanilla bean ice cream topped with a drizzle of caramel sauce for an indulgent finale.
❓ Frequently Asked Questions
Q: Can I use milk chocolate instead of dark chocolate?
Yes, you can substitute milk chocolate for a sweeter, creamier shell. Keep in mind that milk chocolate contains more sugar and less cocoa butter, so the shell will be softer and may require a slightly lower tempering temperature (around 30‑32 °C). The final taste will be less bitter and more kid‑friendly.
Q: How do I know when the chocolate is properly tempered?
After reaching the target temperature, dip a spoon into the chocolate and let it sit for a few seconds. If the chocolate thickens slightly and forms a glossy sheen without streaks, it’s properly tempered. You can also perform the “cold plate test”: spread a thin layer on a chilled metal surface; it should harden within 2‑3 minutes and snap cleanly.
Q: What if my peanut butter filling is too runny?
If the filling spreads, add an extra tablespoon of powdered sugar or a pinch more powdered sugar until it reaches a firmer consistency. Alternatively, chill the mixture for 10 minutes before piping; the cooler temperature helps it hold its shape.
Q: Can I add other nuts or toppings?
Absolutely! Crushed hazelnuts, toasted coconut flakes, or even a drizzle of caramel can be added after the final chocolate layer sets. Just press the toppings gently so they adhere without breaking the shell.
Q: How can I make these cups gluten‑free?
All core ingredients are naturally gluten‑free. Ensure any optional toppings (such as pretzels or wafer crumbs) are certified gluten‑free, or omit them entirely.
Q: Is it possible to prepare the cups ahead of a party?
Yes, you can make the cups up to two days in advance and store them in the refrigerator. Bring them to room temperature 20 minutes before serving for optimal flavor and texture.
🎉 Let’s Get Cooking!
These homemade peanut butter cups bring together the best of classic confectionery with the freedom to customize every element. Whether you’re treating yourself after a long day, impressing guests at a dinner party, or creating a thoughtful gift, the glossy chocolate shell and creamy peanut butter center will never disappoint. Remember the key steps: temper the chocolate correctly, keep the filling thick, and seal each cup with a final layer for that perfect snap.
Now that you have the full roadmap, it’s time to roll up your sleeves, gather your ingredients, and create a batch that will become a staple in your dessert repertoire. Don’t forget to experiment with the variations – a pinch of sea salt, a dash of chili, or a drizzle of caramel can turn a classic into a signature creation.
Have you tried this recipe?
Leave a comment and a rating below! Share your photos on Instagram with #HomemadePBcups for a chance to be featured.
Peanut Butter Cups Homemade Chocolate
Silky dark chocolate shells filled with a creamy, salty‑sweet peanut butter center – a timeless treat.
📝 Ingredients
Chocolate Shells
Peanut Butter Filling
Optional Topping
👨🍳 Instructions
- 1 Prepare a silicone muffin mold and set up a double‑boiler over simmering water.
- 2 Melt dark chocolate with coconut oil and a pinch of sea salt, stirring until smooth.
- 3 Coat each mold cavity with a thin chocolate layer, tap out bubbles, and chill for 5 minutes.
- 4 Whip peanut butter, powdered sugar, vanilla, and sea salt until light and fluffy.
- 5 Pipe a teaspoon of filling into each chocolate shell, leaving space for a seal.
- 6 Cover the filling with a final chocolate layer, smooth the tops, and chill again.
- 7 Optional: Sprinkle crushed peanuts and sea‑salt flakes on top before the chocolate fully sets.
- 8 Pop the cups out of the mold, store in an airtight container, and enjoy.
- 9 For a warm serving, gently reheat in a 150 °C oven for 5‑7 minutes.
- 10 Share with friends, snap a photo, and tag #HomemadePBcups!
🥗 Nutrition (per serving)
*Nutrition values are estimates based on standard ingredients.
📚 You Might Also Like
Salted Caramel Truffles
Chocolate Hazelnut Tart
Matcha White Chocolate Bark


💬 Comments & Reviews
Leave a Comment
No comments yet. Be the first to share your thoughts!