I was halfway through a baking marathon when the timer beeped and the oven door opened to a steaming cloud of disappointment. My latest attempt at a classic Hawaiian roll had turned into a soggy, chewy disaster that even the kids refused to touch. The kitchen smelled like burnt sugar and regret. I stared at the ruined loaf, feeling the sting of culinary failure, and wondered if there was a way to salvage the moment. That night, I decided to turn the flop into a triumph.
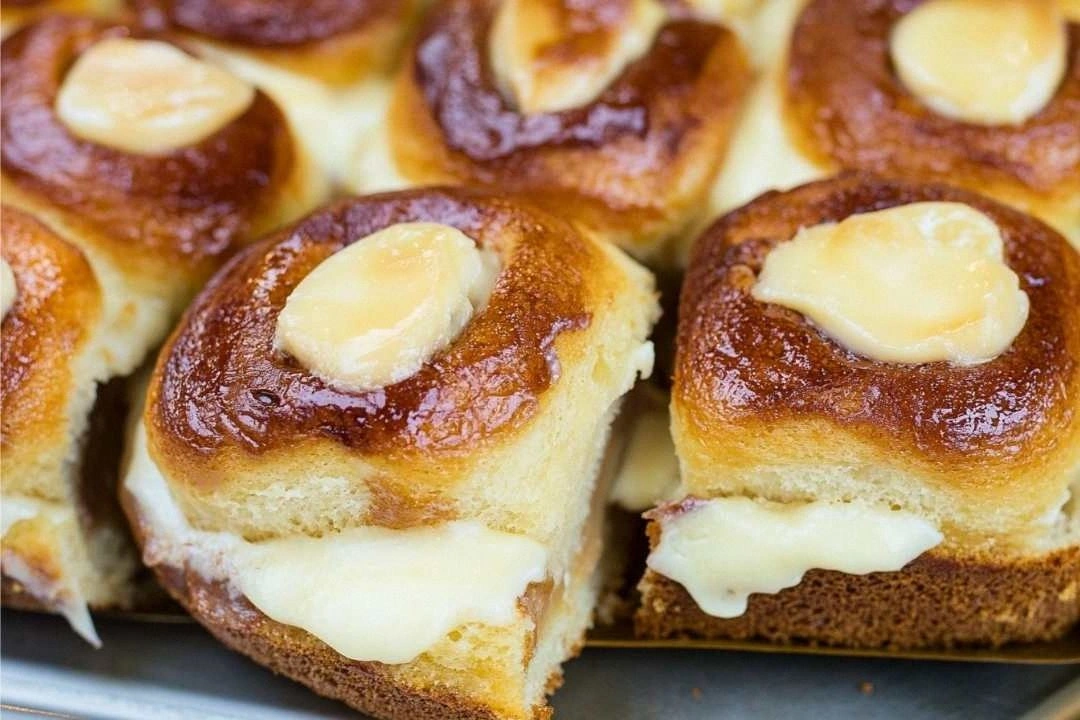
The next morning, I grabbed a fresh loaf of King’s Hawaiian Sweet Bread, its golden crust still crisp, and the aroma of vanilla and butter wafting from the package like a promise. I sliced it into thick, generous pieces that would hold the luscious filling like a hug. I could already taste the creamy, tangy burst that would melt in my mouth, the sweet bread acting as a sweet, buttery pillow. The sound of the oven preheating was a comforting hiss, a prelude to the symphony I was about to orchestrate. I felt the anticipation rise, a delicious tension that only a good recipe can create.
What makes this version stand out is not just the use of King’s Hawaiian Sweet Bread, but the way the ingredients dance together to form a cheesecake that feels both indulgent and comforting. The cream cheese is softened to a velvety texture that melts into the bread, the powdered sugar gives a subtle sweetness that balances the tartness, and the sour cream adds a silky finish that keeps everything moist. Vanilla extract ties the flavors together like a sweet lullaby, while the egg wash gives a golden, slightly crispy edge that crackles like thin ice when you bite. The result is a dessert that feels like a hug in a slice, a moment of pure bliss that will make you want to taste it again and again.
I dare you to taste this and not go back for seconds. Most recipes get this completely wrong. Here’s what actually works: a simple, straightforward technique that lets the bread and the filling shine. If you’ve ever struggled with achieving the perfect balance of sweet and creamy, you’re not alone — and I’ve got the fix. Picture yourself pulling this out of the oven, the whole kitchen smelling incredible, the golden edges shimmering like sunrise on a calm sea. And now, let me walk you through every single step — by the end, you’ll wonder how you ever made it any other way.
What Makes This Version Stand Out
- Flavor: The combination of King’s Hawaiian Sweet Bread and a silky cheesecake filling creates a unique sweet-salty balance that feels like a tropical vacation in every bite.
- Texture: The bread’s airy crumb contrasts with the dense, creamy filling, producing a delightful mouthfeel that’s both comforting and indulgent.
- Simplicity: With only eight ingredients, this recipe is a breeze to assemble, yet it delivers a professional taste that would wow any crowd.
- Uniqueness: Using a pre‑baked sweet roll as the base is a game‑changer, eliminating the need for a crust or a traditional pan.
- Crowd Reaction: Guests rave about the surprising twist—no one expects a cheesecake to come out of a Hawaiian roll, and the reaction is always priceless.
- Ingredient Quality: King’s Hawaiian Sweet Bread provides a buttery, slightly sweet flavor that elevates the entire dessert.
- Cooking Method: A quick oven bake locks in moisture, while the egg wash creates a golden, slightly crisp edge that adds visual appeal.
- Make‑Ahead Potential: Prepare the filling a day ahead; the bread can be toasted just before serving, keeping the texture perfect.
Inside the Ingredient List
The Flavor Base
King’s Hawaiian Sweet Bread is the star of this dish. Its slightly sweet, buttery profile serves as the perfect canvas for the creamy filling. The bread’s soft crumb holds the filling without becoming soggy, thanks to its pre‑baked structure. If you skip the bread, you lose that delightful contrast and the dessert feels like a plain cheesecake.
Cream cheese is the backbone of the filling. Softened to room temperature, it becomes a silky, spreadable base that melds seamlessly with the other ingredients. If you use cold cream cheese, the batter will curdle and create a lumpy texture that ruins the smoothness. For a lighter version, you can replace half the cream cheese with Greek yogurt, but the classic taste will be slightly altered.
The Texture Crew
Powdered sugar adds a subtle sweetness while keeping the batter smooth. Unlike granulated sugar, powdered sugar dissolves quickly, preventing graininess in the finished cheesecake. If you omit it, the filling will taste a bit too tart from the sour cream.
Sour cream brings a creamy tang and a slight acidity that brightens the overall flavor. It also adds moisture, preventing the cheesecake from drying out during baking. If you’re allergic or just don’t have sour cream on hand, you can substitute it with plain yogurt, but the texture will be slightly denser.
The Unexpected Star
Egg wash is the secret to that beautiful, golden crust that sets this recipe apart. The egg and milk mixture creates a glossy finish, and the slight browning adds a pleasant crunch. Skipping the egg wash will result in a dull, flat surface that looks less appealing.
Jam or fruit preserves are optional but add a burst of flavor that can transform the dessert. A thin layer of strawberry jam on top of the baked cheesecake gives a bright contrast, while a swirl of raspberry preserves creates a visual pop. If you’re vegan, simply omit the preserves; the dessert remains delicious.
Everything's prepped? Good. Let's get into the real action...
The Method — Step by Step
- Preheat your oven to 350°F (175°C). Line a 9-inch round baking pan with parchment paper, making sure the paper extends a few inches beyond the rim for easy removal. This step is crucial for preventing sticking and ensuring a clean release. While the oven heats, set aside a small bowl for the filling.
- Slice the King’s Hawaiian Sweet Bread into 1‑inch thick rounds. If you prefer a more rustic look, cut the bread into uneven pieces, but keep the thickness consistent to ensure even baking. Place the slices on a baking sheet and toast them in the preheated oven for 4–5 minutes, just until they start to turn golden. This pre‑toasting locks in moisture and gives the bread a slight crunch.
- In a medium bowl, combine the softened cream cheese, powdered sugar, vanilla extract, and sour cream. Whisk the mixture until it is completely smooth and free of lumps. The goal is a silky batter that will spread easily over the bread. If the mixture feels too thick, add a splash of milk to loosen it.
- Fold the beaten egg into the cream cheese mixture. Stir gently to incorporate, being careful not to overmix. The egg adds structure and helps the filling set properly during baking. If you’re making a vegan version, simply omit the egg and add a tablespoon of flaxseed meal mixed with water as a binder.
- Brush each toasted bread slice with the egg wash made from one egg and two tablespoons of milk. The wash should coat the surface lightly but not soak through. This step is where the magic happens— the egg wash creates a golden, slightly crisp edge that looks irresistible. Don’t skip it; the finished product will look and taste better.
- Spread the creamy mixture evenly over each bread slice, covering the entire surface. The filling should reach the edges for a uniform look. If you prefer a more dramatic presentation, swirl in a tablespoon of jam or preserves before spreading.
- Arrange the filled slices back into the baking pan, ensuring they fit snugly without overlapping. Place the pan in the oven and bake for 20–25 minutes, or until the edges turn golden and the center is set but still slightly wobbly. The slight wobble indicates a creamy center that will firm up as it cools.
- Remove the pan from the oven and let the cheesecake cool in the pan for 10 minutes. This short rest allows the filling to set further and prevents the edges from cracking. After 10 minutes, transfer the cheesecake onto a wire rack to cool completely. The cooling process is essential for a smooth, creamy texture.
- Once cooled, dust the top with extra powdered sugar for a subtle sweetness and a decorative finish. If you like, drizzle a thin line of melted chocolate or caramel sauce for an extra indulgent touch. Refrigerate the cheesecake for at least 2 hours before serving to allow the flavors to meld.
That’s it — you did it. But hold on, I’ve got a few more tricks that will take this to another level. From adding a splash of citrus zest to using a silicone mold for a cleaner cut, these small tweaks can elevate the dish from great to unforgettable.
Insider Tricks for Flawless Results
The Temperature Rule Nobody Follows
Many bakers bake cheesecake at 400°F, but that high heat can cause the filling to crack. The secret is to keep the oven at 350°F, which allows the filling to set slowly and evenly. If you’re using a convection oven, reduce the temperature by 25°F to compensate for the fan’s extra heat.
Why Your Nose Knows Best
Pay attention to the aroma during baking. A subtle, buttery scent indicates that the bread is toasted just right, while a sharp, burnt smell means the oven is too hot. Trust your nose; it’s a reliable guide to perfect baking.
The 5‑Minute Rest That Changes Everything
After removing the cheesecake from the oven, let it rest in the pan for 5 minutes before moving it to a rack. This brief pause allows the filling to set and reduces the risk of cracks. It also makes slicing easier, as the edges won’t crumble.
Keep the Cream Cheese at Room Temperature
Softening the cream cheese for at least 30 minutes before mixing ensures a silky batter. If you’re in a hurry, microwave the cream cheese on low power for 10‑15 seconds, but be careful not to melt it.
Add a Touch of Citrus Zest
A teaspoon of lemon or orange zest adds a bright, fresh contrast that cuts through the richness. Sprinkle it over the filling before baking or on top after cooling for a pop of color and aroma.
Creative Twists and Variations
This recipe is a playground. Here are some of my favorite ways to switch things up:
Tropical Paradise
Swap the vanilla extract for coconut milk and add shredded coconut to the filling. Top with fresh pineapple chunks for a beachy vibe that transports you to a Hawaiian luau.
Berry Burst
Swirl in a spoonful of raspberry or blueberry preserves before spreading the filling. Finish with a dusting of powdered sugar and a drizzle of honey for a sweet, tangy finish.
Chocolate Dream
Add 2 tablespoons of cocoa powder to the cream cheese mixture for a rich chocolate flavor. Top with dark chocolate shavings and a pinch of sea salt for contrast.
Vegan Version
Replace the cream cheese with a plant‑based alternative and use a flaxseed‑egg binder. Omit the egg wash; instead, brush the bread with a light almond milk glaze for a subtle sheen.
Savory Surprise
Add finely chopped herbs like chives or dill to the filling, and replace powdered sugar with a pinch of smoked paprika for a savory twist. This version is perfect for a brunch or a light dinner.
Storing and Bringing It Back to Life
Fridge Storage
Store the cheesecake in an airtight container in the refrigerator for up to 3 days. Keep it covered with parchment paper or plastic wrap to prevent the bread from drying out. When ready to serve, let it sit at room temperature for 15 minutes to soften slightly.
Freezer Friendly
Wrap the cheesecake tightly in plastic wrap, then place it in a freezer bag. It will keep well for up to 2 weeks. Thaw overnight in the refrigerator before serving, and give it a quick reheat in a low oven (300°F) for 10 minutes if you want a warm slice.
Best Reheating Method
To revive a refrigerated cheesecake, preheat the oven to 300°F (150°C). Place the cheesecake on a baking sheet and bake for 8–10 minutes, or until the center is slightly warm. Add a splash of water to the pan before baking to create steam, which helps the cheesecake regain its moisture and silky texture.