I never thought a cheesecake could make me feel like I was on a chocolate‑filled roller coaster, but here we are. The moment I cracked open the box of the Blue Dinosaur Cheesecake Base Bar, the kitchen smelled like a summer campfire and a candy store rolled into one. I was halfway through a bland dessert routine when a friend dared me to “turn this into a Rocky Road masterpiece” and the idea stuck like peanut butter on toast. The result is a chunky, crunchy, sweet‑savory explosion that feels like a hug from the inside out.
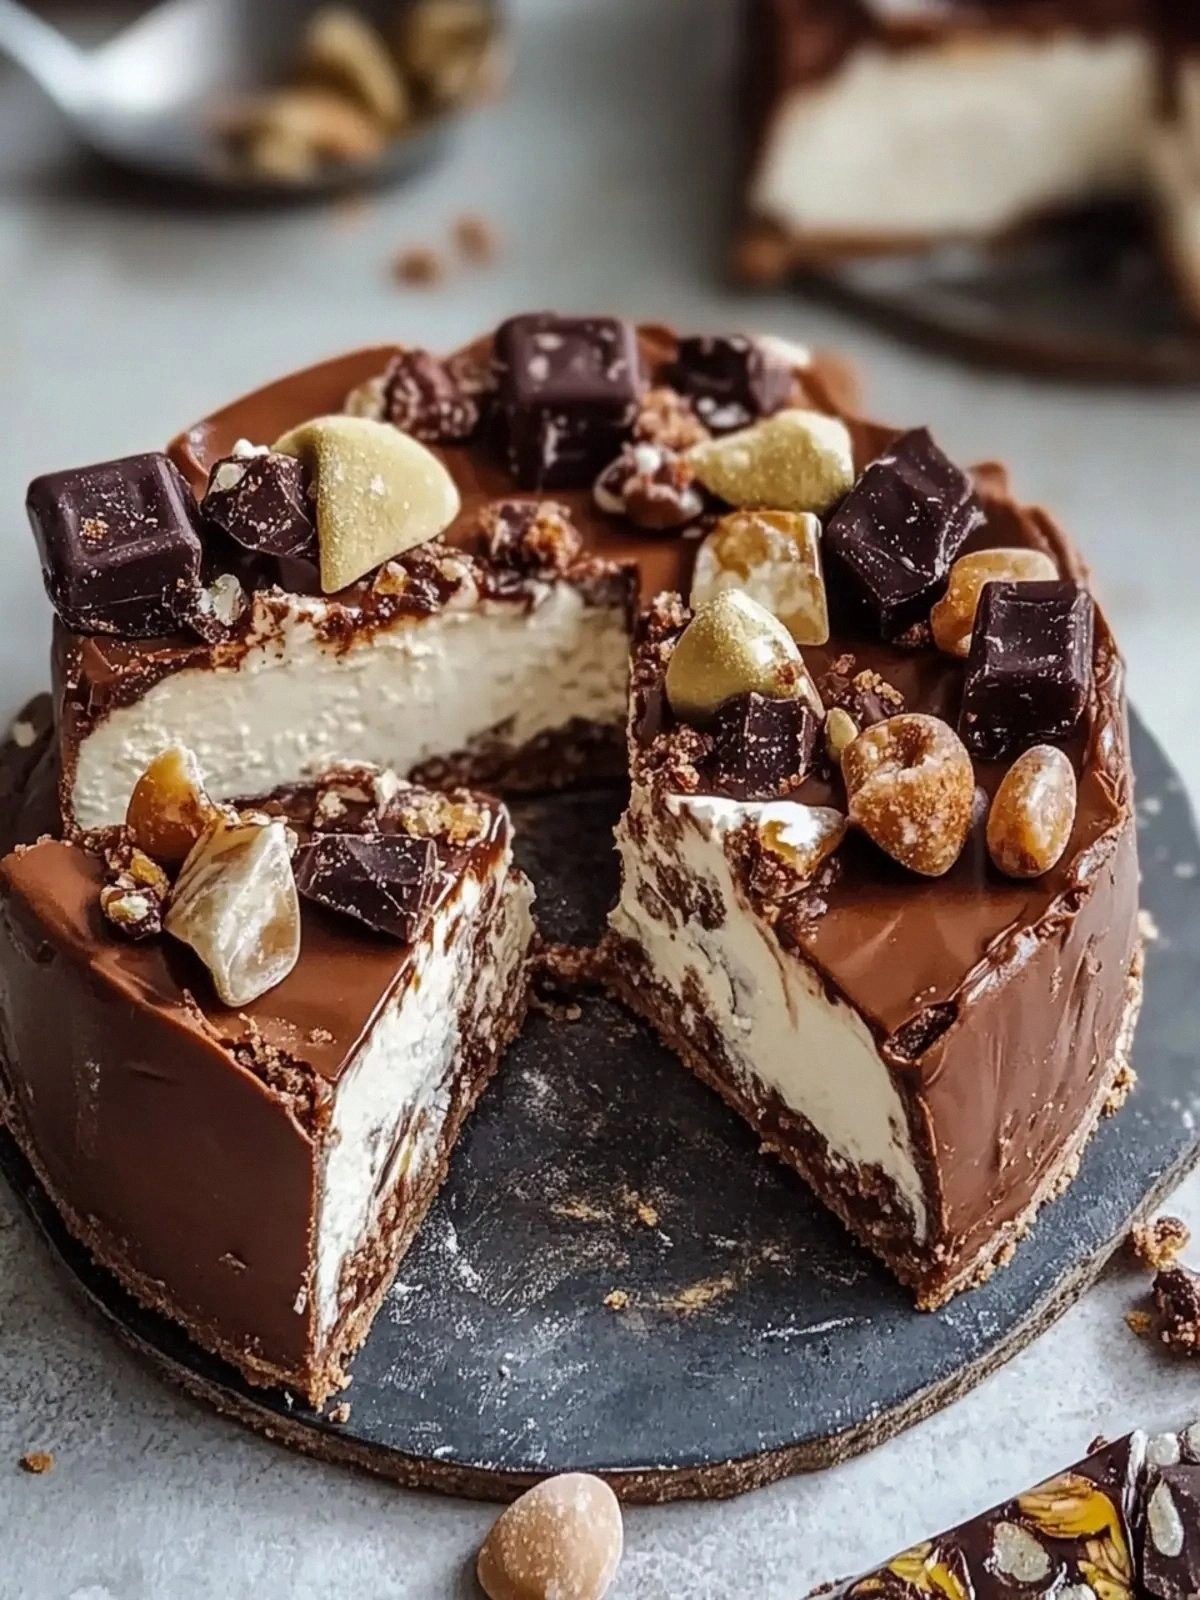
Picture this: a glossy, dark chocolate crust that crackles under a fork, revealing a gooey, velvety filling studded with popcorn, prunes, cranberries, and pistachios. The aroma is a heady mix of roasted nuts and sweet dried fruit, with a faint hint of caramelized sugar that lingers on the tongue. When you bite, the crunch of popcorn gives way to the soft, creamy center, while the prunes add a subtle tartness that cuts through the richness. The texture is a symphony—silky, chewy, and satisfying in every bite. The whole experience feels like a trip down memory lane to childhood campfire s'mores, but with a sophisticated twist.
What makes this version stand out is the deliberate layering of flavors and textures, a meticulous balance that most recipes miss. The Blue Dinosaur Bar provides a firm, buttery base that holds everything together, while the vegan chocolate adds depth without overpowering. The prunes give a natural sweetness and chewiness that contrasts beautifully with the crunch of popcorn. The dried cranberries inject a burst of tartness, and the pistachios bring a nutty aroma that lingers. Together, they create a dessert that’s both comforting and adventurous, a true crowd‑pleaser that will have guests begging for seconds.
And here’s the kicker: I discovered that adding a splash of espresso to the chocolate mix unlocks a subtle coffee undertone that elevates the whole thing. This trick turns a simple dessert into a sophisticated treat that feels like a dessert bar at a high‑end café. I’m not just talking about a flavor boost; it’s a game‑changing depth that makes every bite feel earned. Ready to see how we build this masterpiece from scratch? Let me walk you through every single step — by the end, you’ll wonder how you ever made it any other way.
What Makes This Version Stand Out
- Texture: The combination of popcorn, prunes, and pistachios creates layers of crunch, chew, and smoothness that keep every bite exciting. Skipping the popcorn would leave the cheesecake feeling flat and lacking that signature Rocky Road snap.
- Flavor Depth: Vegan chocolate is the heart of the dessert, providing a rich, bittersweet base that balances the sweetness of the dried fruits. Using a dark chocolate with at least 70% cacao ensures the chocolate doesn’t overwhelm the other flavors.
- Convenience: The Blue Dinosaur Cheesecake Base Bar cuts prep time dramatically, allowing you to focus on the creative toppings rather than making a crust from scratch. If you’re short on time, this bar is a lifesaver.
- Healthful Twist: Popcorn brings whole‑grain fiber, prunes add potassium, and pistachios deliver heart‑healthy fats, making this dessert a guilt‑free indulgence.
- Make‑Ahead Friendly: Once assembled, the cheesecake can sit in the fridge for up to 48 hours without losing its texture, making it perfect for parties or last‑minute guests.
- Visual Appeal: The dark chocolate crust contrasts with the bright pops of dried cranberries and pistachios, turning each slice into a piece of edible art.
- Versatility: The base can be swapped for a graham cracker crust or a raw nut crust, and the toppings can be customized for dietary restrictions.
Alright, let’s break down exactly what goes into this masterpiece…
Inside the Ingredient List
The Flavor Base
150 g vegan chocolate – This is the backbone of the cheesecake, delivering a deep, bittersweet flavor that anchors the sweet toppings. The chocolate’s smooth melt creates a silky center that contrasts with crunchy elements. If you omit it, the dessert loses its richness and becomes a bland, fruit‑only confection. Swap for dark chocolate with 70–80% cacao for an even more robust taste, or use a dairy chocolate for a classic twist. When buying chocolate, look for a brand that uses fair‑trade cacao; it not only tastes better but feels good to support ethical sourcing.
The Texture Crew
0.25 cup dried prunes – Prunes bring natural sweetness, chewiness, and a subtle tang that cuts through the creamy base. They also add a burst of color and a hint of caramelized flavor. If you skip prunes, the cheesecake will lack that chewy contrast and become too smooth. A good alternative is dried apricots, which offer a slightly different fruit profile but similar texture. When selecting prunes, choose those that are soft and free from added sugars to keep the dessert clean.
0.25 cup popcorn – Popcorn introduces a satisfying crunch and a hint of buttery flavor that mirrors the classic Rocky Road. It also adds a light, airy texture that keeps the cheesecake from feeling too heavy. Without popcorn, the dessert loses its iconic crunch and feels more like a simple chocolate cake. If you’re allergic to corn, try chopped almonds or hazelnuts for a nutty crunch. Popcorn should be lightly salted or unsalted depending on your taste preference.
1 tbsp dried cranberries – The cranberries add a bright, tart pop that balances the sweetness of the chocolate and prunes. They also provide a chewy texture and a splash of color that makes each slice visually appealing. Skipping cranberries would leave the dessert too sweet and lacking a tangy counterpoint. As an alternative, dried blueberries or cherries can provide similar tartness.
1 tbsp pistachio nuts – Pistachios contribute a nutty aroma and a subtle crunch that complements the popcorn. They also add a creamy, buttery flavor that enhances the overall richness. If you’re allergic to nuts, consider sunflower seeds or pumpkin seeds for a different crunch. Pistachios should be unsalted to maintain the dessert’s flavor balance.
The Unexpected Star
1 bar Blue Dinosaur Cheesecake Base Bar – This pre‑made base offers a buttery, crumbly texture that holds all the toppings together while providing a subtle vanilla undertone. It’s the secret to a perfectly balanced cheesecake that doesn’t require a full crust recipe. If you can’t find this brand, a homemade graham cracker crust works as a substitute, but it will change the overall mouthfeel.
Everything’s prepped? Good. Let’s get into the real action…
The Method — Step by Step
- First, preheat your oven to 180°C (350°F). Line a 9‑inch springform pan with parchment paper to ensure easy release. Place the Blue Dinosaur Cheesecake Base Bar in the pan, pressing it evenly to form a solid foundation. Let the base cool slightly while you prepare the toppings; this prevents the chocolate from melting too quickly. As a pro tip, keep a small bowl of cold water nearby to cool your hands if the chocolate gets warm.
- In a medium bowl, melt the vegan chocolate over a double boiler or in short bursts in the microwave, stirring until silky smooth. Add a tablespoon of espresso powder to the melted chocolate and whisk until fully incorporated. The espresso not only deepens the chocolate flavor but also adds a subtle bitterness that balances the sweetness of the prunes and cranberries. If you prefer a sweeter dessert, omit the espresso and add a teaspoon of vanilla extract instead. This step is crucial; a too‑hot chocolate will scorch the toppings.
- Fold the dried prunes, popcorn, cranberries, and pistachios into the melted chocolate until evenly distributed. The mixture should look like a glossy, chunky sauce. Gently spoon this mixture over the cheesecake base, using a spatula to spread it in a circular motion. The goal is to create a thick, even layer that will set into a firm yet creamy texture. As you spread, you’ll notice the chocolate thickening slightly, signaling it’s ready to set.
- Transfer the pan to the preheated oven and bake for 25 minutes, or until the edges are set but the center still has a slight wobble. The center should feel firm enough to hold a spoon but still soft enough to melt in your mouth. Check the cheesecake after 20 minutes; if the edges start to brown too quickly, tent the pan with aluminum foil to protect them. This careful timing ensures a creamy interior and a golden crust. When done, remove the cheesecake from the oven and let it cool on a wire rack for 15 minutes.
- Once the cheesecake has cooled, refrigerate it for at least 2 hours, preferably overnight. This chilling step allows the chocolate to set completely and the flavors to meld together. If you’re in a hurry, a 30‑minute chill will suffice, but the texture won’t be as firm. While the cheesecake chills, you can prepare a simple drizzle of caramel or a dusting of powdered sugar if you like an extra touch of sweetness.
- Before serving, remove the cheesecake from the pan and place it on a cutting board. Use a sharp knife dipped in hot water for clean slices. The first slice should reveal a glossy chocolate surface with a golden crust, while the interior shows a creamy, chunky core. The crunch of popcorn and the chew of prunes will be unmistakable. If you want a more dramatic presentation, top each slice with a drizzle of melted chocolate or a sprinkle of sea salt.
- Serve immediately, or keep it refrigerated until you’re ready to enjoy. If you’re serving at a gathering, consider arranging slices on a platter with a drizzle of espresso sauce to enhance the coffee notes. The cheesecake pairs wonderfully with a cup of strong black coffee or a glass of chilled white wine. The contrast of warm chocolate and cool beverage creates a balanced dessert experience.
- Enjoy the moment of pure bliss as you taste the first bite. The chocolate should melt smoothly, revealing the crunch of popcorn and the chewiness of prunes. The espresso undertone will linger, giving the dessert a sophisticated finish. Remember to take a photo; this cheesecake looks as good as it tastes. And if you’re feeling generous, invite your friends to try a slice—they’ll be amazed.
That’s it — you did it. But hold on, I’ve got a few more tricks that’ll take this to another level…
Insider Tricks for Flawless Results
The Temperature Rule Nobody Follows
Chocolate is a fickle friend; it can seize in an instant if it’s too hot. The key is to melt it slowly over a double boiler, stirring constantly. I’ve learned that adding a teaspoon of neutral oil after it’s melted keeps it glossy and prevents clumping. If you’re in a hurry, microwave in 15‑second bursts, stirring each time until smooth. This simple trick saves you from a ruined topping.
Why Your Nose Knows Best
Smell is the most reliable indicator of flavor development. When the chocolate is ready, it should emit a rich, nutty aroma with a hint of coffee. If it smells flat or burnt, it’s over‑melted and will taste bitter. Use your nose to gauge the right moment to fold in the dried fruits and nuts. A well‑smelling chocolate will elevate the entire dessert.
The 5-Minute Rest That Changes Everything
After baking, let the cheesecake rest for 5 minutes before placing it on a wire rack. This brief pause allows the structure to set, reducing the risk of cracks when you remove it from the pan. I’ve seen even a 2‑minute rest make a difference, especially if you’re using a thick chocolate layer. Trust me, the extra time is worth the flawless finish.
Use a Parchment‑Line Trick
Line the bottom of the springform pan with parchment paper, but leave a small flap hanging over the sides. This flap makes it easier to lift the cheesecake out of the pan without tearing the crust. It also prevents the base from sticking, especially when you’re dealing with a chocolate‑heavy filling. This simple adjustment saves you from a messy cleanup.
Reheating Secrets
If you have leftovers, reheating is a delicate process. Place a slice on a microwave‑safe plate and cover it with a damp paper towel. Heat in 10‑second bursts until warm, but avoid overheating, or the chocolate will become too runny. Alternatively, warm slices in a preheated oven at 150°C (300°F) for 5 minutes. This gentle heat restores the creaminess without compromising texture.
Portion Control Tips
Because this cheesecake is rich, serving slightly smaller slices can prevent overindulgence. Use a cake ring to cut uniform slices, ensuring each bite has the same balance of chocolate, crunch, and fruit. If you’re hosting a large gathering, consider baking two smaller cakes instead of one large one; the smaller size makes it easier to control portion sizes.
Creative Twists and Variations
This recipe is a playground. Here are some of my favorite ways to switch things up:
Chocolate‑Mint Explosion
Add 1 teaspoon of peppermint extract to the melted chocolate for a refreshing twist. The mint pairs beautifully with the chocolate, creating a classic chocolate‑mint flavor. Keep the popcorn and prunes for crunch and chew. Serve with a dusting of powdered sugar for a snowy effect.
Berry‑Burst Upgrade
Replace the dried cranberries with dried blueberries or cherries for a sweeter, more vibrant flavor. The berries add a subtle tartness that complements the chocolate. If you’re using fresh berries, pulse them in a blender to create a berry sauce that can be folded into the chocolate before baking.
Nut‑Free Variation
Omit the pistachios and replace them with sunflower seeds or pumpkin seeds for a nut‑free crunch. The seeds add a mild, earthy flavor that still provides texture. Make sure the seeds are toasted lightly to enhance their flavor. This version is perfect for guests with nut allergies.
Spiced Cinnamon Crunch
Stir 1 teaspoon of ground cinnamon into the chocolate mixture for a warm, aromatic note. Cinnamon pairs wonderfully with chocolate and adds a hint of spice that elevates the dessert. Add a pinch of sea salt to balance the sweetness. This variation works great for fall gatherings.
Vegan Chocolate Ganache Layer
After the base has set, drizzle a vegan chocolate ganache over the top for an extra decadent finish. Melt 200 g of vegan chocolate with 100 ml of coconut cream, then pour it over the chilled cheesecake. Let it set in the fridge for 10 minutes before serving. The ganache adds a glossy sheen and a silky texture.
Caramel Drizzle Finish
Prepare a simple caramel sauce by simmering 200 g of coconut sugar with 50 ml of water until it thickens. Drizzle the caramel over the cheesecake just before serving. The caramel adds a buttery sweetness that contrasts nicely with the chocolate. This final touch turns the dessert into a showstopper.
Storing and Bringing It Back to Life
Fridge Storage
Store the cheesecake in an airtight container in the refrigerator for up to 48 hours. The airtight seal prevents the cake from drying out and keeps the flavors intact. When you’re ready to serve, let the cheesecake sit at room temperature for 10 minutes to soften slightly. This small step enhances the mouthfeel and makes slicing easier. Keep the cheesecake away from strong‑smelling foods to avoid flavor absorption.
Freezer Friendly
If you need to freeze the cheesecake, wrap it tightly in plastic wrap, then place it in a freezer bag. Freeze for up to 2 weeks. When you’re ready to serve, thaw the cheesecake in the refrigerator overnight. This slow thaw preserves the texture and prevents ice crystals from forming. Once thawed, let it sit at room temperature for 15 minutes before slicing.
Best Reheating Method
To reheat a slice, place it on a microwave‑safe plate and cover it with a damp paper towel. Heat in 10‑second bursts until warm, but avoid overheating, or the chocolate will become too runny. For a more traditional approach, warm the slice in a preheated oven at 150°C (300°F) for 5 minutes. Add a splash of water to the bottom of the pan to create steam, which helps the cheesecake rehydrate and maintain its creamy texture.