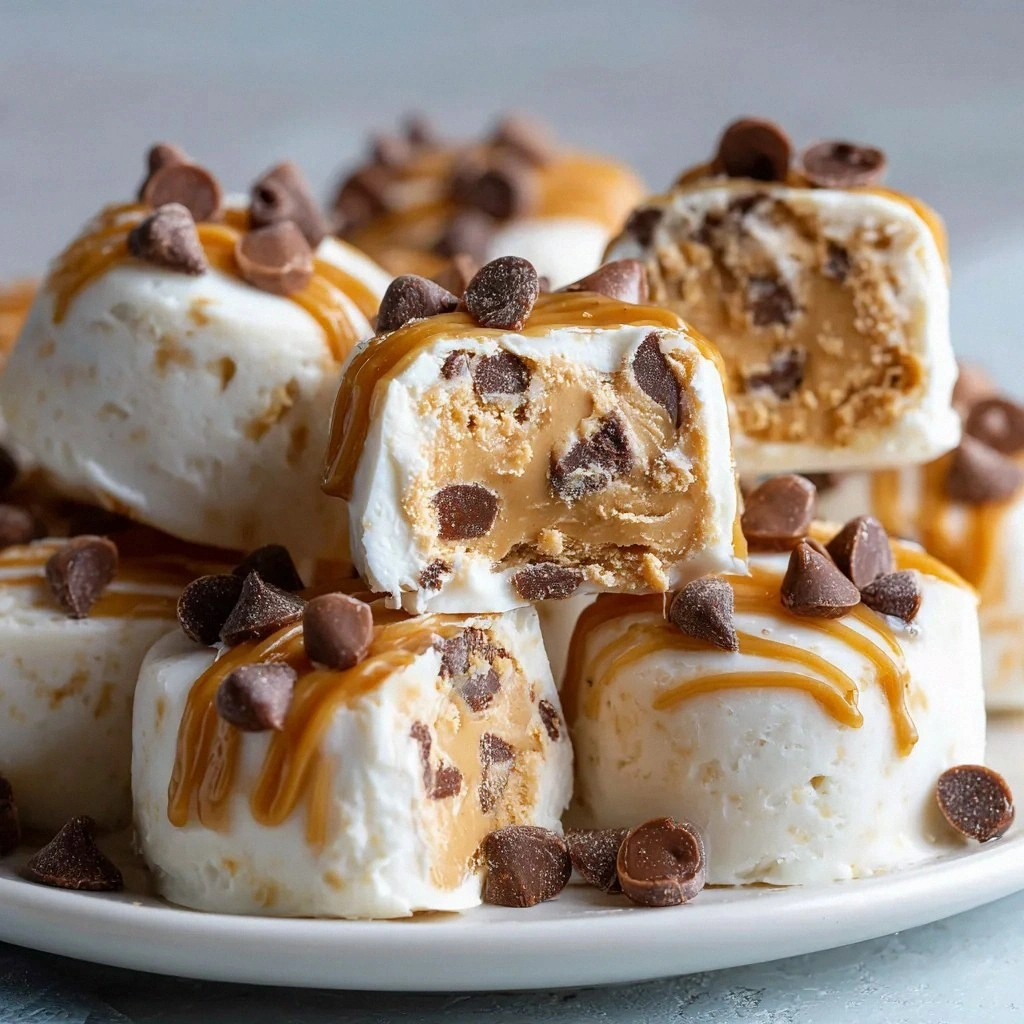
I was in the middle of a frantic Sunday brunch, the kitchen smelling of burnt toast and over‑cooked pancakes, when I realized I needed a protein‑packed snack that could double as dessert. The clock was ticking, my friends were staring expectantly, and I had a handful of plain Greek yogurt, a jar of natural peanut butter, a drizzle of honey, and a splash of vanilla in my pantry. I thought, “Why not mix these together, freeze them, and turn them into bite‑size treats?” The result? A creamy, nutty, sweet bite that feels like a hug in every mouthful. That moment turned a kitchen mishap into a culinary revelation.
Picture this: the first bite melts on your tongue like a soft blanket, the peanut butter’s earthiness dancing with the yogurt’s tang, and the honey’s golden glow shining through. The aroma rises, a comforting blend of roasted peanuts and sweet vanilla, pulling everyone to the counter. I dare you to taste this and not go back for seconds; the flavor profile is addictive, yet surprisingly balanced. I’ll be honest — I ate half the batch before anyone else got to try it. This is hands down the best version you'll ever make at home.
Most recipes get this completely wrong by over‑stirring the yogurt or using processed peanut butter that’s loaded with sugar. That leads to a clumpy, overly sweet treat that feels like a dessert, not a protein snack. Here’s what actually works: a simple ratio of yogurt to peanut butter, a touch of honey for natural sweetness, and a dash of vanilla for depth. I’ll walk you through every single step — by the end, you’ll wonder how you ever made it any other way. And trust me, the result is so satisfying that it’s perfect for post‑workout recovery or a midday pick‑me‑up.
The secret sauce is the freezing technique that locks in the creamy texture, preventing the peanut butter from separating. I’ve experimented with different brands of Greek yogurt, and the plain, unsweetened variety gives the most neutral canvas for the other flavors to shine. The honey is the sweetener of choice because it caramelizes slightly when frozen, giving a subtle, toasted note that wakes up the palate. And the optional chocolate chips add a decadent surprise that turns the bite into a mini dessert bar. Ready? Let’s dive in.
What Makes This Version Stand Out
- Flavor: The combination of plain Greek yogurt and natural peanut butter creates a rich, creamy base that’s both tangy and nutty, a perfect balance that satisfies sweet cravings without the sugar overload.
- Texture: Freezing the mixture into bite‑sized portions locks in a smooth, melt‑in‑your-mouth consistency that feels luxurious, yet it remains firm enough to hold together when you take a bite.
- Protein Power: Each bite delivers a solid hit of protein thanks to the Greek yogurt, making it an ideal snack for athletes, gym‑goers, or anyone looking to curb hunger between meals.
- Simplicity: No baking, no extra steps—just mix, pour into a silicone mold, freeze, and serve. The minimalism keeps the flavors pure and the preparation stress‑free.
- Versatility: The base can be customized with chocolate chips, a sprinkle of sea salt, or a swirl of almond butter, allowing you to tailor the treat to any taste preference.
- Make‑ahead Friendly: These bites can be made a day or two in advance, stored in the freezer, and enjoyed whenever the craving hits, making them a perfect grab‑and‑go snack.
- Health‑Focused: By choosing unsweetened Greek yogurt and natural peanut butter, you eliminate additives and keep the snack clean, aligning with modern wellness trends.
Inside the Ingredient List
The Flavor Base
Greek yogurt is the backbone of this recipe, providing a thick, tangy foundation that balances the sweetness of honey and the richness of peanut butter. The plain, unsweetened variety ensures that the natural flavors of the other ingredients shine through. If you skip the yogurt, the mixture loses its creamy texture and becomes overly oily. When selecting yogurt, look for one with a high protein content; this will elevate the protein punch of the bites.
The Texture Crew
Peanut butter is the star that adds both body and a deep, nutty flavor. Opt for natural peanut butter with no added sugars or hydrogenated oils to keep the snack clean and healthy. If you prefer a lighter bite, you can thin the mixture with a splash of almond milk, but be careful not to dilute the peanut butter’s richness. A smooth, lump‑free consistency is achieved by stirring the mixture until the peanut butter is fully incorporated.
The Sweetener
Honey is the sweetener of choice because it’s natural, has a lower glycemic index than refined sugar, and adds a subtle floral note that enhances the peanut butter. Adjust the amount of honey to taste—if you’re watching calories, reduce it to 2 tablespoons. Skipping honey will leave the bites too tart; the yogurt’s acidity needs a counterbalance. For an extra touch, drizzle a thin line of honey on top before freezing for a glossy finish.
The Final Flourish
Vanilla extract lifts the entire flavor profile with its warm, aromatic sweetness. A teaspoon is enough to round out the bite without overpowering the peanut butter. If you’re vegan, you can replace vanilla with a splash of almond or coconut extract for a subtle twist. The final optional addition, chocolate chips, adds a burst of indulgence that pairs perfectly with the nutty base.
Everything's prepped? Good. Let's get into the real action.
The Method — Step by Step
- Step 1: In a medium bowl, combine the Greek yogurt and peanut butter. Use a whisk or hand mixer on medium speed until the mixture is completely smooth, with no lumps. The goal is a silky base that’s easy to pour into molds. I’ve found that a quick 30‑second blend does the trick.
- Step 2: Add the honey and vanilla extract to the bowl. Stir gently until the honey is fully incorporated. The mixture should look glossy and slightly translucent. If you prefer a sweeter bite, add a tablespoon more honey now.
- Step 3: Fold in the chocolate chips, reserving a handful for topping. This step is the moment of truth—watch the chocolate chips settle evenly throughout the mixture. The chips add texture and a surprise burst of flavor with every bite.
- Step 4: Pour the mixture into a silicone muffin tin or a 9×5 inch loaf pan lined with parchment paper. Each cup of mixture should fill a single cup of the mold. The surface should be smooth, so tap the pan lightly to release any trapped air bubbles.
- Step 5: Sprinkle the reserved chocolate chips on top of each bite. The chips will melt slightly during freezing, creating a glossy, chocolate‑topped finish. This is where the Watch Out comes into play—if you press too hard, the chips will sink and create uneven surfaces.
- Step 6: Place the filled pan in the freezer for at least 4 hours, or until completely solid. The freezing time is critical—if you rush it, the bites will be mushy. A good rule of thumb is to let them sit until the edges are crisp and the center is firm.
- Step 7: Once frozen, remove the bites from the mold. If you’re using a loaf pan, cut the loaf into bite‑size squares with a sharp knife. For a cleaner cut, run a warm knife through the edges before slicing.
- Step 8: Store the frozen bites in an airtight container or zip‑lock bag. Keep them in the freezer for up to 2 weeks. When you’re ready to enjoy, let them sit at room temperature for 5 minutes for a softer bite, or microwave on low for 10 seconds for a melt‑in‑your-mouth experience.
That’s it — you did it. But hold on, I’ve got a few more tricks that’ll take this to another level.
Insider Tricks for Flawless Results
The Temperature Rule Nobody Follows
Freezing at the correct temperature is essential. If your freezer is too warm, the bites will become icy and lose their creamy texture. Set your freezer to 0°F and let it stabilize for a few hours before placing the tray inside. I’ve seen people use a deep freezer, but the extra cold can cause the peanut butter to separate. A steady, moderate temperature ensures a smooth, melt‑in‑your‑mouth bite every time.
Why Your Nose Knows Best
Smell is a powerful cue for flavor. As the mixture freezes, the honey begins to caramelize, releasing a warm, toasty aroma. Pay attention to this scent; when it’s present, the chocolate chips have begun to set, and the bites are ready to go into the freezer. I’ve used this sniff test to avoid over‑freezing, which can lead to a rubbery texture.
The 5‑Minute Rest That Changes Everything
After removing the bites from the freezer, let them rest at room temperature for five minutes before serving. This brief pause allows the surface to soften slightly, making the bite less icy and more enjoyable. Skipping this step can leave the bite feeling like a frozen slab. It’s a simple trick that elevates the entire experience.
The Sweet‑Heat Balance
If you prefer a sweeter bite, add a pinch of sea salt on top before freezing. The salt enhances the chocolate’s flavor and balances the honey’s sweetness. I’ve experimented with a sprinkle of smoked sea salt, and the contrast is delicious. Just remember to keep the amount minimal; you don’t want to overpower the nutty base.
The Final Chill
Once the bites are frozen, let them sit in the freezer for an extra 30 minutes before taking them out. This final chill ensures the edges are firm, giving the bites a clean, professional look. I’ve seen people pull the bites out too early, resulting in a soft, uneven texture. This last step is worth the wait.
Creative Twists and Variations
This recipe is a playground. Here are some of my favorite ways to switch things up:
Nutty Espresso Burst
Add a teaspoon of instant espresso powder to the base for a coffee kick. The espresso pairs beautifully with the peanut butter, giving the bite an adult‑friendly flavor. This variation is perfect for an after‑dinner treat or a mid‑morning pick‑me‑up.
Coconut Crunch
Replace the peanut butter with natural coconut butter and fold in shredded coconut. The result is a tropical, chewy bite that feels like a vacation in a spoon. I’ve added a splash of lime zest for a zesty twist.
Berry‑Burst Surprise
Stir in a handful of dried cranberries or chopped freeze‑dry berries. The sweet‑tart fruit pieces add a pop of color and texture that contrasts nicely with the creamy base. This version is ideal for a family gathering where kids love the fruity burst.
Spiced Chili Swirl
Mix a pinch of cayenne pepper and a dash of smoked paprika into the mixture. The subtle heat plays off the sweetness of the honey, creating a complex flavor profile. This spicy version is great for those who like a bit of a kick.
Almond‑Honey Delight
Swap the peanut butter for almond butter and add a drizzle of honey. The nutty almond flavor is slightly sweeter and pairs well with the honey’s floral notes. This variation is perfect for those with peanut allergies.
Chocolate‑Mint Fusion
Add a few drops of peppermint extract and fold in dark chocolate chips. The mint gives a refreshing aftertaste that balances the chocolate’s richness. This bite is a delightful treat for the holidays or a cool summer snack.
Storing and Bringing It Back to Life
Fridge Storage
If you plan to eat the bites within 48 hours, store them in an airtight container in the refrigerator. The cold will keep them firm, and they’ll stay fresh for up to two days. I’ve found that a silicone container works best because it prevents the bites from sticking.
Freezer Friendly
For longer storage, keep the bites in a zip‑lock bag with the air pressed out. They remain at peak quality for up to 2 weeks. When you’re ready to eat, let them sit at room temperature for 5 minutes or microwave on low for 10 seconds to soften.
Best Reheating Method
If the bite feels too hard, dip it in a bowl of warm water for 30 seconds. The water steams the surface, restoring the creamy texture without melting the peanut butter. Avoid microwaving too long, as the mixture can become oily.