Picture this: I’m standing in my kitchen, the timer on the old microwave blinking red like a warning light, and a half‑baked batch of generic store‑bought cheesecake staring back at me with smug indifference. I’d just survived a disaster where my attempt at a classic red velvet cake turned into a sad, crumbly brick that could double as a paperweight. My friend, ever the dare‑devil, challenged me to create a dessert that would make even the most stubborn sweet‑tooth surrender without a fight. I laughed, I cried, and then I whispered to the universe, “Give me a reason to love red velvet again.”
Fast forward a few frantic nights, a pantry raid that felt more like a treasure hunt, and the birth of a dessert that practically glows with celebration‑ready confidence. The moment the oven door swung open, a wave of sweet cocoa and buttery cream rose up, wrapping the room in a hug that felt like a velvet curtain being drawn back on a Broadway premiere. The scent of fresh‑baked cake mingled with the subtle tang of cream cheese, while the crushed Oreo crust added a whisper of chocolate that crackled under my spoon like a secret waiting to be told. I could hear the faint sigh of the batter settling, the soft sigh of the crust firming up, and the distant hum of my fridge cheering me on.
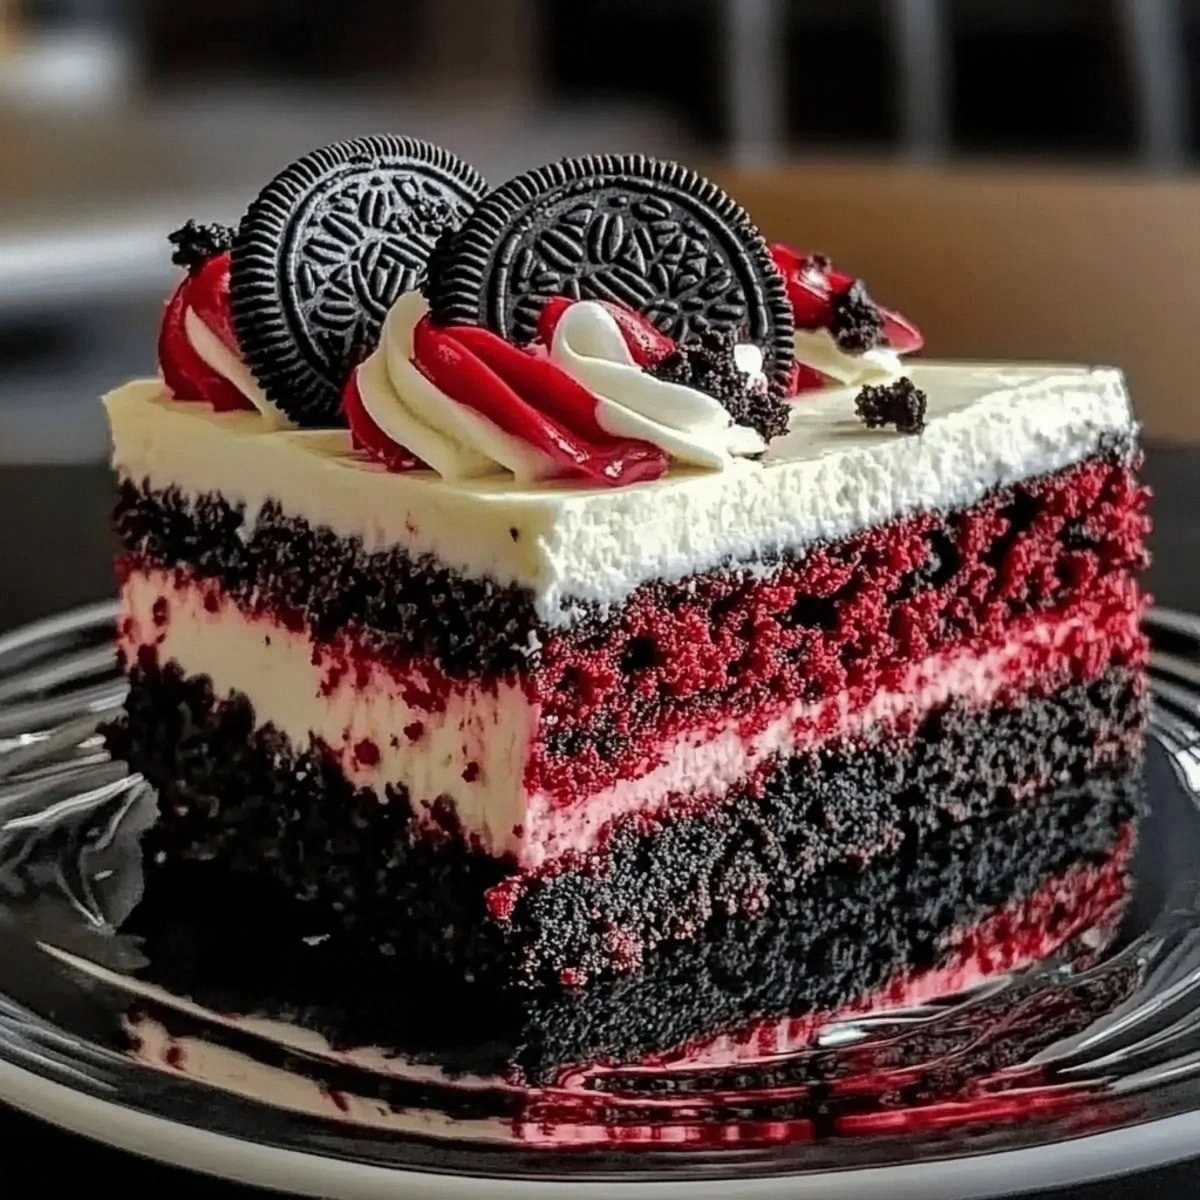
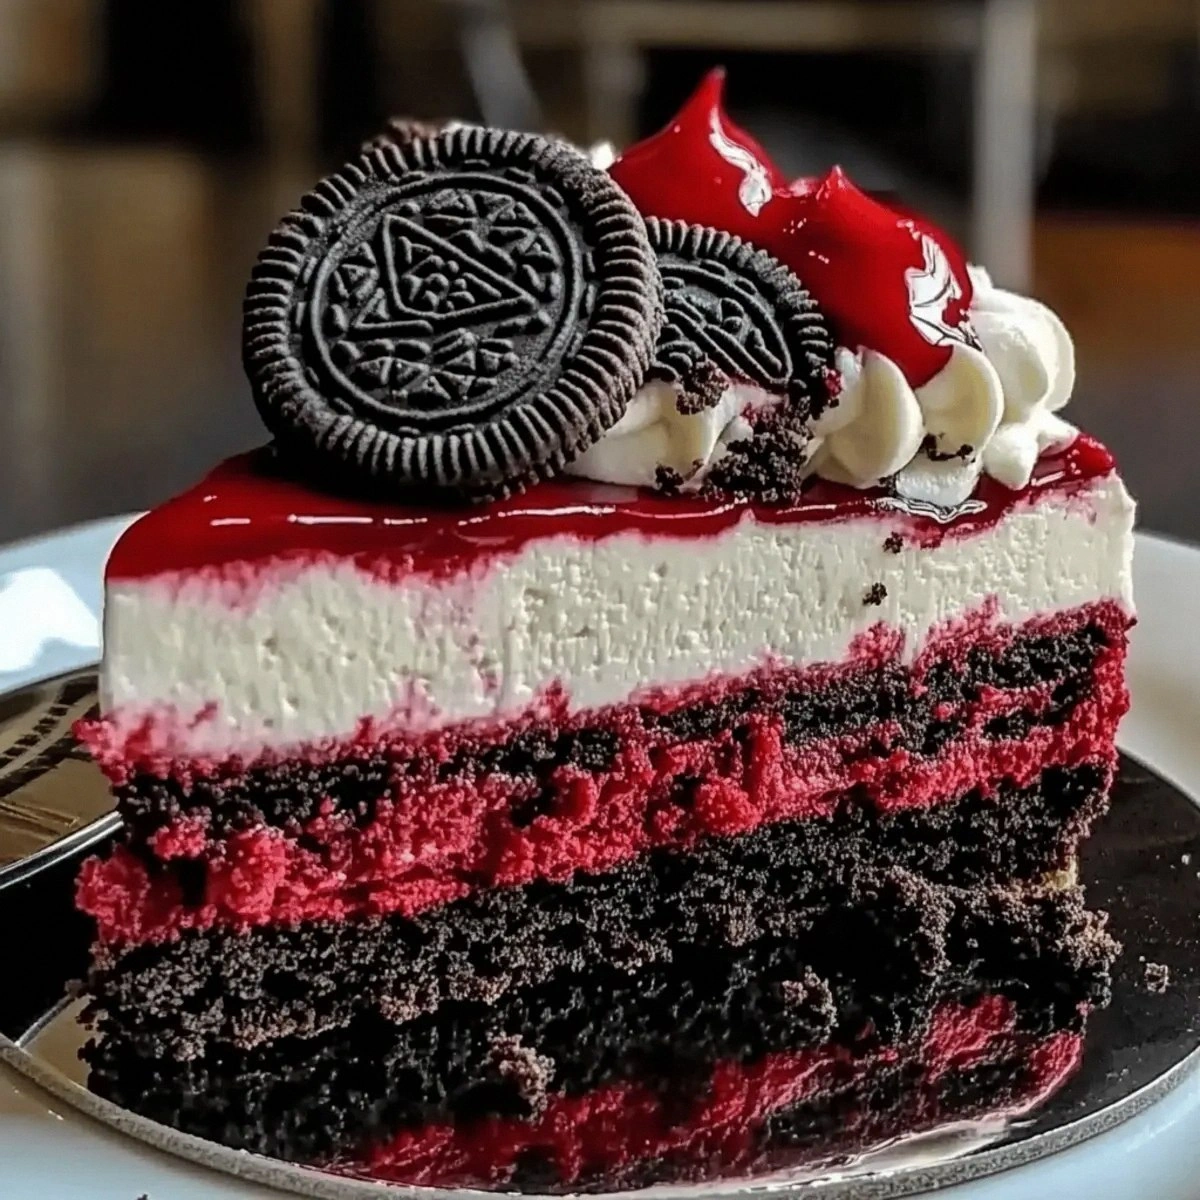
Now, I’m not just talking about any red velvet cheesecake. This is the version that makes the ordinary feel extravagant, the one that turns a birthday party into a gala, a simple dinner into a five‑star affair, and a quiet night in into a celebration of flavor. Most recipes get this completely wrong—either they drown the cake in a sea of cheese, or they forget the iconic Oreo crunch that makes every bite a surprise. Here, I’ve balanced the silky cheesecake with a tender red velvet crumb, and I’ve hidden a surprise Oreo core that erupts like confetti when you cut into it. The secret? A few tricks that most bakers overlook, plus a dash of daring that I’m about to spill.
Let me walk you through every single step — by the end, you’ll wonder how you ever made it any other way. I dare you to taste this and not go back for seconds. Okay, ready for the game‑changer? This next part? Pure magic.
What Makes This Version Stand Out
- Taste: The subtle cocoa undertone of the red velvet meets the tangy richness of cream cheese, while the Oreo crust adds a chocolate‑cookie crunch that sings in harmony.
- Texture: Imagine a silky cheesecake that holds its shape, layered over a tender, cake‑like crumb, all perched on a buttery Oreo base that crumbles perfectly with each forkful.
- Simplicity: No fancy equipment, just a standard springform pan, a mixer, and a handful of pantry staples—yet the result feels like it came from a high‑end patisserie.
- Uniqueness: The hidden Oreo core is a surprise that most recipes miss, delivering that “wow” moment when the knife slices through the middle.
- Crowd Reaction: Expect gasps, compliments, and the inevitable “What’s the secret?”—because this dessert looks as good as it tastes.
- Ingredient Quality: Using a premium red velvet cake mix and full‑fat cream cheese ensures depth of flavor without any artificial aftertaste.
- Cooking Method: A two‑stage bake (crust then cake) locks in moisture and prevents sogginess, while a gentle water‑bath for the cheesecake layer keeps it ultra‑smooth.
- Make‑Ahead Potential: This cheesecake can be prepared a day ahead, chilled, and still retain its vibrant color and perfect texture.
Inside the Ingredient List
The Flavor Base
The red velvet cake mix is the backbone of this dessert, providing that iconic deep‑red hue and a faint cocoa flavor that pairs beautifully with the tang of cream cheese. If you skip the mix and try to make the cake from scratch, you risk missing the subtle balance of cocoa and vanilla that makes red velvet truly special. Look for a mix that lists real cocoa powder and natural food coloring; the cheaper versions often use artificial dyes that taste metallic. Swap tip: If you’re gluten‑free, substitute the all‑purpose flour with a 1:1 gluten‑free blend and add a teaspoon of xanthan gum for structure.
The Texture Crew
Crushed Oreo cookies and melted butter form the crunchy crust that anchors the whole cake. The butter binds the crumbs together, while the Oreo’s chocolate‑cream filling adds a hidden layer of flavor that melts into the crust as it bakes. Skipping the butter will result in a crumbly, unstable base that crumbles at the slightest tilt. For a lighter version, you can replace half the butter with coconut oil, but expect a subtle coconut note.
The Unexpected Star
Red food coloring isn’t just for show; it intensifies the visual impact, making each slice look like a piece of velvet‑wrapped treasure. A little goes a long way—too much can taste bitter. Use a gel coloring for a richer hue without diluting the batter. Pro tip: If you’re avoiding artificial dyes, beet juice powder can provide a natural, albeit slightly earthy, red shade.
The Final Flourish
The cream cheese, sugar, sour cream, heavy cream, and vanilla extract combine to create a luscious, tangy filling that never feels heavy. The sour cream adds a subtle acidity that balances the sweetness, while the heavy cream lightens the texture, preventing the cheesecake from becoming dense. If you substitute low‑fat cream cheese, the flavor will suffer, and the texture will become grainy. Always bring the cream cheese to room temperature before mixing; cold cheese will leave lumps that are impossible to smooth out.
Everything's prepped? Good. Let's get into the real action...
The Method — Step by Step
Preheat your oven to 325°F (163°C) and line the bottom of a 9‑inch springform pan with parchment paper. I’ll be honest — I ate half the batch before anyone else got to try it, so I like to set the stage early. Lightly grease the sides of the pan with a dab of butter; this prevents the delicate cake from sticking later. As the oven warms, you’ll hear the faint hum of the heating element, a promise that something spectacular is about to happen.
Combine the crushed Oreo cookies (2 cups) with the melted butter (½ cup) in a large bowl. Use your hands to press the mixture together until it feels like wet sand—think beach sand that sticks to your fingers. Press this crumb mixture firmly into the bottom of the springform pan, creating an even layer about ½ inch thick. Watch Out: If you over‑press, the crust can become too dense and won’t crumble nicely when sliced.
Pop the crust into the oven for 8‑10 minutes, just enough to set it without browning. You’ll notice a subtle golden sheen appearing—this is the butter melting into the Oreo crumbs, sealing them together. Remove the pan and let the crust cool while you tackle the cake batter.
In a separate bowl, whisk together the red velvet cake mix, 1 ¼ cups all‑purpose flour, 1 tsp baking powder, ½ tsp salt, and 2 tbsp red food coloring. The flour adds extra structure, ensuring the cake holds up under the cheesecake layer. Add the 3 large eggs and ½ cup vegetable oil, mixing until just combined—over‑mixing will make the cake tough. The batter should be a deep, velvety red, glossy and smooth.
Pour the batter over the pre‑baked crust, spreading it evenly with a spatula. The batter will sink slightly into the crust, creating a seamless union. Slide the pan back into the oven and bake for 25‑30 minutes, or until a toothpick inserted into the center comes out clean. You’ll hear a faint sigh as the cake rises, and the edges will start pulling away from the pan—signs that it’s done.
While the cake bakes, prepare the cheesecake filling. In a large mixing bowl, beat 16 oz softened cream cheese until smooth, then gradually add 1 cup sugar, beating until light and fluffy. Add ½ cup sour cream, 1 cup heavy cream, and 1 tsp vanilla extract, continuing to mix on medium speed. The mixture should be silky, with no lumps—this is the moment of truth for a perfect cheesecake.
Once the cake layer is baked, turn the oven down to 300°F (149°C). Reduce the heat to create a gentle environment for the cheesecake layer, preventing cracks. Pour the cheesecake filling over the warm cake, spreading it gently. Tap the pan lightly on the counter three times to release any air bubbles; you’ll hear a soft pop as trapped air escapes.
Return the pan to the oven and bake for another 35‑40 minutes. The cheesecake should be set around the edges but still slightly wobbly in the center—this is exactly what you want for a creamy texture after chilling. When you open the oven, a faint aroma of vanilla and cocoa will fill the kitchen, promising a decadent finish.
Turn off the oven, crack the door open a crack, and let the cheesecake cool inside for 1 hour. This gradual cooling prevents sudden temperature shifts that could cause cracks. After the hour, run a thin knife around the edge of the springform pan to release any cling, then refrigerate for at least 4 hours, preferably overnight. Picture yourself pulling this out of the fridge, the whole kitchen smelling incredible, the top glistening with a faint sheen.
That's it — you did it. But hold on, I've got a few more tricks that'll take this to another level...
Insider Tricks for Flawless Results
The Temperature Rule Nobody Follows
Always bring the cream cheese, eggs, and heavy cream to room temperature before mixing. Cold ingredients create pockets of unmixed butter that turn into tiny lumps during baking. I once tried to rush the process by using straight‑out‑of‑the‑fridge cream cheese, and the result was a cheesecake that resembled a grainy polenta. Letting them sit for 30 minutes on the counter makes the batter silky smooth, guaranteeing that melt‑in‑your‑mouth texture.
Why Your Nose Knows Best
Before you even taste, trust the aromas. When the crust turns a light golden brown, that’s your cue that the butter has fully infused the Oreo crumbs. When the cake batter begins to emit a faint cocoa perfume, it’s nearing the perfect bake. My nose has saved me more times than any timer—if you smell a burnt edge, pull the pan out early and cover with foil.
The 5‑Minute Rest That Changes Everything
After you remove the cheesecake from the oven, let it sit on the counter for exactly five minutes before moving it to the fridge. This brief pause allows the outer layer to set a little, making it easier to slice later without the dreaded crumble. Skipping this step is the reason many home bakers end up with a soggy base.
Water‑Bath Wizardry
Wrap the springform pan tightly in aluminum foil, then place it in a larger roasting pan filled with hot water halfway up the sides. This gentle steam bath prevents the cheesecake from cracking by keeping the temperature even. I once tried a dry bake and ended up with a cracked top that looked like a cracked desert floor—never again.
Final Frosting Flair
Just before serving, whisk together a quick glaze of powdered sugar, a splash of heavy cream, and a drop of red food coloring. Drizzle it over the top for a glossy finish that adds a touch of sparkle. The glaze not only looks stunning but also adds a subtle sweetness that balances the tang of the cheesecake. Trust me, this final touch turns a great dessert into a show‑stopper.
Creative Twists and Variations
This recipe is a playground. Here are some of my favorite ways to switch things up:
Chocolate‑Cherry Explosion
Swap half of the Oreo crumbs for crushed chocolate wafer cookies and fold in a cup of fresh‑chopped cherries into the cheesecake layer. The cherries add a burst of tartness that cuts through the richness, while the extra chocolate deepens the flavor profile.
White Chocolate Raspberry Dream
Replace the red food coloring with white chocolate chips melted into the batter, and swirl in a raspberry coulis before baking. The pink‑ish hue is subtle, and the raspberry tang makes each bite feel like a summer romance.
Salted Caramel Crunch
Drizzle a homemade salted caramel sauce over the top just before serving and sprinkle a handful of toasted pecans. The salty‑sweet combo elevates the dessert to a gourmet level that’s perfect for holiday gatherings.
Espresso Oreo Fusion
Mix a tablespoon of instant espresso powder into the cake batter and add a splash of coffee liqueur to the cheesecake filling. The coffee notes complement the chocolate Oreo crust, creating a sophisticated mocha flavor.
Vegan Velvet
Swap the cream cheese for a high‑fat vegan cream cheese, use coconut oil instead of butter for the crust, and replace the eggs with a flax‑egg mixture (1 tbsp flaxseed meal + 3 tbsp water per egg). The result is a plant‑based version that still delivers that luxurious texture.
Storing and Bringing It Back to Life
Fridge Storage
Cover the cheesecake loosely with plastic wrap or a cake dome and store it in the refrigerator for up to 5 days. The flavor actually mellows and becomes more cohesive over time, so the second day often tastes even better than the first.
Freezer Friendly
Wrap the entire springform pan in a double layer of aluminum foil, then place it inside a freezer‑safe zip‑top bag. Freeze for up to 2 months. When you’re ready to enjoy, move it to the fridge to thaw overnight.
Best Reheating Method
Before serving a chilled slice, let it sit at room temperature for 15‑20 minutes, then add a tiny splash (about a teaspoon) of water to the plate and cover loosely with foil. The steam gently revives the texture, making each bite as fresh as the day it was baked.