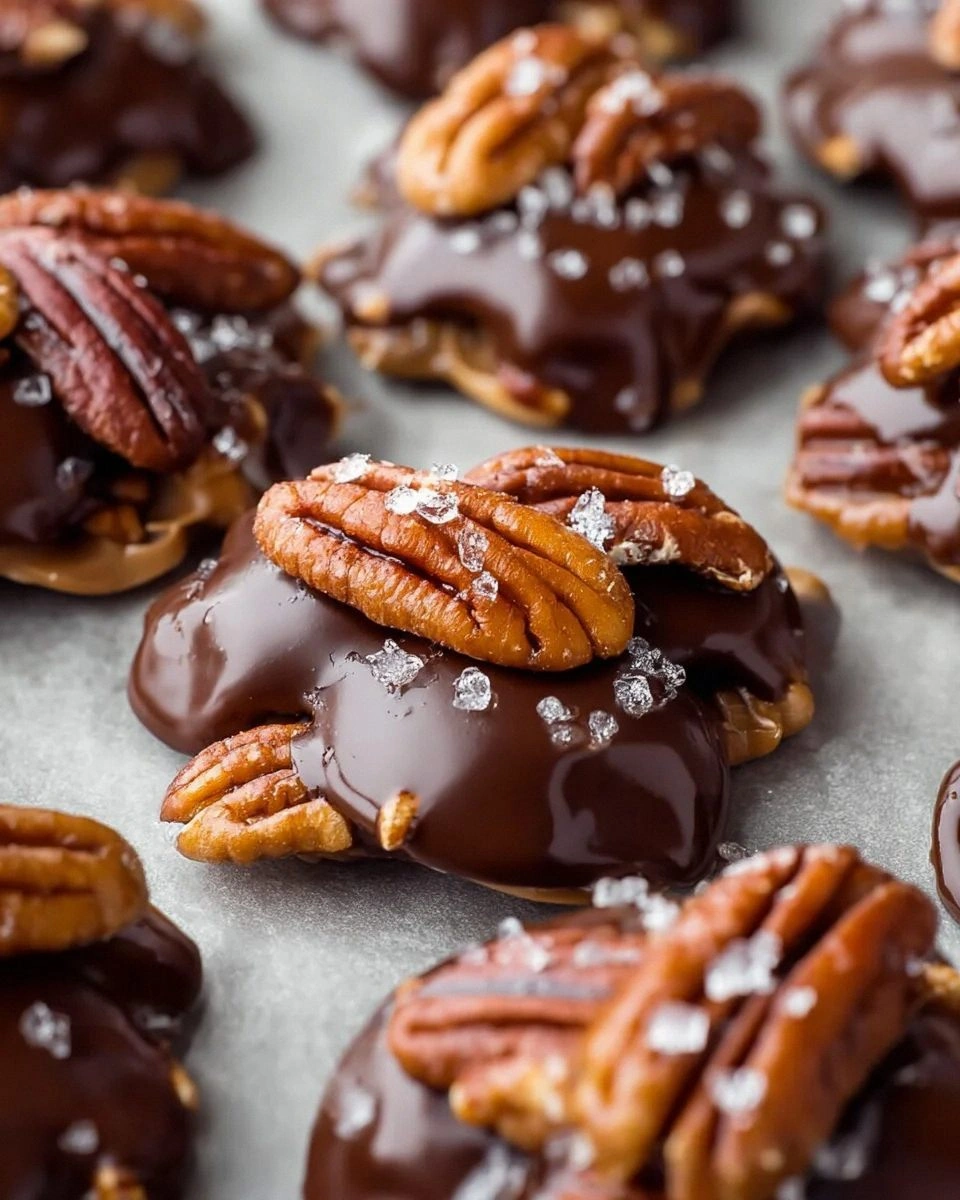
I was in the middle of a frantic Saturday night when a sudden craving for something sweet, salty, and downright addictive struck me like a bolt of lightning. The pantry was a barren wasteland—just a few pecans, a half‑finished bag of chocolate chips, and a lonely can of condensed milk staring back at me. I thought, “What if I could turn these leftovers into a show‑stopping treat that makes everyone forget about the pizza we ordered?” That thought turned into a full‑blown kitchen experiment, and after a few frantic minutes of toasting, melting, and stirring, I birthed the most decadent, glossy, bite‑sized wonders you’ll ever call a snack.
Picture this: the kitchen filled with the warm, buttery aroma of toasted pecans, the caramelized scent of brown sugar mingling with a whisper of vanilla, and the faint, seductive hiss of chocolate melting into a glossy river of goodness. The sound of the whisk against the saucepan is like a drumroll announcing a grand performance, while the glossy caramel pools like liquid amber, ready to coat each nut in sweet perfection. When you finally scoop the clusters onto parchment, they glisten like tiny jewels, each one a promise of crunch, chew, and melt‑in‑your‑mouth chocolate that will have you reaching for more before the first bite even settles.
Most turtle‑style confections end up either too soggy or overly sweet, and the texture is usually a mess of clumped nuts and hard‑to‑cut chocolate. I’ve tried the “quick” versions that use store‑bought caramel and they always fall flat—literally. This version, however, uses a simple stovetop caramel that stays chewy, a precise butter‑to‑sugar ratio that gives a buttery depth without overwhelming the nuts, and a secret weapon: a splash of shortening that makes the chocolate coating silky smooth and snap‑ready. The result? A cluster that cracks like a caramelized dream and melts like velvet on the tongue.
I’m about to hand you the exact method that turned a pantry raid into a masterpiece, and trust me, I dare you to taste this and not go back for seconds. Let me walk you through every single step — by the end, you’ll wonder how you ever made it any other way.
What Makes This Version Stand Out
- Texture: A crunchy toasted pecan core wrapped in a chewy caramel that refuses to harden, all cloaked in a glossy chocolate shell that snaps cleanly under your teeth.
- Flavor Balance: The deep, nutty notes of the pecans are perfectly offset by the buttery caramel and the rich, milky chocolate, creating a harmonious trio that sings on the palate.
- Simplicity: Only eight ingredients, all pantry staples, and no fancy equipment—just a saucepan, a whisk, and a baking sheet.
- Ingredient Quality: Using real butter, high‑quality milk chocolate chips, and toasted pecan halves elevates the taste far beyond the store‑bought versions.
- Crowd Reaction: These clusters disappear faster than fresh‑baked cookies at a kids’ birthday party—expect compliments, empty plates, and requests for the recipe.
- Make‑Ahead Potential: They keep beautifully for up to two weeks, making them perfect for party prep or a grab‑and‑go snack.
- Visual Appeal: The glossy chocolate coating and the speckled pecan bits give each cluster a professional, bakery‑level look.
- Versatility: You can swap the nuts, use dark chocolate, or add a pinch of sea salt for an elevated flavor profile.
Inside the Ingredient List
The Flavor Base
Pecan Halves: Toasted for a deep, nutty flavor that perfectly complements the sweetness. The toasting process releases oils that intensify the buttery notes, creating a crunchy backbone for each bite. If you skip the toast, you’ll end up with a flat, bland nut that doesn’t stand up to the caramel’s richness. For the best result, choose raw, unsalted pecans and toast them yourself.
Unsalted Butter: Adds richness and creaminess, balancing out the sweetness from the caramel. Butter’s milk solids caramelize slightly, contributing a nutty undertone that pairs beautifully with the pecans. Using salted butter would throw off the delicate balance, so stick with unsalted and season later if needed.
The Texture Crew
Brown Sugar: For a hint of molasses flavor, enhancing the caramel notes in the clusters. Its fine crystals dissolve quickly, ensuring a smooth caramel without gritty texture. If you use white sugar, you’ll lose that deep, caramelized depth that makes these clusters unforgettable.
Light Corn Syrup: Helps create that irresistible chewy texture in the caramel. The syrup prevents crystallization, keeping the caramel silky and pliable even after it cools. In a pinch, honey can substitute, but expect a subtle flavor shift.
Sweetened Condensed Milk: Adds a creamy sweetness that enriches the caramel mixture, making it luxuriously thick. It also contributes a slight caramelized milk flavor that you can’t get from regular milk. If you’re avoiding dairy, a coconut‑based condensed milk works, though the flavor will be tropical.
The Unexpected Star
Vanilla Extract: A dash of this brings a warm, inviting flavor to the clusters. The aromatic compounds in vanilla amplify the sweet notes without being overpowering. Real vanilla extract (not imitation) makes a noticeable difference in the final aroma.
The Final Flourish
Milk Chocolate Chips: The star of the show! They melt into a smooth coating, enveloping the clusters in chocolatey goodness. Milk chocolate provides the perfect balance of sweetness and creaminess; dark chocolate can be used for a more intense flavor, but it will change the overall sweetness profile.
Shortening: Just a little mixed with the chocolate chips helps achieve a perfectly smooth melted chocolate. It lowers the viscosity, giving the coating a glossy finish and a snap that’s essential for that satisfying bite. Too much shortening will make the coating too soft, so measure carefully.
Everything's prepped? Good. Let's get into the real action...
The Method — Step by Step
- Preheat your oven to 350°F (175°C). While the oven warms, line a large baking sheet with parchment paper and set aside. This step ensures the clusters have a non‑stick surface and a uniform cooling area. Pro tip: If you’re short on parchment, a silicone baking mat works just as well.
- Toast the pecan halves: place them in a dry skillet over medium heat, stirring constantly until they turn a deep golden brown and emit a nutty perfume. This should take about 5–7 minutes. Let them cool completely before moving on.Kitchen Hack: Transfer toasted pecans immediately to a cool bowl to stop the cooking process and preserve their crunch.
- In a medium saucepan, melt the unsalted butter over medium heat until it foams, then add the brown sugar, light corn syrup, and sweetened condensed milk. Stir constantly with a whisk; the mixture will bubble vigorously—this is the caramel forming. Keep the heat steady; too high and you’ll scorch the sugar, too low and the caramel will stay thin. Watch Out: If the caramel starts to stick to the bottom of the pan, lower the heat immediately and keep whisking to avoid a burnt flavor.
- Once the mixture reaches a smooth, thick consistency (about 8–10 minutes), remove the saucepan from the heat and stir in the vanilla extract. The caramel should coat the back of a spoon and have a deep amber hue. Allow it to cool just enough so it’s thick but still pourable—think of the consistency of warm honey.
- Fold the toasted pecan halves into the caramel, ensuring each nut is thoroughly coated. Use a rubber spatula to gently turn the mixture, preserving the delicate caramel bubbles. This step is where the magic starts to happen; the nuts become the heart of each cluster.
- Scoop the caramel‑nut mixture onto the prepared parchment using a tablespoon or small ice‑cream scoop, spacing them about 2 inches apart. Gently press each mound to form a compact, round shape about 1½ inches in diameter. Future pacing: Picture yourself pulling these out of the oven later, the whole kitchen smelling incredible.
- Place the baking sheet in the oven for just 5 minutes—this step sets the caramel without fully baking it, giving the clusters a firm bite. Keep a close eye; you want a light golden crust on the caramel, not a hard shell.
- While the clusters are still warm, melt the milk chocolate chips with the shortening in a double boiler or a microwave in 30‑second bursts, stirring between each burst. The shortening ensures the chocolate stays glossy and has a perfect snap once cooled. Kitchen Hack: Add a pinch of sea salt to the melted chocolate for a subtle flavor boost that makes the sweet‑salty contrast pop.
- Using a fork or a small spoon, drizzle or dip each warm caramel‑pecan mound into the chocolate, allowing excess to drip back into the bowl. The chocolate should coat each cluster in a thin, even layer that hardens quickly. Let the clusters sit on the parchment until the chocolate fully sets—about 15 minutes at room temperature, or 5 minutes in the fridge if you’re impatient.
- Once set, transfer the clusters to an airtight container. Store them at room temperature for up to a week, or refrigerate for longer freshness. And now the fun part: break a piece, hear that crisp snap, and let the caramel melt on your tongue. That’s the payoff for all the love you poured in.
That's it — you did it. But hold on, I've got a few more tricks that'll take this to another level...
Insider Tricks for Flawless Results
The Temperature Rule Nobody Follows
Never let the caramel boil too hard. A gentle simmer keeps the sugar molecules from crystallizing, which is the main culprit behind a grainy caramel. Keep the heat at medium, and use a candy thermometer if you have one—aim for 240°F (115°C). A few degrees can mean the difference between silky and gritty.
Why Your Nose Knows Best
Your sense of smell is a reliable indicator of caramel readiness. When the mixture turns a deep amber and releases a buttery, toasted scent, you’re at the perfect stage. If you’re still catching hints of raw sugar, keep cooking a minute longer. Trusting your nose saves you from over‑cooking and ruining the delicate balance.
The 5‑Minute Rest That Changes Everything
After you combine the caramel with the toasted pecans, let the mixture rest for five minutes before shaping. This brief pause lets the caramel thicken just enough to hold the nuts together without becoming too stiff. Skipping this rest leads to clusters that fall apart during the chocolate coating stage.
The Shortening Secret
Adding a small amount of shortening to the melted chocolate isn’t just about shine; it also lowers the chocolate’s viscosity, allowing a thinner coat that hardens faster. Too much, and the coating becomes soft; the sweet spot is about 1 tablespoon per 2 cups of chocolate chips. This trick is why professional bakers achieve that flawless snap.
Cool, But Not Cold
When you set the clusters to harden, avoid a refrigerator that’s too cold; rapid chilling can cause the chocolate to develop a dull, matte finish. Instead, let them sit at room temperature for 10 minutes, then finish the hardening in a mildly chilled fridge (around 40°F/4°C). This gradual cooling preserves the glossy sheen.
Creative Twists and Variations
This recipe is a playground. Here are some of my favorite ways to switch things up:
Dark Chocolate Delight
Swap the milk chocolate chips for 70% dark chocolate. The bitterness adds depth and balances the sweet caramel, making the clusters feel more sophisticated—perfect for an adult gathering.
Sea‑Salted Caramel Crunch
After dipping the clusters in chocolate, sprinkle a pinch of flaky sea salt on each while the coating is still wet. The salt amplifies the caramel’s flavor and introduces a delightful crunch that pops with each bite.
Nutty Mix‑Up
Combine pecans with toasted almonds or walnuts for a more complex nut profile. Each nut brings its own texture: almonds add a firmer snap, while walnuts contribute a buttery softness.
Spiced Holiday Version
Add a dash of ground cinnamon and a pinch of ground nutmeg to the caramel. The warm spices turn these clusters into a festive treat that pairs wonderfully with hot cocoa.
Coconut‑Infused Twist
Replace half of the butter with coconut oil and sprinkle unsweetened toasted coconut flakes on the chocolate coating. The tropical aroma adds an unexpected but delightful layer of flavor.
Coffee‑Kick
Stir a teaspoon of finely ground espresso into the caramel before adding the pecans. The coffee notes deepen the chocolate flavor and give the clusters an energizing edge.
Storing and Bringing It Back to Life
Fridge Storage
Place the cooled clusters in an airtight container and store them in the refrigerator for up to two weeks. The cool environment keeps the chocolate firm and prevents the caramel from becoming overly soft. Before serving, let them sit at room temperature for 10 minutes so the chocolate regains its snap.
Freezer Friendly
These clusters freeze beautifully. Spread them on a parchment‑lined tray, freeze for an hour, then transfer to a zip‑top bag. They’ll stay fresh for up to three months. When you’re ready to enjoy, thaw them in the fridge for 30 minutes, then bring to room temperature.
Best Reheating Method
If the chocolate coating has lost its shine, gently warm the clusters in a microwave for 5‑10 seconds, or place them in a preheated oven at 250°F (120°C) for 5 minutes. Adding a tiny splash of water to the microwave dish creates steam that revives the glossy finish without melting the caramel.