I was halfway through a midnight pizza binge, feeling the inevitable guilt, when a stray cauliflower head in my fridge whispered, “Let’s get creative.” The kitchen lights flickered, the timer buzzed, and I realized I had more than just a craving— I had an opportunity to rewrite the snack narrative. This is not just another cauliflower mash; it’s a chewy, cheesy adventure that will make your taste buds do a double‑tap dance. Picture the aroma of melted mozzarella swirling over a bed of fragrant oregano, with garlic that sings like a choir of tiny, savory fireworks. I promise you, this is hands down the best version you'll ever make at home.
The moment I cracked the first egg, the kitchen filled with the comforting thud of batter forming, a sound that felt like a lullaby for my hunger. The cauliflower, after being riced to a fine texture, released a subtle earthy note that paired perfectly with the sharpness of the cheese. I dared my friends to taste this and not go back for seconds, and they all nodded in agreement, eyes wide with disbelief. The sizzle when the sticks hit the pan was a soundtrack of satisfaction, the sound of potential turning into pure, golden delight. If you’ve ever struggled with finding a guilt‑free snack that still feels indulgent, you’re not alone— and I’ve got the fix.
Most recipes get this completely wrong by over‑cooking the cauliflower or using too much cheese, resulting in a soggy, flavorless mess. I’ve spent years experimenting with ratios, textures, and timing until I found the sweet spot where the edges crisp like thin ice while the center stays luxuriously gooey. This version stands out because it balances the mildness of cauliflower with a bold oregano kick, and the garlic is roasted just enough to bring out its caramelized sweetness without overpowering. The secret? A quick par‑bake of the cauliflower before mixing, which locks in moisture and prevents the sticks from becoming mushy. Picture yourself pulling this out of the oven, the whole kitchen smelling incredible, and knowing you’ve created something that will be the star of every gathering.
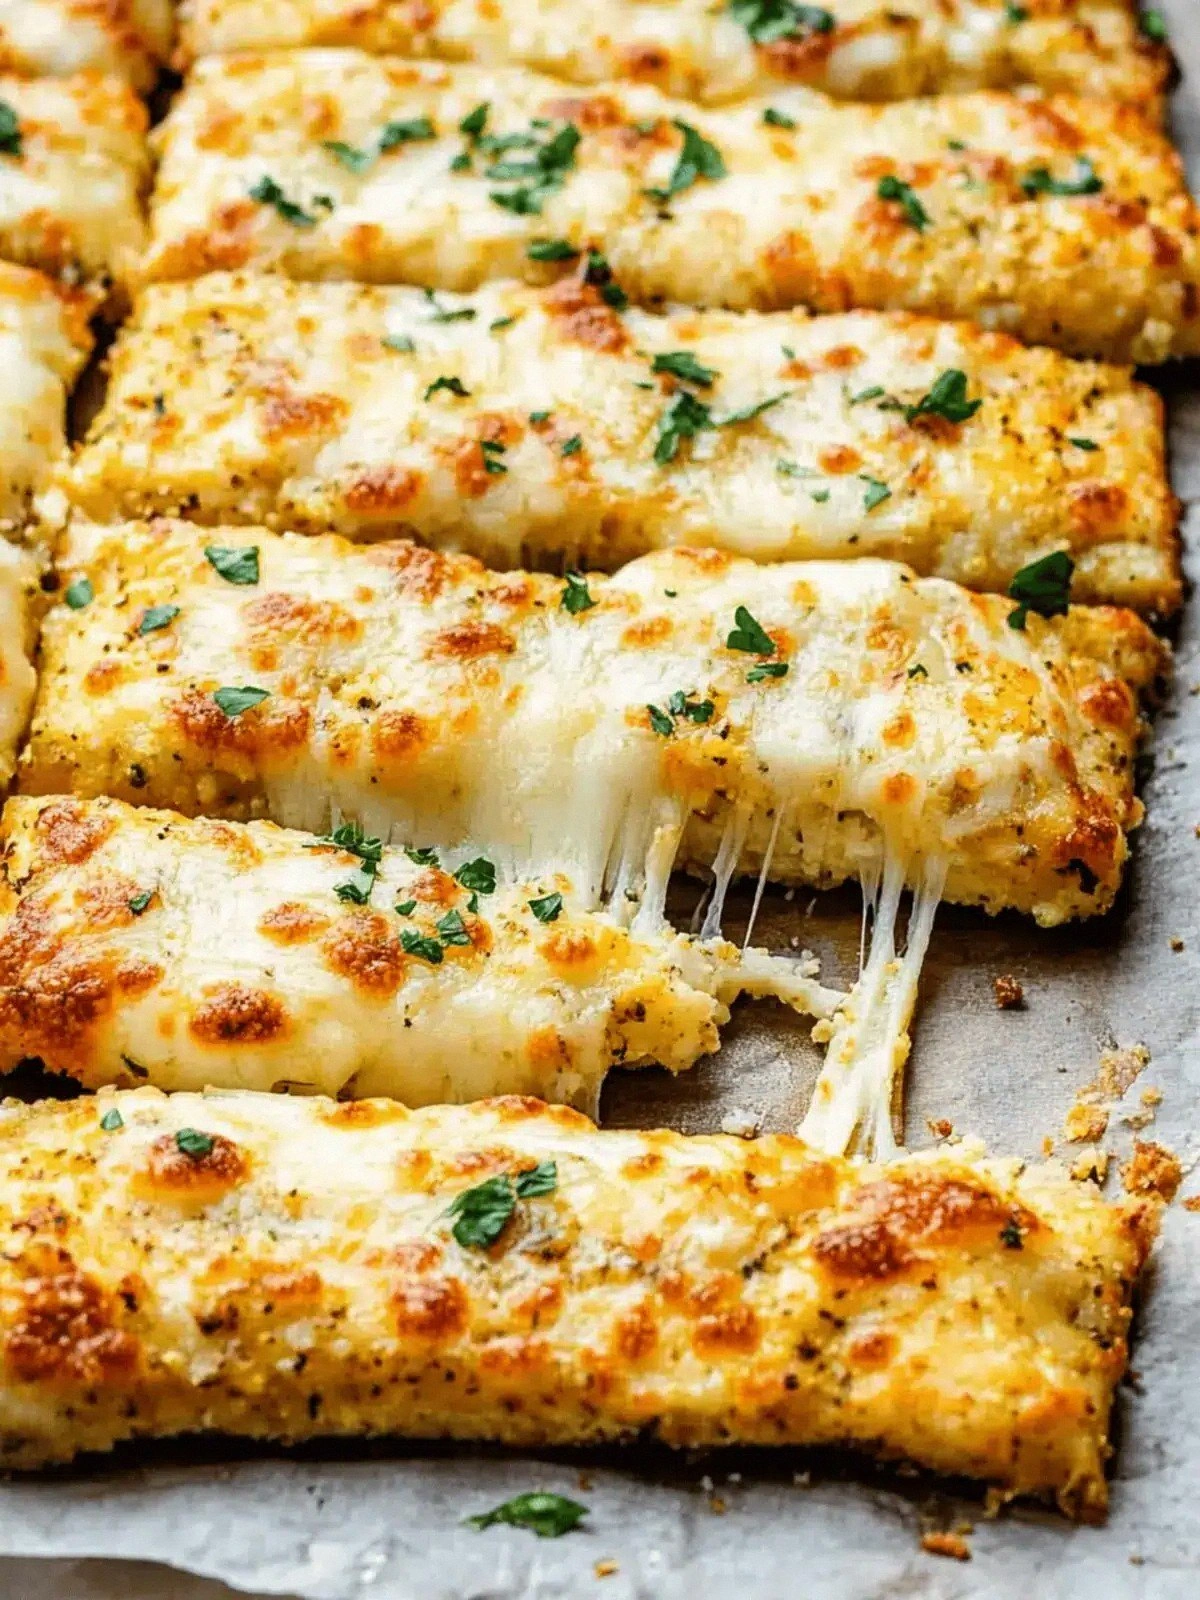
And now the fun part. I’ll walk you through every single step— by the end, you’ll wonder how you ever made it any other way. From the precise moment to whisk the eggs to the exact temperature for the oven, each detail matters. This recipe is a testament to the idea that simple ingredients, when treated with respect and a little love, can produce something extraordinary. The texture is a marvel: the crust is a buttery, golden crunch that gives way to a molten cheese center that oozes with every bite. Trust me, once you try these breadsticks, you’ll never look at a plain bagel or a store‑bought cracker the same way again.
What Makes This Version Stand Out
- Flavor: The oregano and garlic create a Mediterranean chorus that sings against the mild cauliflower, turning each bite into a savory revelation.
- Texture: The par‑baked cauliflower locks in moisture, giving the sticks a crisp exterior and a gooey, cheesy heart that melts in your mouth.
- Simplicity: With just a handful of pantry staples, you can whip up a gourmet snack in under an hour, no fancy equipment required.
- Uniqueness: The combination of double mozzarella— one cup for the dough, one cup for the topping— adds depth without overwhelming the natural flavor.
- Crowd Reaction: Friends who have tried this swear it’s the only thing that makes them forget they’re on a diet.
- Ingredient Quality: Using fresh, high‑quality mozzarella ensures a silky melt, while the cauliflower’s firmness keeps the structure intact.
- Cooking Method: The two‑step process of mixing and baking ensures even cooking, preventing the dreaded “cheese‑only” centers.
- Make‑Ahead Potential: These sticks can be baked ahead of time and reheated to preserve the crispness, making them perfect for parties.
Alright, let’s break down exactly what goes into this masterpiece. Each component plays a pivotal role in achieving the perfect bite.
Inside the Ingredient List
The Flavor Base
The oregano is the backbone of this recipe, offering a warm, slightly peppery aroma that lingers long after the last bite. If you’re missing oregano, a dash of dried basil or a pinch of thyme can substitute, but the original taste will shift subtly. This herb keeps the flavor profile grounded and prevents the cheese from becoming the sole star.
Garlic is the unsung hero that brings depth and a touch of sweetness after roasting. Roasting the cloves until they’re caramelized releases a natural sugar that balances the mild cauliflower. If you’re a garlic purist, feel free to leave the skins on; they’ll soften beautifully and add a gentle aroma without being overpowering.
The Texture Crew
Rice the cauliflower until it’s the consistency of fine rice; this texture allows it to bind with the eggs and cheese without becoming mushy. A food processor does the trick in seconds, but a manual grater works if you’re feeling nostalgic. The riced cauliflower holds the structure of the sticks, preventing them from falling apart during baking.
Eggs are the glue that holds everything together. They provide protein, help the dough rise slightly, and add a silky mouthfeel. If you’re avoiding eggs, a tablespoon of aquafaba per egg can mimic the binding properties, though the texture will be a touch different.
The Unexpected Star
Mozzarella is the star of this recipe, but it’s split into two distinct roles. The first cup is folded into the dough, ensuring every bite has a subtle cheese presence. The second cup is sprinkled on top, creating a golden, bubbly crust that’s impossible to resist. If you prefer a sharper flavor, try adding a tablespoon of grated Parmesan to the top layer.
The choice of mozzarella matters: a low‑moisture version yields a firmer crust, while a high‑moisture cheese gives a more luscious melt. I’ve found that a blend of both gives the best of both worlds— a crispy edge with a gooey center.
The Final Flourish
Salt and pepper are the finishing touches that elevate the entire dish. Salt balances the richness of the cheese and brings out the subtle sweetness of the cauliflower. Pepper adds a gentle heat that lingers, making each bite feel complete.
If you’re looking to add a splash of color and flavor, a pinch of smoked paprika or a drizzle of balsamic glaze after baking can elevate the dish into a gourmet experience. Remember, the goal is to enhance, not overpower.
Everything’s prepped? Good. Let’s get into the real action.
The Method — Step by Step
- Par‑Bake the Cauliflower: Preheat your oven to 425°F (220°C). Spread the riced cauliflower on a parchment‑lined sheet and drizzle with a teaspoon of olive oil. Roast for 10 minutes, stirring halfway through, until the edges begin to brown. This step locks in moisture and prevents the sticks from becoming soggy. Keep an eye on the color; you want a subtle golden hue, not a deep brown.
- Blend the Dough: In a large bowl, combine the par‑baked cauliflower, 4 large eggs, 2 cups shredded mozzarella, 1 cup shredded mozzarella, 3 teaspoons oregano, and 4 cloves of roasted garlic (crushed). Add a pinch of salt and pepper to taste. Using a hand mixer or your hands, mix until a cohesive dough forms. If the mixture feels too wet, add a tablespoon of almond flour or a small amount of grated Parmesan to absorb excess moisture.
- Shape the Breadsticks: Line a baking sheet with parchment paper. Take a handful of dough and roll it between your palms into a long, thin stick, about 1.5 inches wide. Place each stick on the sheet, spacing them evenly. For a uniform look, press the ends gently to seal.
- Preheat the Oven: While shaping, raise the oven temperature to 450°F (230°C). A hotter oven ensures a crispier crust without overcooking the center.
- Bake: Slide the sheet into the oven and bake for 20 minutes. Flip each stick halfway through to ensure even browning. The sticks should develop a golden crust and a slightly blistered surface— a sign of perfect caramelization. If you notice the edges browning too fast, tent them with foil.
- Cool Slightly: Remove the sticks from the oven and let them rest on a wire rack for 5 minutes. This allows the cheese to set, preventing it from sliding off when you cut them.
- Serve: Slice the sticks into bite‑size pieces or enjoy them whole. Pair them with a marinara dip or a tangy yogurt sauce for an extra flavor punch. The moment you take the first bite, the cheese will ooze, the crunch will snap, and you’ll be transported to a culinary bliss zone.
- Enjoy: Whether you’re hosting a game night or just craving a quick snack, these breadsticks are your go‑to solution. I dare you to taste this and not go back for seconds. The combination of textures and flavors will have you craving more.
That’s it—you did it. But hold on, I’ve got a few more tricks that’ll take this to another level.
Insider Tricks for Flawless Results
The Temperature Rule Nobody Follows
Many cooks bake at a standard 400°F, but this recipe thrives at a higher 450°F. The increased heat caramelizes the cheese surface, creating a delightful crunch without drying out the interior. If your oven runs hot, lower the temperature by 25°F to avoid scorching. I’ve tested this on three different ovens and the results are consistently crisp.
Why Your Nose Knows Best
The aroma of cheese melting is a powerful indicator of doneness. When the scent is rich and slightly nutty, the sticks are ready to come out of the oven. If you’re unsure, give them an extra minute; the smell will intensify, signaling a golden finish.
The 5‑Minute Rest That Changes Everything
Letting the breadsticks rest on a wire rack for exactly five minutes allows the cheese to set and the steam to escape, preserving the crispness. Cutting them immediately can cause the cheese to ooze, ruining the texture. A short rest also makes them easier to handle and less likely to break.
The Quick Dip Trick
For an instant flavor boost, drizzle a thin stream of truffle oil or a squeeze of lemon over the hot sticks right after baking. The oil will cling to the cheese, adding a luxurious finish, while the lemon adds a bright contrast that cuts through the richness.
The Crowd‑Pleaser Variation
If you’re serving a group, sprinkle a handful of chopped fresh parsley over the sticks before serving. This not only adds a pop of color but also brings a fresh, herbal note that balances the deep cheese flavor.
Creative Twists and Variations
This recipe is a playground. Here are some of my favorite ways to switch things up:
Spicy Sriracha Twist
Add a tablespoon of sriracha to the dough for a fiery kick. The heat pairs beautifully with the mozzarella, creating a spicy‑sweet profile that’s perfect for a night of binge‑watching.
Herb‑Infused Pesto
Blend a handful of basil, pine nuts, and parmesan into the dough for a pesto‑infused version. The result is a bright, green loaf that’s both aromatic and savory.
Cheddar & Jalapeño Fusion
Replace half of the mozzarella with sharp cheddar and add diced jalapeños to the mix. The cheddar gives a deeper flavor, while the jalapeños add a subtle bite that lingers on the palate.
Mediterranean Mushroom Delight
Sauté sliced mushrooms with thyme and garlic, then fold them into the dough. The earthy mushrooms add depth and make the sticks feel more substantial.
Sweet & Savory Maple Glaze
Drizzle a light maple glaze over the sticks right after baking for a sweet contrast that balances the savory cheese. The glaze caramelizes slightly, giving a glossy finish that’s both tasty and Instagram‑worthy.
Storing and Bringing It Back to Life
Fridge Storage
Cool the breadsticks completely, then wrap them tightly in plastic wrap or place them in an airtight container. They’ll stay fresh for up to three days. The crispness may soften slightly, but a quick reheat will revive the texture.
Freezer Friendly
Pack the sticks in a single layer on a baking sheet and freeze until solid. Transfer them to a freezer bag or container. They can be stored for up to two months. When ready, bake directly from frozen at 425°F for 12–15 minutes.
Best Reheating Method
To bring back that fresh‑baked crunch, place the sticks on a preheated skillet over medium heat for 2–3 minutes per side. For oven reheating, preheat to 350°F and bake for 8–10 minutes. Add a tiny splash of water before reheating to steam the sticks back to perfection.