Picture this: I was halfway through a dinner party, the kitchen was a mess, and the only thing left to serve was a pile of raw chicken tenderloins. I stared at the skillet, feeling the heat of the stove like a warning sign. A friend dared me to turn those bland strips into something spectacular in under thirty minutes. My stomach growled with anticipation, and the air smelled faintly of burnt garlic from the previous night. I laughed, because if I could pull this off, I’d win the title of “Master of the Midnight Meal.”
The scene was chaotic: pots clanged, the oven door was stuck, and the fridge was a maze of leftovers. I could hear the timer buzz in the background, a frantic metronome for my culinary sprint. The scent of olive oil sizzling on the pan mingled with the sharp tang of lemon zest, creating a perfume that promised something extraordinary. My fingertips tingled as I whisked the butter, feeling the silky texture slide through the bowl. The sound of the chicken sizzle was a drumbeat, and I could almost taste the crisp crust forming in my mind’s eye.
What sets this version apart is that it’s not just baked; it’s a flavor symphony that plays on the tongue. The tenderloins are coated with a buttery, peppery crust that crackles like a golden coin when bitten. Inside, the meat stays juicy, almost as if it’s been kissed by a secret sauce. The recipe’s simplicity hides a depth of technique that elevates the ordinary to the extraordinary. I dare you to taste this and not go back for seconds, because the first bite will leave you craving the rest.
I’m not just telling you a recipe; I’m handing you a kitchen manifesto. This isn’t a run-of-the-mill bake; it’s a bold claim that this is hands down the best version you’ll ever make at home. The trick? A whisper of lemon zest that lingers long after the last bite. The result? A dish that feels like a hug in the shape of chicken. You’ll be asking for the recipe even after you’ve finished the meal. Trust me, you won’t want to share this secret.
If you’ve ever struggled with chicken tenderloins, you’re not alone, and I’ve got the fix. I’ve spent countless nights trying to find that perfect balance between crispy and succulent, and this is the culmination of that quest. The secret lies in a simple coating that turns the ordinary into something that sings. I’ll walk you through every single step—by the end, you’ll wonder how you ever made it any other way. Let’s dive in and transform your kitchen into a flavor laboratory.
Picture yourself pulling this from the oven, the whole kitchen smelling incredible, and guests leaning in for a taste. The moment the tray opens, a steam cloud rises, carrying the aroma of garlic, lemon, and butter. Your eyes light up as the golden edges crackle, and you feel the satisfaction of a job well done. This is the kind of dish that turns a simple dinner into a celebration. And if you’re ready for the game‑changer, let’s get started.
What Makes This Version Stand Out
- Flavor: The combination of smoked paprika and lemon zest creates a bright, smoky undertone that cuts through the richness of the chicken. Each bite bursts with citrusy zing, followed by a lingering peppery finish that keeps you reaching for more. This contrast turns every mouthful into an adventure.
- Texture: A buttery coating turns the tenderloins into crispy gold on the outside while locking in moisture inside. The result is a satisfying snap that shatters like thin ice, revealing juicy meat beneath. It’s the kind of crunch that makes you want to taste again.
- Simplicity: With only ten ingredients, this recipe is a quick win for busy evenings. No complicated sauces or time‑consuming marinades—just a few pantry staples and a handful of fresh ingredients. It’s the perfect solution when you need something delicious without the fuss.
- Uniqueness: The addition of panko breadcrumbs gives a light, airy crunch that sets this dish apart from standard baked chicken. It’s an unexpected twist that elevates the ordinary into something memorable. The breadcrumbs also absorb the buttery coating, creating a golden crust that’s hard to resist.
- Crowd Reaction: Friends and family rave about the way the chicken stays moist yet crisp. The dish is a hit at gatherings, and people often ask for the recipe after the first bite. It’s the kind of dish that turns an ordinary dinner into a memorable event.
- Ingredient Quality: Fresh chicken, real butter, and high‑quality olive oil are the backbone of this recipe. Each ingredient is chosen for its flavor profile and how it enhances the overall dish. The result is a dish that feels premium, even when made at home.
- Cooking Method: Baking at a slightly higher temperature creates a caramelized exterior while keeping the interior tender. The technique is quick yet effective, making the dish suitable for both novice and experienced cooks alike. It’s a method that delivers consistent results every time.
- Make‑Ahead Potential: The coating can be applied ahead of time, and the chicken can be stored in the refrigerator for up to 24 hours before baking. This flexibility makes it ideal for meal prep and busy schedules. The dish still comes out crispy and flavorful when baked fresh.
Alright, let’s break down exactly what goes into this masterpiece. Each component plays a pivotal role, and understanding why each ingredient matters will help you tweak the recipe to your taste.
Inside the Ingredient List
The Flavor Base
Olive Oil (2 tbsp): Olive oil is the foundation that binds the coating together and prevents the chicken from drying out. Its robust flavor complements the garlic and lemon, adding a subtle fruity note. If you’re looking for a milder taste, swap for avocado oil, but keep the quantity the same.
Salt (1 tsp): Salt is the unsung hero that brings out the natural sweetness of the chicken. It balances the acidity of the lemon zest and the heat from the paprika. Too much salt can overpower the dish, so measure carefully.
Black Pepper (½ tsp): Freshly ground pepper adds a sharp bite that contrasts the buttery coating. It’s essential for depth of flavor; a pinch of cayenne could replace it if you prefer a spicier kick. Remember, pepper is the final touch that completes the seasoning profile.
The Texture Crew
Garlic Powder (1 tsp): Garlic powder delivers a concentrated garlic flavor without the moisture that fresh cloves would add. It ensures an even distribution across each tenderloin, preventing uneven seasoning. If you prefer fresh garlic, use one minced clove, but reduce the oil slightly to compensate.
Smoked Paprika (1 tsp): Smoked paprika introduces a subtle smokiness that elevates the dish beyond plain chicken. It’s the secret to that “grilled” taste without the grill. A pinch of chili powder can be added for a more robust heat if desired.
Panko Breadcrumbs (¼ cup): Panko gives the coating a light, airy crunch that is far superior to regular breadcrumbs. Its porous texture allows the butter to seep in, creating a golden, crisp exterior. If you’re gluten‑free, opt for gluten‑free panko or crushed cornflakes.
The Unexpected Star
Lemon Zest (1 tbsp): Lemon zest is the unexpected star that adds brightness and a citrusy aroma. It cuts through the richness of the butter and provides a refreshing contrast that lingers on the palate. Be sure to use a microplane for the finest zest to avoid bitterness.
Parmesan Cheese (¼ cup): Parmesan adds depth and a savory umami note that pairs beautifully with the lemon zest. Its sharpness balances the sweetness of the paprika, creating a harmonious flavor profile. For a sharper taste, use aged Parmigiano‑Reggiano.
The Final Flourish
Melted Butter (1 tbsp): Butter is the secret to that silky coating that melts in your mouth. It enriches the flavor and gives the crust a luxurious sheen. If you’re avoiding dairy, substitute with a neutral oil like grapeseed oil.
Chicken Tenderloins (1 lb): Fresh chicken tenderloins are the star of this dish. Their lean, tender texture makes them ideal for quick baking. If you’re using frozen tenderloins, thaw them fully and pat dry before coating.
Everything’s prepped? Good. Let’s get into the real action.
The Method — Step by Step
- Preheat the oven. Set the temperature to 425°F (220°C) and allow it to fully heat before placing the tray inside. The high heat is crucial for a crisp exterior; if the oven isn’t hot enough, the coating will become soggy. While the oven preheats, line a baking sheet with parchment paper to prevent sticking. This step ensures a clean cleanup later. A well‑heated oven also helps the butter melt evenly across the coating.
- Prepare the coating mixture. In a shallow bowl, combine olive oil, melted butter, garlic powder, smoked paprika, lemon zest, salt, pepper, and Parmesan. Whisk until the mixture forms a cohesive paste. The butter’s fat content helps the coating adhere to the chicken. The lemon zest adds a bright aroma that will permeate the dish. A smooth paste ensures an even crust.
- Coat the tenderloins. Toss the chicken tenderloins in the coating mixture until each piece is fully covered. The coating should cling to every surface, forming a thin, even layer. Pat the coated pieces gently to remove any excess paste, which could prevent crispness. This step is where the magic begins, as the coating begins to set in the oven. Ensure each piece is separated to avoid steaming.
- Add panko breadcrumbs. Sprinkle panko breadcrumbs over the coated tenderloins, pressing lightly to adhere. The panko adds a light crunch that complements the buttery coating. It also absorbs any excess moisture, keeping the exterior crisp. If you prefer a denser crust, add a bit more panko. This layer is essential for the signature texture.
- Arrange on the baking sheet. Place the coated tenderloins on the prepared baking sheet in a single layer, leaving space between each piece. This spacing allows hot air to circulate, ensuring even cooking. If the sheet is crowded, the chicken will steam rather than bake. The arrangement also helps the edges crisp up nicely. Check the spacing before placing the sheet in the oven.
- Bake until golden. Cook the chicken for 15 minutes, then flip each piece and bake for an additional 10 minutes. The total time should be about 25 minutes. The chicken is done when the internal temperature reaches 165°F (74°C) and the coating is golden brown. The flipping step ensures both sides get the same crispness. Keep an eye on the edges—they should start to pull away from the parchment when ready.
- Rest before serving. Remove the chicken from the oven and let it rest for 5 minutes. Resting allows the juices to redistribute, keeping the meat moist. The coating will firm up slightly during this time, making it easier to cut. While resting, you can prepare a quick side or garnish. The rest period also ensures a clean bite, free from raw edges.
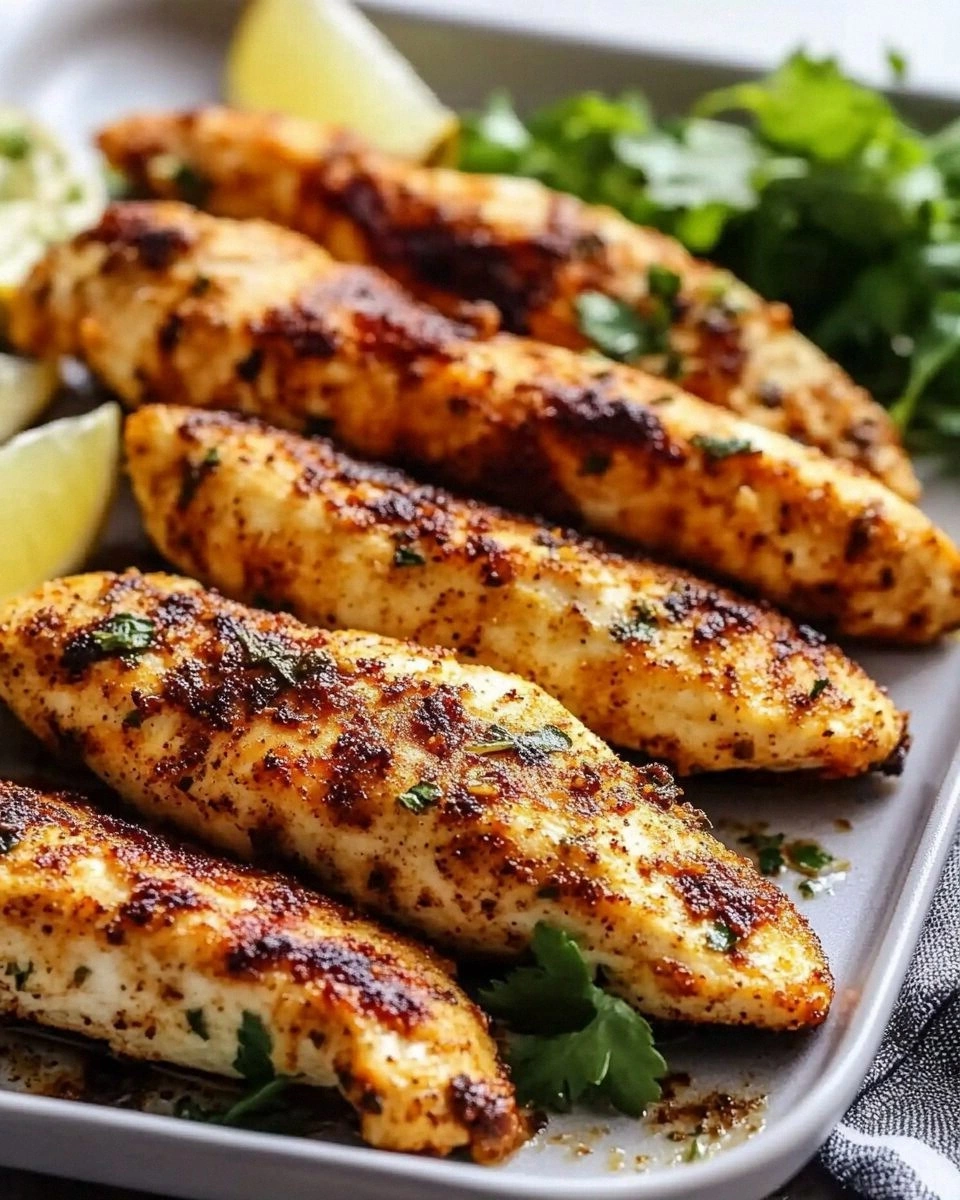
- Serve and enjoy. Plate the tenderloins on a serving platter, drizzle any pan juices over the top, and garnish with fresh parsley or a squeeze of lemon. The aroma of the buttery crust will draw everyone in. Pair with a light salad or roasted vegetables for a balanced meal. The dish is best enjoyed hot, when the crust is still crisp. The finish is a satisfying blend of crunch and tenderness.
That’s it—you did it. But hold on, I’ve got a few more tricks that will take this to another level. These insider tips will help you avoid common pitfalls and elevate the flavor profile even further.
Insider Tricks for Flawless Results
The Temperature Rule Nobody Follows
Most people bake at 400°F, thinking that’s the sweet spot. I’ve learned that 425°F is the sweet spot for a crispy crust. The higher heat caramelizes the coating faster, preventing it from becoming soggy. This trick is especially useful when you’re cooking in a convection oven—just reduce the temperature by 25°F. The result is a golden exterior that still feels tender inside.
Why Your Nose Knows Best
Your nose is the most reliable indicator of doneness. As the chicken bakes, the aroma shifts from buttery to toasted, signaling that the coating is ready. If the scent is still raw, give it a few more minutes. Trusting your senses saves you from overcooking or undercooking the meat. It’s a simple, no‑tech trick that ensures consistent results.
The 5‑Minute Rest That Changes Everything
Resting the chicken for five minutes is more than a formality; it’s a flavor amplifier. During this time, the juices redistribute, preventing them from spilling out when you cut into the meat. The coating also firms up, making it easier to slice cleanly. Skipping the rest can lead to a dry, uneven bite. I always keep a timer ready to make sure you don’t rush this step.
Use a Baking Rack for Even Heat
A baking rack elevates the chicken, allowing heat to circulate around each piece. This technique ensures that the bottom of the tenderloins gets as crisp as the top. If you don’t have a rack, simply flip the chicken halfway through cooking. The goal is to avoid steaming and keep the coating crunchy.
Keep the Coating Moist
If you notice the coating drying out before the chicken is fully cooked, drizzle a little extra butter or olive oil over the top. This will rehydrate the crust and prevent it from becoming brittle. A quick splash of oil also adds shine to the finished dish. Be careful not to over‑oily, or you’ll lose that crispness.
Creative Twists and Variations
Spicy Sriracha Glaze
Swap the lemon zest for a splash of sriracha and drizzle a thin glaze of honey over the coating. The heat from the sriracha pairs beautifully with the sweet honey, creating a dynamic flavor profile. This version is perfect for those who love a little kick in their chicken.
Herb‑Infused Parmesan
Add fresh thyme or rosemary to the coating mixture for an earthy undertone. The herbs infuse the butter with aromatic flavors that complement the Parmesan. This twist is ideal for a rustic dinner that feels like a farmhouse favorite.
Asian‑Inspired Sesame Crust
Replace the panko with toasted sesame seeds and add a splash of soy sauce to the coating. The sesame seeds give a nutty crunch while the soy sauce adds umami depth. This version transforms the dish into an Asian‑inspired delight.
Low‑Carb Coconut Flour Coating
For a low‑carb option, mix coconut flour with the spices and coat the tenderloins before baking. The coconut flour absorbs moisture and creates a crispy exterior. Pair this with a side of cauliflower rice for a keto‑friendly meal.
Smoky Chipotle Butter
Blend chipotle powder into the melted butter and use this smoky butter as the coating base. The chipotle adds a deep, smoky flavor that pairs well with the lemon zest. This variant is great for a smoky, bold dinner.
These variations showcase how versatile this recipe can be. Each twist offers a new flavor adventure while keeping the core technique intact. Feel free to experiment and make it your own.
Storing and Bringing It Back to Life
Fridge Storage
Store the baked tenderloins in an airtight container in the refrigerator for up to 3 days. Keep them on a paper towel to absorb excess moisture and prevent sogginess. When you’re ready to reheat, place them in a preheated oven at 350°F for 10 minutes. This method restores the crispness without drying out the meat. The tenderloins stay juicy and flavorful after refrigeration.
Freezer Friendly
To freeze, place the cooked tenderloins on a parchment‑lined tray and freeze until solid. Once frozen, transfer them to a freezer bag or container. They’ll keep for up to 2 months. When reheating, thaw overnight in the fridge and bake at 375°F for 12 minutes. This process ensures the chicken remains tender and the coating stays crisp.
Best Reheating Method
The best way to reheat baked chicken tenderloins is in the oven, not the microwave. Set the oven to 375°F and heat for 8–10 minutes until the internal temperature reaches 165°F. Before reheating, add a tiny splash of water or broth to the pan to create steam, which keeps the meat moist. The coating will regain its golden crunch, and the flavor will be as good as freshly baked.
Now you’re armed with everything you need to create, store, and reheat this dish like a pro. The next time you’re craving a quick, impressive meal, you’ll know exactly how to deliver.